www.avenview.com
7
1.8
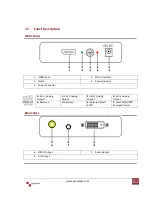
EDID Learning
1.
Power up the C-HDMI-DVIA
2.
Connect HDMI display to DVI OUT
3.
Turn the rotary control counter-clockwise from 0 to 7
4.
The Green light will be bright and then dark to indicate the EDID is learned
5.
Turn the rotary control clockwise from 7 to 0. DO NOT let the rotary control arrow pass 6, which will
erase the just learned EDID and reset to unit to default EDID.
1.9
Installation
To setup Avenview C-HDMI-DVIA follow these steps for connecting to a device:
1.
Power off display source such as DVD Player, Set-top box etc
2.
Connect your HDMI source to HDMI input
3.
Connect S/PDIF or Stereo Audio source to RCA Jack or 3.5mm Jack
4.
Connect DVI cable into the C-HDMI-DVIA’s DVI Output port
5.
Connect other end of DVI cable to TV or projector with DVI input
6.
Plug in 5V DC power cord to power jack of C-HDMI-DVIA
7.
Power on C-HDMI-DVIA converter
8.
Power on HDMI source and display with DVI input.
Only HDMI enabled TV sets with underscan / overscan supported can display full active
video accurately. If underscan / overscan is NOT supported, the top, bottom, left and
right border of the active video may be screened and S/PDIF audio may not sound right.
This version does NOT support 8 Channel analog audio applications
S/PDIF audio input can support 2 out of 8 channel audio inputs. S/PDIF audio only
supports 48 KHz audio sample rate.


