background image


47 

Q: Unable to booting the CaptureShare application 

A: 

1. 

Please make sure if the installation is successful. 

2. 

Restart your computer or laptop before use the 

CaptureShare

 firstly. 

3. 

Try to reinstall the 

CaptureShare


Q: Unable to connect the computer or laptop to the mobile phone when use the CaptureShare. 

A: 

1. 

Please  make  sure  if  the 

CaptureShare

  software  on  your  computer  or  laptop  and  the 

CaptureShare

 APP on your mobile phone installed successful. 

2. 

Please  make  sure  if  the 

CaptureShare

  software  on  your  computer  or  laptop  and  the 

CaptureShare

 APP on your mobile phone enabled simultaneously. 

3. 

Please make sure your computer or laptop and mobile phone are on the same Wi-Fi network. 

4. 

Please make sure if the entered IP address in your mobile phone is correct. 

5. 

Please make sure that your computer or laptop and mobile phone is not too far away from each 

other. 

6. 

Please try to restart your computer or laptop again. 


Q: Unable to connect to other lecture capture systems. 

A: 

1. 

Ensure the power status of the device from the other sited is on. 

2. 

Verify if the firewall blocks the inbound traffics from the other site. 

3. 

Verify if the other site rejected your lecture capture systems. 


Q: No image or poor image on the screen. 

A: 

1. 

Please make sure if pull down and open the privacy shutter of the camera.   

2. 

Please make sure if the power adaptor connected to any power source and the power jack is on 

the camera rear panel. 

3. 

Please  make  sure  if  the  camera  connected  to  your  computer  or  laptop  with  USB  cable 

successfully. 

4. 

Please  do  not  place  objects  before  the  camera  to  avoid  influencing  the  recording  effect.  It  is 

recommended  the  use  properly  the  mini  tripod  to  adjust  the  height  of  the  camera  for  better 

recording effect. 

5. 

Clean and dry thoroughly the lens to avoid influencing the recording effect. 

[Note]

 Do not clean the lens with cleaners containing strong acid or alkaline. 

Summary of Contents for CC30

Page 1: ...CC30 User Manual ...

Page 2: ...perating in conjunction with any other antenna or transmitter Radiation Exposure Statement This equipment complies with FCC radiation exposure limits set forth for an uncontrolled environment This equipment should be installed and operated with minimum distance 20cm between the radiator your body Europe EU Declaration of Conformity This device complies with the essential requirements of the R TTE ...

Page 3: ...s TRADEMARKS AVer is a trademark owned by AVer Information Inc Other trademarks used herein for description purpose only belong to each of their companies COPYRIGHT 2016 AVer Information Inc All rights reserved All rights of this object belong to AVer Information Inc Reproduced or transmitted in any form or by any means without the prior written permission of AVer Information Inc is prohibited All...

Page 4: ...stallation Steps 8 Wireless microphone 10 Connection as a Conference Camera 10 Connect Camera to a computer or a laptop 10 Connect Speaker to Camera 11 Connection as a Lecture Capture Camera 12 Use the Kensington Lock 12 Connect HDMI to Lecture Recording System 12 Use AVer CC30 CaptureShare Software 12 DEPLOYMENT 13 Using the Camera 13 Wireless Microphone Connection 14 Web Video Conferencing 16 Le...

Page 5: ... Interface 25 Basic image setting 30 Advanced image setting 31 Video output mode 32 Audio setting 33 Android 34 The Same Network 34 Connect to CaptureShare Software 34 SOFTWARE APPLICATIONS 40 Before You Begin 40 Making a Video Call 40 Skype 41 Google Hangouts 43 Zoom 44 TROUBLESHOOTING 46 SPECIFICATIONS 49 ...

Page 6: ... conference room or a classroom Wireless Microphone is an echo canceling microphone It provides longer distance voice pickup design mobility and free cabling arrangement for a crowded environment to capture more voice clearly CaptureShare is a powerful application which can be used with your computer laptop or even an android mobile phone to control CC30 HD Camera CaptureShare provides various use...

Page 7: ...e and etc Mechanical privacy shutter AEC AGC Noise Reduction Wireless Microphone Plug and Play wireless module 2 4GHz digital audio transmission Pairing free 10m transceiver distance Omnidirectional microphone Up to 8 hours talk time Typical Zinc carbon battery 25 CaptureShare Desktop screen dual USB video PIP recording Desktop screen annotation Live streaming upload to YouTube Ustream LiveHouse i...

Page 8: ...ot disassemble or modify the items by yourself Contact the dealer for help when the items is failed to work 2 Store the items in a dry place away from moisture Camera Unit Wireless Microphone Wireless Dongle Mini Tripod Power Adaptor USB Cable Battery Quick Guide Note The power cord will vary depending on the standard power outlet of the country where it is sold ...

Page 9: ...e of each item and how to connect the set Camera Name Descriptions Privacy Shutter Protect the lens and for the privacy Built in Microphone Pick up the voice around of microphone Camera Indicator Show you the status of the camera Wireless microphone connected Solid green Wireless microphone disconnected Blinking green Starting up Blinking red Power off ...

Page 10: ...utlet Kensington Lock Port Used to lock the camera to a stable object desk or table legs for protecting the camera from being stolen or moved HDMI Output Connect an HDMI cable to HDMI output And connect the other end of the HDMI cable to a lecture recording system Wireless Dongle Used to connect the camera and the wireless microphone Micro USB Connect the USB cable to the micro USB And connect the...

Page 11: ...Indicator Press this button to turn on off the wireless microphone The indicator shows you the status of the MIC power Wireless microphone connected Solid green Out of range Blinking green Power Off MIC Battery Cover MIC Stand Used as a wireless microphone stand to place the wireless microphone on a flat firmly Simultaneously used as a battery cover ...

Page 12: ...7 Connections HDMI Laptop Desktop OR Speaker Lecture Recording System Kensington Lock AVer CC30 1 2 3 Audio Cable 1 HDMI Cable 2 USB Cable 3 Power Adaptor Wireless Dongle ...

Page 13: ...s dongle slot on camera rear panel Connect the power adaptor to any power source and the power jack located on the camera rear panel When the camera starts up the camera indicator flashes Red When the camera is connected to the wireless microphone the camera indicator turns Solid green When the camera is disconnected to the wireless microphone the camera indicator blinks green ...

Page 14: ...ot press hard on the lens that will cause the camera malfunction Mini tripod Press both sides of the circular shaft and spread the head of your mini tripod to the end Spread the left and right legs of the tripod away from the center support so that the three legs of tripod evenly rests on a flat surface such as a table Attach the tripod socket of camera to the head of mini tripod Lock the screw lo...

Page 15: ...When you close the microphone base be sure aligning the latch slot avoiding causing damage Press the microphone power switch to turn on the microphone When the microphone connected to the camera successfully the indicator turns to Solid green If out of range or disconnected from wireless dongle the indicator is blinking green Connection as a Conference Camera Connect Camera to a computer or a lapt...

Page 16: ... Connect Speaker to Camera Use an audio cable to connect the line out port and a speaker Note It is highly recommended that setting low volume level before turn on the speaker for protecting your hearing ...

Page 17: ...or table legs for protecting the camera from being stolen or moved Connect HDMI to Lecture Recording System Use a HDMI cable to connect the HDMI output jack and a lecture recording system Use AVer CC30 CaptureShare Software Please download the software from the following link USA http averusa com support Global http www aver com download center ...

Page 18: ...angle Set the camera able to capture all view expected 2 Do not place objects in front of the camera to avoid influencing the recording effect 3 Clean and dry thoroughly the lens with lens tissue to avoid influencing the viewing effect Note Do not clean the lens with cleaners containing strong acid or alkaline 4 Do not place the camera on the edge of a desk to avoid dropping and causing damage ...

Page 19: ...f the camera for better recording effect Wireless Microphone Connection 1 Build in 10 meters distance transceiver provides mobility and free cabling arrangement 2 Do not place the wireless microphone on the edge of a desk to avoid dropping and causing damage ...

Page 20: ...y might cause the voice picked up unclearly It is recommended that use the wireless microphone in turns 4 Please make sure that there is no too much obstacle between the camera and the wireless microphone to avoid reducing voice pick up and the transceiver effect ...

Page 21: ... The camera provides 120 wide view angle Set the camera able to capture all view expected 4 Properly use the mini tripod to adjust the height of the camera for better recording view 5 Turn on the wireless microphone for higher quality to make a video conference or a video call 6 Please make sure that there is no too much obstacle between the camera and the wireless microphone to avoid reducing voi...

Page 22: ...rophone are set with the effective range 5 Please make sure that there is no too much obstacle between the camera and the wireless microphone or between the wireless microphone and the voice to avoid reducing voice pick up and the transceiver effect 6 You can use CC30 camera and AVer USB supported Visualizer simultaneously Connect both cameras to your computer or laptop with the CaptureShare softw...

Page 23: ...tions are connected successfully before you are using the CC30 CaptureShare application Connections error will cause no image showing no audio or no reaction For more information please refer to INSTALLATION chapter Windows Tool Bar When you launch CaptureShare the tool bar is showed at the bottom of the windows 1 Select Layout CaptureShare can connect up to two cameras simultaneously There are fo...

Page 24: ...19 No camera Shows no camera screen 1 camera Shows 1 camera screen 2 cameras Shows 2 camera screen ...

Page 25: ... displayed on the other camera full screen at the same time Sound is usually from the main program only Select source of camera then connect the camera to the computer or laptop 2 Capture Desktop Click the button to capture a screen shot of the computer or laptop ...

Page 26: ...he button to choose the build in microphone of the camera or the wireless microphone Slide the blue spot on the volume bar to control the record volume 4 Stream Setting Streaming is a technology that the videos are broken up into several sections before sending to the end user The process of the transmission and playback of the video are simultaneous in order to shorten the download times Click th...

Page 27: ...he computer or laptop and the mobile phone should share the same Wi Fi network Language Setting Set the language displayed on the screen Software Update Firmware Update Click the button to check if the version of software and the firmware is the latest It is recommended to check if the software and firmware need to upgrade regularly for better use Stream Setting There are two Select Service YouTub...

Page 28: ...uct e Capture Click the button to capture the screen shot There are three types capture mode to choose Click the button to capture a full screen shot Click the button to select a specific interface and capture a shot Click the button to marquee a specific area and capture a shot f Select Click the button to select a specific object to modify or cancel g Freehand Click the button to write or draw o...

Page 29: ... Linestyle When you use Freehand Highlighter or Line function click the button to set the style of line Thickness Small Medium Large Form Solid Dash Arrow1 Single arrow Arrow2 Double headed arrow n Color When you use Freehand Highlighter Line or Shape function click the button to set the color of line There are six fixed colors to choose Red Yellow Green Blue Black and White Or you can click the b...

Page 30: ...s connected to your computer and laptop successfully You can adjust these functions before recording or during recording Following are descriptions for each function Volume Set the recording volume on the left of the screen Press the blue dot and move up to increase the volume Conversely move down to decrease the volume ...

Page 31: ...ght of the screen Press the blue dot and move up to zoom in Conversely move down to zoom out Capture recording Click the button on the bottom of the screen to take a screen shot You can use the Capture recording function before recording or during recording ...

Page 32: ...n to stop recording Stream setting Streaming is a technology that the videos are broken up into several sections before sending to the end user The process of the transmission and playback of the video are simultaneous in order to shorten the download times Click the button showing the Stream Setting ...

Page 33: ...28 There are two Select Service YouTube and LiveHouse in There are four Resolution items 1080P 720P 480P 360P You can set a Stream Key After setting click the button to confirm the settings ...

Page 34: ...29 Recording Setting Click the button on the top of the screen to enter Recording Setting ...

Page 35: ... 4 Sharpness Higher the sharpness is clearer the picture Value 1 2 3 5 White Balance The White Balance feature can boil down to the concept of color temperature Color temperature is a way of measuring the quality of a light source Adjust the white balance to get the colors in your images as accurate as possible recorded the video Or click the button to enable automatic adjustment Value 2800 10000 ...

Page 36: ... reduction Adjust the level of reduction of noise during recording Value 0 1 2 3 3 Power frequency It depends on what voltage the country uses 60Hz systems usually use 110V 120V while 50Hz systems tend to use 220V or 230V Value Auto 50Hz 60Hz 4 Image orientation Click the button to mirror the screen Click the button to put screen to the upper edge 5 Default Click the button to reset all settings t...

Page 37: ... rate Higher the RATE is smoother the video Value 30fps 20fps 15fps 10fps 5fps 4 Resolution As the resolution goes up the image becomes clearer sharper more defined and more detailed as well 5 Default Click the button to reset all settings to factory default values 6 Apply After setting click the button to confirm the setting ...

Page 38: ...eless microphone together Value Enable Disable 2 HDMI output setting Enable CC30 HDMI audio output Value Enable Disable 3 More information Click this link to learn more about CC30 audio setting Note Video output mode setting can t adjust during recording Make sure that this setting is correct before recording ...

Page 39: ... the same Wi Fi network Connect to CaptureShare Software 1 Enable the CaptureShare APP in your android mobile phone and CaptureShare software in your computer or laptop simultaneously Note It is recommended that the version of the CaptureShare APP and CaptureShare software are the same for better using You can check if the CaptureShare software is the latest in the Software Update Firmware Update ...

Page 40: ... through the CaptureShare software on your computer or laptop In the Network Information of the Other Setting shows IP address or QR code 3 Enter the IP address or scan the QR code to the CaptureShare APP in your android mobile phone ...

Page 41: ...36 4 Select the source as CC30 Note The camera is required to connect to your computer or laptop 5 Press the button firstly and press the button to start recording ...

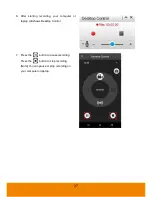
Page 42: ...er starting recording your computer or laptop will shows Desktop Control 7 Press the button to pause recording Press the button to stop recording Note You can pause or stop recording on your computer or laptop ...

Page 43: ...aved on your computer or laptop Note Click the button in the CaptureShare software in your computer or laptop to review the recorded videos 9 Press the button to start stream This function should set through the CaptureShare software in your computer or laptop ...

Page 44: ...een shot Note Click the button in the CaptureShare software in your computer or laptop to review the captured shots 11 If you choose the source as Desktop the recording video and the captured shots will be the screen of your computer or laptop ...

Page 45: ...ts Zoom WebEx Adobe Connect WebRTC and etc 2 Some Video application needs specific account before using 3 Set the CC30 as your primary camera microphone and speaker devices in your application For more information please refer to chapter INSTALLATION 4 Ready to make a video call 5 It is highly recommended that setting low volume level before turn on the speaker for protecting your hearing when you...

Page 46: ...41 Skype 1 Download SkypeTM from the official website Reference http skype pchome com tw download html Note A SkypeTM account is required 2 Install SkypeTM 3 Open SkypeTM 4 Choose CC30 as video camera ...

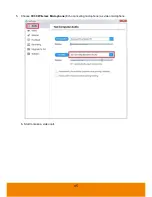
Page 47: ...42 5 Choose CC30 Wireless Microphone Echo canceling microphone as video microphone 6 Start to make a video call ...

Page 48: ...our Google Hangouts Reference https hangouts google com Note A Google account is required 2 Choose CC30 as video camera 3 Choose CC30 Wireless Microphone Echo canceling microphone as video microphone 4 Start to make a video call ...

Page 49: ...ad Zoom from the official website Reference https zoom us support download Note A Zoom account is required Or you can use Google or Facebook account to register 2 Install Zoom 3 Open Zoom 4 Choose CC30 as video camera ...

Page 50: ...45 5 Choose CC30 Wireless Microphone Echo canceling microphone as video microphone 6 Start to make a video call ...

Page 51: ...rophone to avoid reducing voice pick up and the transceiver effect Q The audio quality is poor A 1 Please make sure the wireless microphone is not damaged 2 Please make sure if the battery of the wireless microphone is full 3 Please make sure if the wireless microphone is not facing the output speakers to prevent echo 4 Please make sure the distance between the camera and the wireless microphone i...

Page 52: ...too far away from each other 6 Please try to restart your computer or laptop again Q Unable to connect to other lecture capture systems A 1 Ensure the power status of the device from the other sited is on 2 Verify if the firewall blocks the inbound traffics from the other site 3 Verify if the other site rejected your lecture capture systems Q No image or poor image on the screen A 1 Please make su...

Page 53: ...ra connected to your computer or laptop with USB cable successfully 4 Please make sure if the CC30 is chosen as video camera 5 Please do not place objects before the camera to avoid influencing the recording effect It is recommended the use properly the mini tripod to adjust the height of the camera for better recording effect 6 Clean and dry thoroughly the lens to avoid influencing the recording ...

Page 54: ...JPEG H 264 AVC high profile baseline profile H 264 SVC Resolution MJPEG 3264x2448 5fps 1080p 30fps 480p 60fps download to 320x180 60fps H 264 3264x2448 5fps 1080p 30fps 720p 60fps download to 320x180 60fps Output interface HDMI HDMI connector HDCP is not supported Audio Stereo mini jack Line Output Φ1 8 inch 3 5 mm USB USB 2 0 micro B connector LED indicator Power and Wireless microphone connectio...

Page 55: ... 1 Battery type AA x 2 Battery life Typical up to 8 hours Zinc carbon 2 Compatibility and Compliance USB USB 1 1 UVC video and audio for broad application compatibility Driver No driver needed for Windows 7 8 8 1 10 Mac OS X Chrome OS 29 above Application Compatibility Skype Skype for Business Google Hangouts Zoom WebEx Adobe Connect WebRTC YouTube 1 Actual range depends on signal absorption refle...

Reviews: