English-5
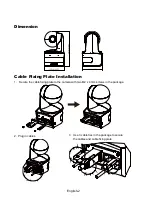
(15) Full Body
Tracking mode switches to Presenter Mode when also pressing Full
Body button, and presenter's size on screen is full body.
Upper Body focuses on the presenter from his/her knees to the top of
the head whereas the Full Body captures the whole outline of the
presenter from his/her feet to the top of the head.
(16) Zone
Tracking mode switches to Zone Mode when pressing Zone button.
(17) Camera Select
CAM1 to CAM4 buttons. Select a camera to operate. Once a camera is
selected, the CAM button LED will be on when pressing other buttons.
If only one AVer camera is connected, then the default is CAM1.
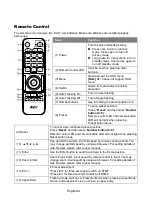
LED Indicator
LED
Status
Blue (Blinking every 2 seconds)
Tracking On
Blue (Solid)
Normal Operation and Tracking Off
Orange (Blinking)
Camera Initialization
Orange (Solid)
Standby Mode
Red (Blinking)
Firmware Update
Purple (Blinking for 3 times)
RTMP being switched on or off
Green (Blinking)
Gesture control command received
CaptureShare
CaptureShare is a powerful application that lets you easily record video, livestream, and capture
still images during distance learning and real-time video conferencing via a USB cable. It can help
teachers turn AVer cameras into an even more effective distance learning collaboration tool.
Use the included application called “AVer Camera Setting Tool” to remotely control AVer cameras
(USB) or AVer virtual cameras. This tool allows easy manipulation of the camera via settings such
as Pan/Tilt/Zoom control, recalling and saving presets, turn on/off auto tracking as well as select
the tracking modes. You can also easily control your camera while using popular video
conferencing tools such as Zoom, Google Meet, and Microsoft Teams.
IP Address Setup
DL cameras’ default setting is DHCP on.
If there is DHCP environment
1. Connect your camera to the internet and wait for your camera to get IP address.
2. From your server, you can find your new camera IP address.
3. If necessary, modify the IP address.
Summary of Contents for DL10
Page 2: ...English 1 繁體中文 8 日本語 15 Deutsch 22 Français 29 Español 36 Italiano 43 한국어 50 ...
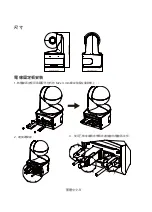
Page 11: ...繁體中文 9 尺寸 電線固定板安裝 1 將電線固定板用兩顆配件包內的 M2 x 4 mm 螺絲鎖緊在攝影機上 2 連接連接線 3 使用三條束線固定帶固定連接線和電線固定板 ...
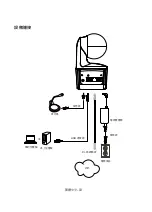
Page 12: ...繁體中文 10 設備連接 網路 麥克風 RJ 45網路線 USB 連接線 電源插座 電源變壓器 電源線 音源線 桌上型電腦 或 筆記型電腦 ...
Page 54: ...한국어 52 연결 RJ 45 케이블 USB 케이블 전원 콘센트 전원 어댑터 전원 코드 데스크탑 Microfono 오디오 케이블 노트북 또 네트워크 ...
Page 59: ...P N 300AS900 xxx ...


