background image


VC320 

User Manual 

Summary of Contents for VC320

Page 1: ...VC320 User Manual ...

Page 2: ...perating in conjunction with any other antenna or transmitter Radiation Exposure Statement This equipment complies with FCC radiation exposure limits set forth for an uncontrolled environment This equipment should be installed and operated with minimum distance 20cm between the radiator your body Europe EU Declaration of Conformity This device complies with the essential requirements of the R TTE ...

Page 3: ...ocumentation even if advised of the possibility of such damages TRADEMARKS AVer is a trademark owned by AVer Information Inc Other trademarks used herein for description purpose only belong to each of their companies COPYRIGHT 2016 AVer Information Inc All rights reserved All rights of this object belong to AVer Information Inc Reproduced or transmitted in any form or by any means without the prio...

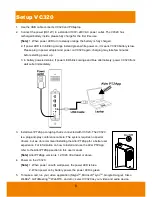
Page 4: ...ttery 5 Remote Control 6 Setup VC320 8 Use VC320 9 Video Conference Mode 9 Presentation Mode 10 Bluetooth Mode 11 NFC connection 12 EZCrop Function 12 Battery Operation 12 Adjust Camera Lens 13 AVer PTZApp 14 Install AVer PTZApp 14 Use AVer PTZApp 14 Test Camera 19 Test Speakerphone 19 Test Bluetooth 20 Test Present 21 Update Now 22 Hotkey Control 23 ...

Page 5: ... 23 24 26 28 29 31 HDMI OUT MICHDMI IN RESET 2 1 A 1 1 12 13 14 15 16 17 18 1 VC320 camera unit 2 Remote control 3 HDMI cable 4 USB cable 5 Power adapter 6 Quick Installation Guide The power plug will vary depending on the standard power outlet of the country where it is sold ...

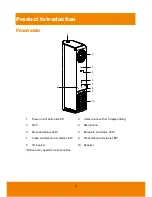
Page 6: ...1 Power on off button LED 2 Camera lens with 10 degree tilting 3 NFC 4 Microphone 5 Mute and status LED 6 Bluetooth and status LED 7 Video conference and status LED 8 Presentation and status LED 9 IR receiver 10 Speaker Buttons are capacitor touch sensitive ...

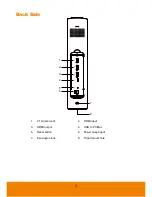
Page 7: ...3 Back Side 1 2 3 4 5 6 7 8 HDMI OUT HDMI IN RESET 2 1 A 1 2 1A reserved 2 HDMI input 3 HDMI output 4 USB to PC Mac 5 Reset button 6 Power adapt input 7 Kensington lock 8 Tripod mount hole ...

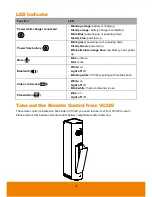
Page 8: ...ink alternate orange blue low battery can t power up Mute Blue unmute Red mute Bluetooth White on Light off off Blinking white VC320 is pairing with mobile phone Video conference White on Light off off Blink white Video conference is use Presentation Blue on Light off off Take out the Remote Control from VC320 The remote control is located on back side of VC320 you need to take it out from VC320 t...

Page 9: ...nd press remote cover toward back end 2 Lightly touch battery and completely pull out the film tab blocking the battery 1 2 To remove or replace the battery 1 Press clip holder toward back end to release the battery 2 Place new CR232 battery side up under the triangle contact and clip ...

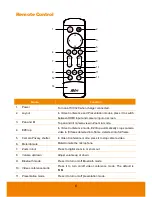
Page 10: ...e EZCrop automatically crops camera video to fill faces detected into frame detected into full frame 5 Camera Privacy shutter In Video Conference mode press it to stop camera video 6 Mute Unmute Mute Unmute the microphone 7 Zoom in out Press to digital zoom in or zoom out 8 Volume up down Adjust volume up or down 9 Bluetooth mode Press it to turn on off Bluetooth mode 10 Video conference mode Pres...

Page 11: ...7 Name Function 12 Call answer Answer a call or start a call 13 Hang up End the call 14 Battery compartment cover Press toward down it to open for battery installation Function requires AVer PTZApp ...

Page 12: ...blue alternatively power VC320 from wall outlet immediately 3 Install Aver PTZApp on laptop that is connected with VC320 The VC320 is a plug and play conference camera The system requires no special drivers but we do recommend installing the AVer PTZApp for a better user experience For information on how to install and use the AVer PTZApp refer to the AVer PTZApp section in this user manual Note A...

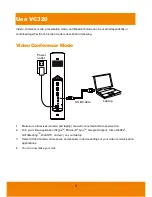
Page 13: ...T MIC HDMI IN RESET 2 1 A USB Cable Laptop Power outlet 1 Make sure all devices camera and laptop are well connected and are powered on 2 Run your video application SkypeTM Microsoft LyncTM Google Hangout Cisco WebEx GoToMeetingTM WebRTC and etc on your laptop 3 Select VC320 camera microphone and speaker in device settings of your video communication applications 4 You can now make your call ...

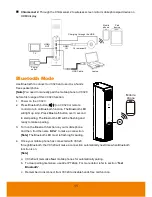
Page 14: ... and are described in following HDMI connection two ways to use present function Use presentation mode to display computer content locally while using VC320 camera and speakerphone for communication app HDMI OUT MIC HDMI IN RESET 2 1 A Power outlet HDMI Cable IN Laptop HDMI Cable OUT TV USB Cable Laptop Use presentation mode to show camera capture to HDMI display HDMI OUT MIC HDMI IN RESET 2 1 A P...

Page 15: ...etooth function The Bluetooth LED will light up And Press Bluetooth button over 3 second to start pairing The Bluetooth LED will be flashing and ready to make a pairing 3 Turn on the Bluetooth function on your mobile phone And then find the name AVer to make a connection Note The Bluetooth LED must in flashing for pairing 4 Once your mobile phone has connected with VC320 through Bluetooth the VC32...

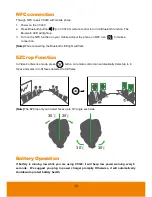
Page 16: ...necting the Bluetooth LED light will flash EZCrop Function In Video Conference mode press button on remote control can automatically detect up to 8 faces and zoom in to fit faces detected to full frame Note The EZCrop only can detect faces up to 30 angle each side 30 30 30 30 Battery Operation If battery is running low while you are using VC320 it will beep low power warning every 5 seconds We sug...

Page 17: ...13 Adjust Camera Lens VC320 camera lens can be manually tilted up or down up to 10 degrees 10 ...

Page 18: ...ation application a plug in needs to be installed and an approval request will be prompted 2 If you have the Skype plug in checked during the installation a plug in request will be displayed in Skype Click on the Skype plug in request to accept the plug in this enables and funcationality on the Remote Control 3 During your video call you can use the AVer PTZApp to pan tilt and zoom the camera in o...

Page 19: ...15 Function icon Click it to switch to the function s page PTZ To control the camera direction zoom in and out and to enable disable the backlight compensation during your video call ...

Page 20: ...d baud rate is for RS232 connection setting Click the Save button to save all settings To change all the settings back to the default values click the Factory Default button Diagnostic Utility To display the S W and F W version and the devices connection status Also test the camera speakerphone Bluetooth mode and present mode status and update the firmware of the camera ...

Page 21: ...con on the system tray and select Quit Camera Click it to view the camera live view Click the camera icon again to close the camera live view If the live video did not appear please check the camera and laptop s connection to make sure all are correct and well connected Normal Un normal ...

Page 22: ...r PTZApp has detected that camera and laptop are not connected well the diagram will indicate the connection has a problem and display Can t start video warning Troubleshooting collect more system information for troubleshooting before you contact AVer technical support ...

Page 23: ...live video Also you can adjust the camera direction and view of the zoom in out To leave the page click the Abort Diagnostic button Test Speakerphone Click to check the speakerphone status It will require the user to record a short message and play it back to ensure the speakerphone is working ...

Page 24: ...nection Currently Paired Device Display the currently connected mobile phone information Remembered Paired Device Four mobile phones can be memorize by VC320 and are listed in Remembered Parried Devices column Manual Pairing Click it to pair with mobile phone manually Clear Pair Device Memory To clear the memorized mobile phone from Remembered Parried Devices list Abort Diagnostic exit the dialog ...

Page 25: ...s on Press present mode button on VC320 or remote control Click Test Present AVer PTZApp will detect current mode status and display on dialog box as below shown Click Toggle Source can switch video source between HDMI input and USB input To exit the dialog click Abort Diagnostic button ...

Page 26: ...Update and update process will start The new firmware will be downloaded first then the new firmware will be uploaded to camera Note Before updating the new firmware to the camera please make sure camera and laptop are all well connected and stay connected during the entire process Download new firmware Update new firmware to camera 4 To update the firmware manually click Manual Update and locate ...

Page 27: ...23 Hotkey Control Enable hotkey control to use keyboard control camera s movement and backlight 1 Select Settings 2 Set Hotkey Control to On 3 A hotkey description as below figure shown 1 2 ...

Page 28: ......

Reviews: