background image


VC520


User Manual 

English 

Deutsch 

Español 

Français 

Italiano 

Summary of Contents for VC520

Page 1: ...VC520 User Manual English Deutsch Español Français Italiano ...

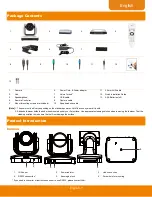
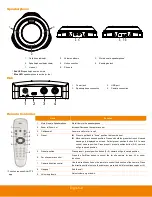
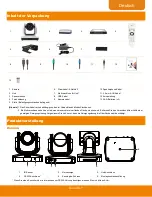
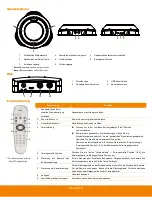
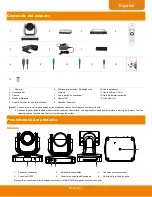
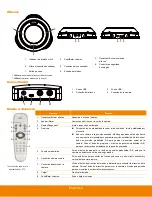
Page 2: ...ower cord will vary depending on the standard power outlet of the country where it is sold 2 Adhesive fastener holds the hub when mounted under your flat surface Use appropriate cleaning solution when removing the fastener Test the cleaning solution to make sure that it will not damage the surface Product Introduction Camera 6 1 2 3 4 5 1 IR Sensor 2 Power indictor 3 Hub connection 4 RS232 connect...

Page 3: ...amera to desired position Press and hold the preset button until saved message is displayed on screen Select preset position button 0 9 to save current camera position Press preset preset position button 0 9 camera will go to saved position 5 Preset position Press preset preset position button 0 9 camera will go to saved position 6 Far site camera control Press the Far Near button to control the f...

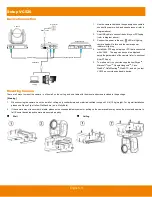
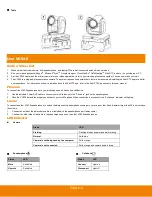
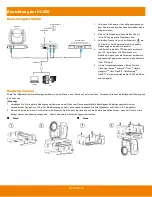
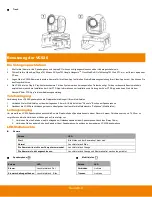
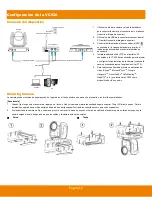
Page 4: ...ement or pulling on the camera cables may cause the mount and camera to fall Ensure the cables and camera are secured properly Wall Ceiling 1 Use the camera cable and the speakerphone cable to connect the camera hub and speakerphone refer to diagram above 2 Use USB cable to connect the hub to your PC laptop refer to diagram above 3 Connect the power to the hub LED will light up camera head will ro...

Page 5: ...e as a hands free call device 1 Use the included 3 5mm AUX cable to connect your mobile device to the Phone In jack on the speakerphone 2 Once the VC520 detects the proper connection to your mobile phone When connection is successful the Cellphone indicator will light up Line in To connect another VC520 speakerphone to extend the distance of speakerphone coverage to cover a room that has a diamete...

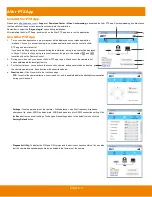
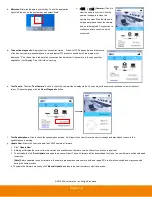
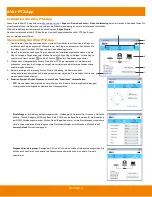
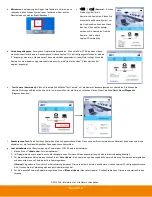
Page 6: ...lug in this enables and funcationality on the Remote Control 2 During your video call you can use the AVer PTZ app to pan tilt and zoom the camera in out and enable disable the backlight feature 3 For the first time use you can check the connection camera and speaker status and setup the camera s parameters Each function will be described below a Function icon Click it to switch to the function s ...

Page 7: ...e camera video display status You can adjust the camera direction and view of the zoom in out To leave the page click the Abort Diagnostic button f Test Speakerphone Click to check the speakerphone status It will require the user to record a short message and play it back to ensure the speakerphone is working g Update Now Allows the user to update the VC520 camera s firmware 1 Click Update Now 2 A...

Page 8: ...ängig von den im Verkaufsland üblichen Steckdosen 2 Ein Klettverschluss sichert den Hub wenn dieser unter einer flachen Fläche montiert wird Entfernen Sie den Verschluss bitte mithilfe einer geeinigten Reinigungslösung Vergewissern Sie sich zuvor dass die Reinigungslösung die Oberfläche nicht beschädigt Produktvorstellung Kamera 6 1 2 3 4 5 1 IR Sensor 2 Netzanzeige 3 Hub Anschluss 4 RS232 Anschlu...

Page 9: ...drückt bis die gespeichert Nachricht angezeigt wird Speichern Sie die aktuellen Kameraposition mit der Position Voreinstellungstaste 0 9 Drücken Sie die Tasten Voreinstellung Voreingestellte Position 0 9 die Kamera schaltet in die gespeicherte Position um 5 Voreingestellte Position Drücken Sie die Tasten Voreinstellung Voreingestellte Position 0 9 die Kamera schaltet in die gespeicherte Position u...

Page 10: ...te dass die Halterung und die Kamera herabfallen können wenn der Tisch zu stark bewegt oder an den Kabeln gezogen wird Kabel und Kamera müssen richtig gesichert werden Wand Decke 1 Verbinden Sie Kamera Hub und Speakerphone mit dem Kamera und dem Speakerphone Kabel siehe Diagramm oben 2 Mit dem USB Kabel verbinden Sie den Hub mit Ihrem PC Laptop siehe Diagramm oben 3 Verbinden Sie den Hub mit dem S...

Page 11: ...efon 1 Verbinden Sie Ihr Mobiltelefon mit dem beiliegenden 3 5 mm AUX Kabel mit der Phone In Buchse am Speakerphone 2 Nachdem die VC520 die Verbindung erkannt und aufgebaut hat leuchtet die Meldeleuchte Cellphone Mobiltelefon Leitungseingang Um ein weiteres VC520 Speakerphone anzuschließen die Reichweite des Speakerphones in einem Raum mit einem Durchmesser von ca 76 20 cm zu vergrößern und die La...

Page 12: ...nung aktiviert 3 Während des Videogesprächs können Sie die AVer PTZ App verwenden um die Kamera zu schwenken zu neigen die Anzeige zu vergrößern verkleinern und die Hintergrundbeleuchtung zu aktivieren deaktivieren 4 Bei der erstmaligen Verwendung können Sie die Verbindung die Kamera und den Lautsprecherstatus überprüfen und die Kameraparameter einrichten Die einzelnen Funktionen werden nachstehen...

Page 13: ...uf den Zoom in out einzustellen Um die Seite zu verlassen klicken Sie auf die Schaltfläche Abort Diagnostic Diagnose beenden f Speakerphone Test Durch Anklicken überprüfen Sie den Speakerphone Status Dann muss der Benutzer eine kurze Nachricht aufnehmen und diese abspielen um die Funktionsfähigkeit des Speakerphone zu überprüfen g Jetzt aktualisieren Der Benutzer kann die Firmware der VC520 Kamera...

Page 14: ...l vary depending on the standard power outlet of the country where it is sold 2 Adhesive fastener holds the hub when mounted under your flat surface Use appropriate cleaning solution when removing the fastener Test the cleaning solution to make sure that it will not damage the surface Presentació n del producto Cámara 6 1 2 3 4 5 1 Sensor de infrarrojos 2 Indicador de encendido 3 Conexión del conc...

Page 15: ...a pulsado este botón hasta que se muestre el mensaje para guardar la posición establecida Seleccione el botón de posición predefinida 0 9 para guardar la posición actual de la cámara Pulse el botón de preajuste el botón de posición predefinida 0 9 para que la cámara se establezca en la posición guardada 5 Posición predefinida Pulse el botón de preajuste el botón de posición predefinida 0 9 para qu...

Page 16: ...a cámara para evitar que el soporte y la cámara caigan al suelo Asegúrese de que los cables y la cámara estén bien sujetos Pared Techo 1 Utilice el cable de la cámara y el cable del altavoz para conectar la cámara el concentrador y el altavoz consulte el diagrama superior 2 Utilice el cable USB para conectar el concentrador al PC portátil consulte el diagrama superior 3 Conecte la alimentación al ...

Page 17: ...n AVer PTZ en este manual Entrada de teléfono Permite conectar el altavoz de la VC520 a su teléfono móvil como un dispositivo de llamada manos libres 1 Utilice el cable AUX de 3 5 mm suministrado para conectar su teléfono móvil al conector Phone In Entrada de teléfono del altavoz 2 Una vez que la VC520 detecte la conexión con el teléfono móvil se encenderá el indicador del teléfono móvil Entrada d...

Page 18: ...ante la videollamada puede utilizar la aplicación AVer PTZ para controlar el zoom y el movimiento horizontal vertical de la cámara y activar desactivar la función de retroiluminación 4 La primera vez que utilice la aplicación podrá comprobar la conexión la cámara el estado del altavoz y los parámetros de la cámara A continuación se describe cada una de las funciones a Icono de funciones haga clic ...

Page 19: ...ión de la cámara y la vista del zoom in out Para salir de la página haga clic en el botón Abort Diagnostic Cancelar diagnóstico f Test Speakerphone Comprobar altavoz haga clic en este botón para comprobar el estado del altavoz El usuario deberá grabar un mensaje corto y reproducirlo para asegurarse de que el altavoz funciona correctamente g Update Now Actualizar ahora permite al usuario actualizar...

Page 20: ... normes des prises du pays où l appareil est vendu 2 Le support adhésif maintient le concentrateur en place lorsqu il est monté sous une surface plane Utilisez une solution de nettoyage adaptée pour enlever l adhésif Testez d abord la solution de nettoyage sur une petite surface pour vérifier qu elle n endommage pas la surface Introduction au produit Caméra 6 1 2 3 4 5 1 Capteur IR 2 Indicateur d ...

Page 21: ...ssage indiquant que la sélection a été enregistrée s affiche Sélectionnez la position présélectionnée avec les boutons 0 9 pour enregistrer la position actuelle de la caméra Appuyez sur le bouton preset preset position 0 9 et la caméra se déplacera vers la position enregistrée 5 Preset position Position présélectionnée Appuyez sur le bouton preset preset position 0 9 et la caméra se déplacera vers...

Page 22: ... camera risquent de faire tomber le support et la caméra Vérifiez que les câbles et la caméra sont bien attachés Mur Plafond 1 Utilice el cable de la cámara y el cable del altavoz para conectar la cámara el concentrador y el altavoz consulte el diagrama superior 2 Utilice el cable USB para conectar el concentrador al PC portátil consulte el diagrama superior 3 Conecte la alimentación al concentrad...

Page 23: ... téléphonique à votre téléphone portable comme appareils mains libres 1 Utilisez le câble AUX de 3 5 mm inclut pour connecter votre appareil mobile à la prise Phone In du haut parleur 2 Une fois que le VC520 détecte la connexion au téléphone portable et que la connexion est réussie l indicateur Cellphone s allume Ligne d entrée Comment connecter un autre haut parleur téléphonique pour augmenter la...

Page 24: ...re appel vidéo vous pouvez utiliser l appli AVer PTZ pour incliner la caméra faire des zooms avant et arrière et activer désactiver la caractéristique de rétro illumination 4 Lors de la première utilisation vous pouvez vérifier l état de la connexion de la caméra et du haut parleur et configurer les paramètres de la caméra Toutes les fonctions sont décrites ci dessous a Icônes de fonction Cliquez ...

Page 25: ... la direction de la caméra et la vue du zoom avant arrière Pour quitter cette page cliquez sur le bouton Interrompre le diagnostic f Testez le haut parleur téléphonique Cliquez pour voir l état du Haut parleur téléphonique L utilisateur devra enregistrer un bref message puis le jouer pour vérifier que le Haut parleur téléphonique fonctionne g Mise à jour Permet aux utilisateurs de mettre à jour le...

Page 26: ... corrente standard per il paese in cui viene venduto 2 Un elemento di fissaggio adesivo tiene in posizione l hub quando viene montato sotto a una superficie piatta Servirsi di una soluzione detergente adeguata in fase di rimozione dell elemento di fissaggio Testare la soluzione detergente per verificare che non danneggi la superficie Introduzione al prodotto Telecamera 6 1 2 3 4 5 1 Sensore Infrar...

Page 27: ...sante preset fino a che il messaggio salvato non verrà visualizzato a video Selezionare il pulsante di posizione preset 0 9 per salvare la posizione attuale della telecamera Premere il pulsante di posizione preset preset 0 9 la telecamera andrà alla posizione salvata 5 Posizione preset Premere il pulsante di posizione preset preset 0 9 la telecamera andrà alla posizione salvata 6 Controllo della t...

Page 28: ...i strattonamenti dei cavi della telecamera possono causare la caduta del supporto e della telecamera Verificare che i cavi e la telecamera siano fissati saldamente Parete Soffitto 1 Usare il cavo della telecamera e il cavo dell altoparlante per collegare telecamera hub e altoparlante rimandiamo allo schema indicato più sopra 2 Servirsi del cavo USB per collegare l hub al proprio PC laptop rimandia...

Page 29: ...funzioni come auricolare per le proprie chiamate 1 Servirsi del cavo AUX da 3 5mm fornito in dotazione per collegare il dispositivo cellulare alla presa Phone In sull altoparlante 2 Non appena il VC520 rileva il collegamento adeguato al cellulare quando il collegamento avviene con successo l indicatore Cellphone si illumina Line in Per collegare un altro altoparlante VC520 ed estendere la distanza...

Page 30: ...er eseguire le azioni di pan tilt e zoom ingrandimento rimpicciolimento della telecamera oltre che attivare disattivare la funzione di retroilluminazione 4 Quando il dispositivo viene usato per la prima volta sarà possibile controllare il collegamento la telecamera lo stato dell altoparlante oltre che configurare i parametri della telecamera Ogni funzione verrà descritta qui di seguito a Icona fun...

Page 31: ...splay video della telecamera Sarà possibile regolare la direzione della telecamera nonché la vista dell ingrandimento rimpicciolimento zoom Per uscire dalla pagina fare clic sul pulsante Annulla Diagnostica f Test dell altoparlante Fare clic per controllare lo stato dell altoparlante Richiederà all utente di registrare un breve messaggio e di riprodurlo al fine di verificare che l altoparlante sti...

Reviews: