User’s Manual
ENG-5
Eng
lish
Deutsch
Franç
ais
Espa
ño
l
Português
Nederlands
Ελληνική
3.1 Using the
AVerTV BoxW9 Plus
The first time you power on the AVerTV BoxW9 Plus unit, it will automatically display the following menus:
Note: The text appeared in red is the currently selected setting.
LANGUAGE menu
LANGUAGE
ENGLISH
RUSSIAN
In this menu, choose the
language to use for the menus
and on-screen display (OSD).
CHANNEL SETUP menu
CHANNEL SETUP
CHANNEL
VIDEO SYSTEM AUTO
FINE TUNING < 0 >
FAST TUNING YES
SAVE
1
FREQUENCY <49.75> Mhz
AUDIO SYSTEM1 D/K
AUDIO SYSTEM2 MONO
In this menu, change the TV
frequency assignments of certain
channels, fine tune TV channels,
etc. See details on each
configuration setting in the
CHANNEL SETUP menu.
To access various TV controls, open up the menu displays or press on the remote control buttons.
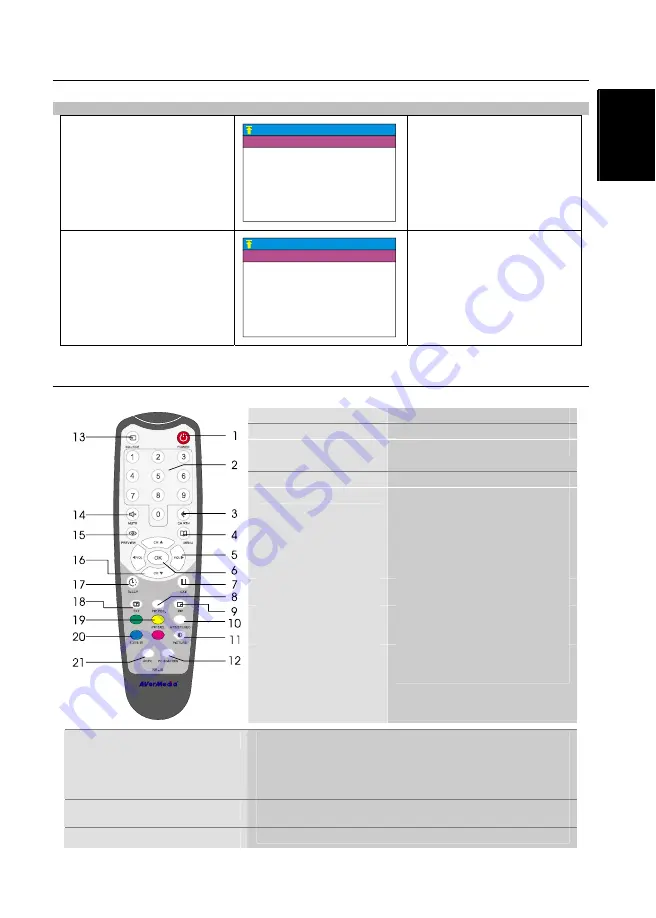
3.2 The Remote Control
The diagram below shows the remote control unit layout.
1.POWER
Turn the unit on/off
2.NUMBER BUTTONS
To select a TV channel
3.CHANNEL RETURN
Go to the previously selected channel
4.MENU
To call up the menu display
5.VOL
◄
/
►
- To increase and decrease volume level.
- Use these button to adjust the menu or
picture setting.
- In adjusting the OSD position, use these
buttons to move the menu display to the
left and right of the screen.
6
.
OK
In the menu, press this button to confirm
the selection.
7
.
To temporarily freeze the image on the
screen. Press the button again to
unfreeze the image.
8.PIP Pos.
To move the small TV/Video screen
using the CH
▲
, CH
▼
, Vol
◄
, and
Vol
►
buttons in PIP mode.
9
.
PIP
Switch between PIP*, PIP See-thru** and Full Screen mode
* To watch TV/Video in a small screen on an always on top of the PC
display.
** Make the small video screen semi-transparent allowing the image
behind the small screen show through.
10
.
MTS/ STEREO
If the channel offers multi-language feature, press this button to toggle
between languages.
11
.
PICTURE
To adjust brightness, contrast, color, tint or sharpness


