E-4
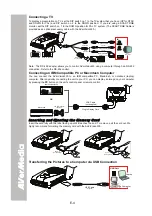
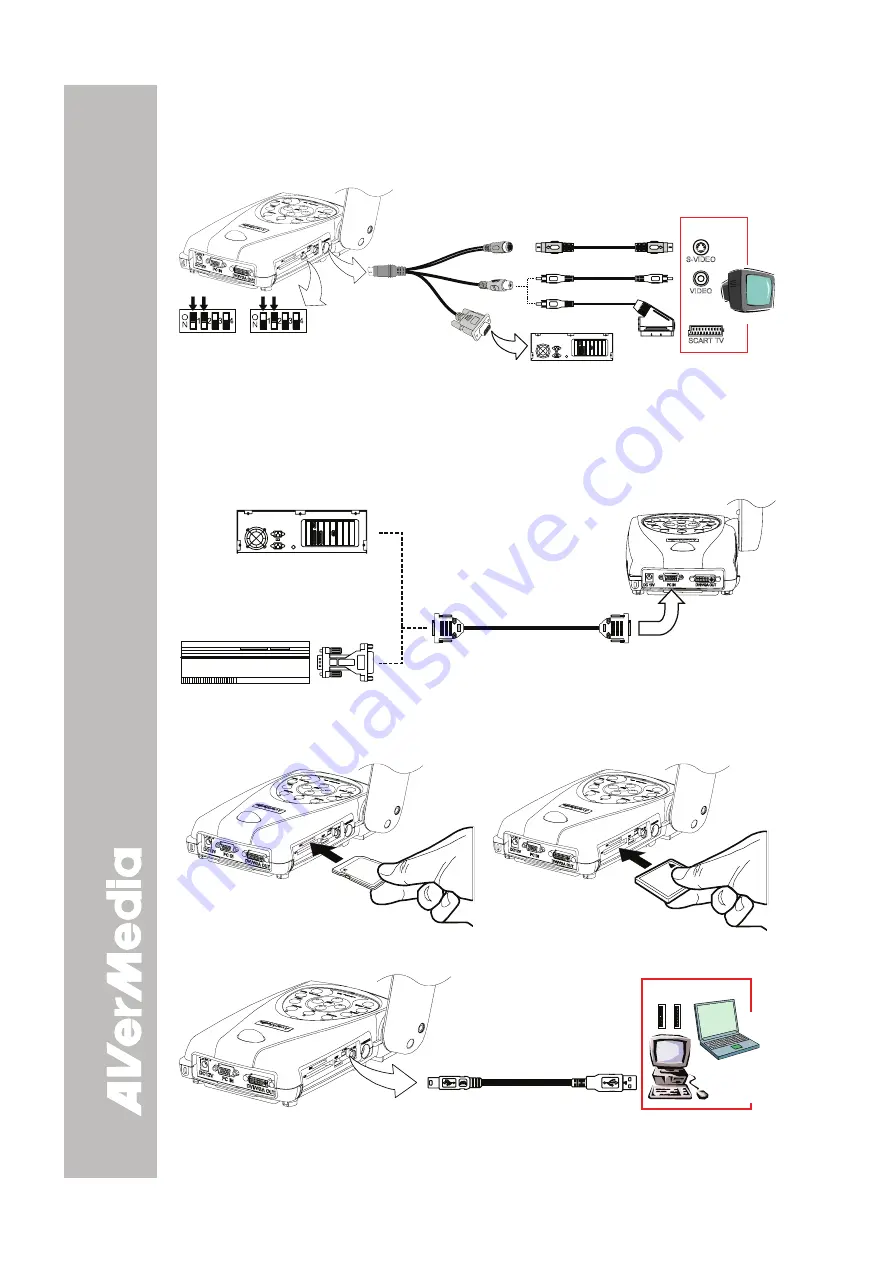
Connecting a TV
To display a presentation on TV, set the DIP switch no. 1 to the TV system that you have (UP for NTSC
and DOWN for PAL) and DIP switch no. 2 to the DOWN position. If you are using a SCART RGB
monitor, set the DIP switch no. 1 to the DOWN position for PAL TV system. (The SCART RGB Cable is
provided as an optional accessory cable with the AVerVision330.)
DC12V
PC IN
DVI/VGA O
UT
TV/
RS2
32
DC
6V
SW
SD
CF
SW
NTSC TV SYSTEM
SW
PAL TV SYSTEM
S-Video Cable
(supplied)
Video Cable
(supplied)
IN
Television
SCART TV
S-VIDEO
VIDEO
RCA to SCART
Cable
(optional)
S-Video
Connector
RCA
Connector
RS-232
Connector
To Computer COM PORT
Note: The RS-232 adapter allows you to control AVerVision330 using a computer through an RS-232
connection. Refer to the RS-232 control.
Connecting an IBM Compatible PC or Macintosh Computer
You can connect the AVerVision330 to an IBM compatible PC, Macintosh, or notebook (laptop)
computer. After physically connecting the unit to your PC, you can display an image on your computer
by pressing the
PC
button on the unit’s control panel or remote control.
VGA Cable
(not supplied)
Plug to Display Card
IBM Compatible PC
Macintosh
Computer Adapter
(optional)
OR
MA
C
I
I
n
n
s
s
e
e
r
r
t
t
i
i
n
n
g
g
a
a
n
n
d
d
E
E
j
j
e
e
c
c
t
t
i
i
n
n
g
g
t
t
h
h
e
e
M
M
e
e
m
m
o
o
r
r
y
y
C
C
a
a
r
r
d
d
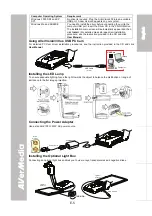
Insert the card fully with the label facing up until it reaches the end. To remove, pull the card out. We
highly recommend formatting the memory card with the AVerVision330.
DC12V
PC IN
DVI/VGA O
UT
TV/
RS2
32
DC
6V
SW
SD
CF
DC12V
PC IN
DVI/VGA O
UT
TV/
RS2
32
DC
6V
SW
SD
CF
SD Card
(not supplied)
CF Card
(not supplied)
Transferring the Pictures to a Computer via USB Connection
DC12V
PC IN
DVI/VGA O
UT
TV/
RS2
32
DC
6V
SW
SD
CF
USB Cable
(supplied)
USB Port
Laptop
Computer
Summary of Contents for AVerVision330
Page 2: ...P N 3 0 0 A A C D A Made in Taiwan...
Page 6: ......

