background image


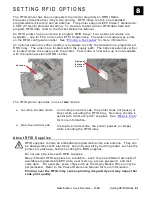
8-14


System Administrator’s Guide


Classification:  Avery Dennison - Public 

Enabling Retry Encode 

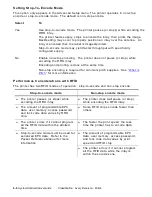
This option only appears in the Advanced Setup menu.  The default is enabled.  


Select 

To 

Enable 

The printer tries to reprint and program a label where a supply error 

occurred.  The printer uses the same EPC data from the errored label 

on the next label.  Use with incrementing batches. 

Disable 

The printer does not re-use the same EPC data.  Once EPC data is 

already programmed into an inlay, the printer will not program that 

same EPC data again.  For example, printing a batch of 100 labels 

prints  99 labels (or less) if a supply error occurs. 

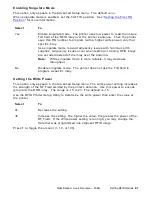
Clearing Data  

This option only appears in the RFID Advanced menu. The printer keeps track and stores 

the following items: 


The number of RFID inlays successfully programmed. 


The number of RFID inlays that failed programming. 

Depending on your application and volume of labels printed, clear this data daily or after 

each batch. 


Select 

To 

Yes 

Clear (erase) all RFID data collected since the last time it was cleared. 

No 

No data is erased.  This is the default. 

U si n g   t h e   R e a d   T ag   O p t i o n  

Use the Read Tag menu option to read the data of an encoded RFID tag.  Place the 

encoded RFID tag over the reader then select Read Tag from the menu. 


RF I D  T r o u b l e s h o o t in g   w it h   No n - S t o p   E n co d i n g  

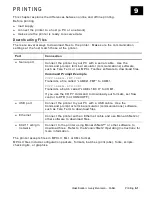
If the RFID printer is not encoding any inlays, print a configuration label to check the 

module type and region of use settings.  If the module type and region of use are not 

compatible, call Technical Support. 
If an RFID error occurs when using Easy Setup, call Technical Support. 


Try sending the print job with the printer’s speed set to 2.5 ips, disable tag saver, and 

disable RFID verification.  When the inlay prints successfully, adjust one setting (print 

speed, tag saver, verification) at a time and resend the print job.  Doing so makes it 

easier to resolve any errors if they occur. 


The start encode position may need to be decreased or increased.  The read power 

level may also need to be increased by 1.  Call Technical Support.  For detailed 

descriptions of error messages, refer to the 

Packet Reference Manual

If an RFID error occurs when using stop-to-encode mode, call Technical Support.  
 

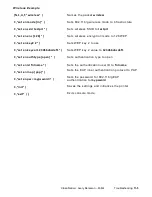
Main

Menu

Setup

RFID

Read 

Tag

Summary of Contents for Monarch ADTP1

Page 1: ...SYSTEM ADMINISTRATOR S GUIDE TCADTP1SA Rev AM 7 21 2015 Avery Dennison Corp All rights reserved Classification Avery Dennison Public Printer Solutions Avery Dennison Monarch Tabletop Printer 1...

Page 2: ...Dennison Corp shall not be liable for any omissions or inaccuracies Any update will be incorporated in a later edition of this manual 2015 Avery Dennison Corp All rights reserved No part of this publi...

Page 3: ...e 2 5 Cut Modes with RFID 2 6 Setting the Backfeed 2 6 Adjusting the Position Settings 2 6 Setting the Print Position 2 7 Setting the Supply Position 2 7 Setting the Margin Position 2 8 Setting the Cu...

Page 4: ...e 6 4 Setting the Power up Mode 6 5 Setting the Numeric Format 6 5 Using Flash Storage 6 5 Setting the Image Error Mode 6 6 Setting the Configuration Packet Mode Ignore Config 6 6 Setting the Batch Pa...

Page 5: ...formance Considerations with RFID 8 6 Enabling Singulate Mode 8 7 Setting the Write Power 8 7 Setting the Read Power 8 8 Setting the Encode Position 8 8 Enabling Tag Saver 8 9 Setting the First TID Po...

Page 6: ...the Network Console Packet 11 4 Adjusting the Printer to Remove Ribbon Wrinkle 11 6 About the Ribbon s Take up Reel 11 7 Setting the Supply Guides 11 8 Adjusting the Ribbon Tension 11 9 SPECIFICATION...

Page 7: ...b site However they are not label production software Call Customer Service for information about label production software Usi n g t h e Con tro l P an el The control panel has a four line LCD displa...

Page 8: ...ious menu however changes are not saved Prin ti ng a T est L ab el From the Main Menu select TLABEL Select from the test label options Printer Information MPCL Label Contains generic information inclu...

Page 9: ...he retaining latch 3 Lift the printhead assembly using the printhead tab until the assembly locks into place 4 Remove both cover thumbscrews 5 Gently push down on the control panel release tab located...

Page 10: ...1 4 System Administrator s Guide Classification Avery Dennison Public...

Page 11: ...t Supply Type E Aperture E Die Cut E Black Mark Continuous C Aperture C Die Cut C Black Mark C Tag Edge E Die Cut Ribbon No Yes High Energy Yes Speed 2 5 4 0 6 0 8 0 10 0 12 0 Default Default Feed Mod...

Page 12: ...C Die Cut Center Die Cut Die cut supplies have a rounded edge The supply is sensed using the gap between the labels If using semi die cut supplies tags with rounded corners on the edges select Edge D...

Page 13: ...etting for resin ribbon applications Using a High Energy Ribbon When you select high energy ribbon for the printer setting you are setting the printer to a higher printing temperature Select this sett...

Page 14: ...Easy Setup to configure the printer for RFID supplies the print speed may be decreased For example some inlays encode better at slower speeds so if the printer is set for 8 0 ips Easy Setup may change...

Page 15: ...thead and cutter The cutter operates when the printer is running If the printer is paused the cutter stops cutting The cutter also stops cutting whenever the cutter s cover is opened When cutting RFID...

Page 16: ...to the desired dispense position Once that label is removed the next label to be printed is backed up underneath the printhead Select To Off Disable backfeed On Enable backfeed The printer moves the s...

Page 17: ...ng Moves the print down Increase the setting Moves the print up Press 1 to toggle the amount 1 10 or 100 Setting the Supply Position This function adjusts the position of the supply relative to the in...

Page 18: ...setting Moves print to the left Increase the setting Moves print to the right Press 1 to toggle the amount 1 10 or 100 Setting the Cut Position This function adjusts where the tag is cut The printer a...

Page 19: ...tearing butt cut supplies the backfeed distance must be 30 dots 0 15 inches less than the dispense position This causes a 30 dot non print zone on the supply but prevents exposed adhesive under the pr...

Page 20: ...ponds to a bad RFID inlay or a bad barcode verifier scan Selecting overstrike and continue 1x 5x sets the number of times the printer prints an overstrike pattern on consecutively bad labels scans bef...

Page 21: ...s In the above example if the third label did NOT generate an error the batch image is printed the consecutive error counter is reset the printer continues processing the batch Usi n g Rot at e I m ag...

Page 22: ...the supply according to the supply type Die cut supplies Measure from the leading edge of one label to the leading edge of the next label accounting for the die cut gap Enter this value in dots Black...

Page 23: ...cleaning create bar code growth and or lead to reduced scanning Solid black print cannot exceed 30 of any given square inch of the supply Select To Decrease the contrast Lightens the print Increase t...

Page 24: ...2 14 System Administrator s Guide Classification Avery Dennison Public...

Page 25: ...5200 9600 Word length 7 8 8 Stop bits 1 2 1 Parity None Odd Even None Flow control None Xon Xoff DTR CTS DTR Reset No Yes No The serial values on the printer must match those at the host Set ti ng t h...

Page 26: ...mediately follows the last data bit for a character The computer adjusts the parity bit according to the parity so the data bits in the character with the parity bit form an odd or even number when su...

Page 27: ...nter port Microsoft Windows prompts the user for the printer driver which is provided by our third party developers and found on our Web site https printers averydennison com en home resources service...

Page 28: ...3 4 System Administrator s Guide Classification Avery Dennison Public...

Page 29: ...AC Address View only None preset value IP Address xxx xxx xxx xxx 192 0 192 0 Subnet Mask xxx xxx xxx xxx 0 0 0 0 IP Gateway xxx xxx xxx xxx 0 0 0 0 Boot Method Static DHCP Auto Wireless See Chapter 5...

Page 30: ...four 3 digit numeric fields If using the optional keyboard enter the subnet mask you need using the numeric keys and press ENTER Select To Subnet Mask Change the printer s subnet mask Press or to hig...

Page 31: ...Reset Defau lt P assw ord Reset the password for Web browser and Telnet sessions to the default access using version 3 0 or greater firmware The password is reset and the printer restarts Make a note...

Page 32: ...value is hard coded and does not change IP Address Subnet Mask 255 255 000 000 IP Gateway Signal Strength 0 SSID none Wireless Mode Infrastructure Roam Threshold 6 Transmit Rate 1 Channel 1 Boot Metho...

Page 33: ...t2 Operating Instructions on our Web site With version 1 6 or greater firmware the Ethernet and wireless interfaces share the same MAC Address When using DHCP Ethernet and wireless will receive the sa...

Page 34: ...SSID scroll to the end of the field press and hold and at the same time for a few seconds then release If you are in the middle of the field press and hold and at the same time for a few seconds then...

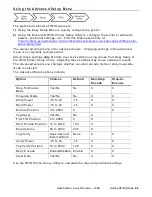
Page 35: ...etup Menu the option is saved when the printer is turned off The monetary formatting options are in the table below Option Choices Default Language English Fran ais Deutsch Espa ol ES Portugu s Italia...

Page 36: ...isplays prompts in English Fran ais Displays prompts in French Deutsch Displays prompts in German Espa ol ES Displays prompts in European Spanish Displays prompts in Japanese Portugu s Displays prompt...

Page 37: ...nt the Kr sign Markka Print the sign Shilling Print the sign Rupee Print the Rs sign Ruble Rubel Print the sign Won Print the sign Baht Print the sign Yuan Print the sign Euro Print the sign Set ti ng...

Page 38: ...ce after the decimal prices print like this 20 5 2 Print two places after the decimal prices print like this 20 50 3 Print three places after the decimal prices print like this 20 500 Set ti ng t h e...

Page 39: ...connected if you need to enter data Set ti ng t h e Nu m eri c F or m at Numeric format determines how numeric values appear in your printed data Select To Default Latin numerals print in Latin Arabic...

Page 40: ...bar code data 603 missing batch 618 invalid font size 611 invalid font bar code or density 620 missing font data 612 missing batch data 621 invalid downloaded font 613 reference point off label 622 no...

Page 41: ...tion packets We recommend changing your host s data stream but if that is not possible enable this option Use caution if ignoring the batch control field because the printer may not operate as expecte...

Page 42: ...inches long as defined in the format header Image Length is 30 Format B prints 5 82 inches long Refer to the Packet Reference Manual for more information about defining the format header Select To Dec...

Page 43: ...printer receives a format followed by multiple batches referencing that format Format Batch Batch Batch For example F 1 B 1 B 1 B 1 Enable The printer ignores all format numbers which may improve ima...

Page 44: ...has volatile RAM packets deleted when the printer is off and flash memory packets saved when the printer is off Flash memory must be formatted before any packets can be saved See Formatting Flash Memo...

Page 45: ...loaded fonts formats or graphics saved in the printer s flash memory are deleted and must be resent to the printer Viewing Available Flash Memory If you receive errors when downloading a script or oth...

Page 46: ...database is included with the printer s firmware and does not need to be flashed separately However new inlays may be qualified in between firmware releases Only inlays qualified for use in the print...

Page 47: ...t be saved into a folder named ADTP not ADTP1 or the root Set ti ng t h e Clo ck Op ti on al The EF version extended features printer contains a real time clock Set the clock during initial printer se...

Page 48: ...the time in minutes to the specified time Setting the Day of the Month Set the clock s day of the month Select To 1 31 Sets the day of the month to the specified number Setting the Month Set the cloc...

Page 49: ...d interpreter appears in the upper left hand corner of the display The interpreter options are in the table below Option Choices Default Interpreter MPCL MLI WMS XML MCPL Select To MPCL Use the MPCL i...

Page 50: ...6 16 System Administrator s Guide Classification Avery Dennison Public...

Page 51: ...ble Immediate Commands Disable Enable Disable In it i al S cr ipt S tar tu p Pro ced ur es Before you can start using a script check the following items Check to see if a script is already in the prin...

Page 52: ...more information Format flash memory See Formatting Flash Memory in Chapter 6 for more information After downloading a script if the script does not appear to be loaded try formatting flash memory an...

Page 53: ...at batches Immediate commands are turned on or off through an MPCL packet Refer to the Packet Reference Manual available on our Web site for more information about immediate commands and control chara...

Page 54: ...7 4 System Administrator s Guide Classification Avery Dennison Public...

Page 55: ...mode or liner take up is not available with the optional external RFID verifier The RFID printer operates in one of two modes non stop encode mode In non stop encode mode the printer does not pause or...

Page 56: ...es Die cut supplies Measure from the leading edge of one label to the leading edge of the next label Black mark supplies Measure from the top of one black mark to the top of the next black mark Apertu...

Page 57: ...or use with non stop encoding The Easy Setup options include Option Choices Default Select Inlay various N A Inlay Pos mm 0 200 0 The printer contains a RFID inlay database d46ESxx db If the database...

Page 58: ...n the RFID Printer Setup Utility For example AD 383U7 GNC 2 Press or to select your inlay then press SET Custom appears as the selected inlay s name if the print speed is increased or any RFID setting...

Page 59: ...values from Easy Setup or the RFID Printer Setup Utility Adjusting these settings may cause undesired results The advanced setup menu changes whether non stop encode mode or stop to encode mode is sel...

Page 60: ...ired for minimum pitch supplies See What is Pitch for more information Performance Considerations with RFID The printer has two RFID modes of operation stop to encode and non stop encode Stop to encod...

Page 61: ...ys are encoded instead of the inlay over the antenna Note While singulate mode is more reliable it may decrease throughput No Disable singulate mode The printer does not use the TID field to program a...

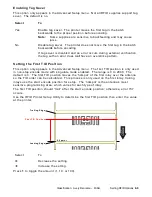
Page 62: ...nly appears in the Advanced Setup menu when using stop to encode mode The encode position is measured from the leading edge of the supply to the best programming position within the inlay The encode p...

Page 63: ...on This option only appears in the Advanced Setup menu The first TID position is only used in non stop encode mode with singulate mode enabled The range is 0 to 2000 The default is 0 The first TID pos...

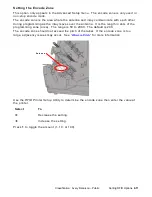
Page 64: ...range is 10 to 2000 The default is 100 The start encode position is measured from the leading edge of the supply to the beginning of the RFID inlay encoding area in 0 01 inches The start encode positi...

Page 65: ...ng as the inlay moves over the antenna It is the length in dots of the programming zone area The range is 50 to 2000 The default is 200 The encode zone should not exceed the pitch of the label If the...

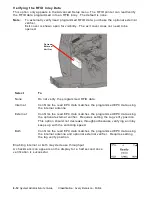
Page 66: ...a Internal Confirms the read EPC data matches the programmed EPC data using the internal antenna External Confirms the read EPC data matches the programmed EPC data using the optional external verifie...

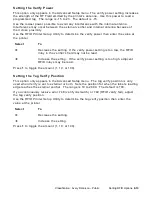
Page 67: ...etting If the verify power setting is too low the RFID inlay in the verifier s field may not be read Increase the setting If the verify power setting is too high adjacent RFID inlays may be read Press...

Page 68: ...time it was cleared No No data is erased This is the default Usi n g t h e Read T ag Opt i on Use the Read Tag menu option to read the data of an encoded RFID tag Place the encoded RFID tag over the r...

Page 69: ...Prompt Example COPY LABEL1 FMT COM1 Transmits a file called LABEL1 FMT to COM1 COPY LABEL1 BCH COM1 Transmits a batch called LABEL1 BCH to COM1 If you use the COPY command to download your formats se...

Page 70: ...flash memory that contains all fixed data 1 Design the format to be saved in flash memory using the Packet Reference Manual or using label creation software 2 Format flash memory Any formats graphics...

Page 71: ...Packet Reference Manual on our Web site Option Choices Default Version Firmware Serial Number Board ID Wireless RFID 1 RFID 2 Easy Setup NA Supply Quality NA NA Password No Yes No Factor y S et P ass...

Page 72: ...s the optional external reader Easy Setup View the database version number for the RFID inlay database d46ESXX db Check our web site for updates See Updating the RFID Inlay Database for more informati...

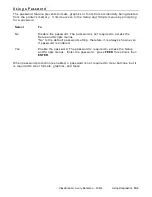
Page 73: ...d Select To No Disable the password The password is not required to access the Setup and Scripts menus No is the default password setting therefore it is always shown even if password is enabled Yes E...

Page 74: ...10 4 System Administrator s Guide Classification Avery Dennison Public...

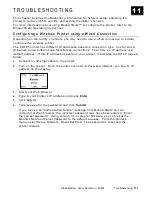
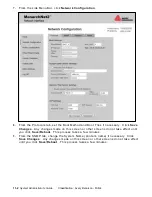
Page 75: ...different one for wireless connections The 169 x x x IP address is a default address If this IP address appears on your printer it indicates the DHCP request failed 1 Connect an ethernet cable to the...

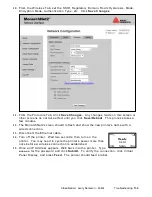
Page 76: ...s if necessary Click Save Changes Any changes made on this screen or other screens do not take effect until you click Save Reboot This process takes a few minutes 9 From the SNMP tab change the System...

Page 77: ...t This process takes a few minutes 12 The MonarchNet2 screen should refresh and show the new printer s name with a wired connection 13 Disconnect the Ethernet cable 14 Turn off the printer Wait two se...

Page 78: ...rinter and store the packet in the wireless module N5 name Packet name 0 to 8 characters enclose within quotation marks is the default C1 C Append data C2 con_comds Console commands Must be enclosed w...

Page 79: ...n mode to 128 WEP C set en key 2 Sets WEP key 2 to use C set en keyval 123456abcdef1 Sets WEP key 2 value to 123456abcdef1 C set en authtype open Sets authentication type to open C set en id fnlname S...

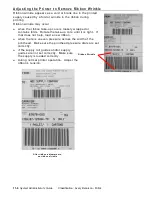
Page 80: ...he ribbon take up core is loosely wrapped or contains folds Rotate the take up core until it is tight If that does not help load a new ribbon when there is uneven pressure across the width of the prin...

Page 81: ...sification Avery Dennison Public Troubleshooting 11 7 About the Ribbon s Take up Reel Rotate the take up reel until the ribbon is tight under the printhead and no wrinkles are visible Ribbon Take up R...

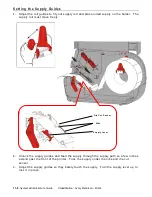
Page 82: ...led supply on the holder The supply roll must move freely 2 Unlock the supply guides and feed the supply through the supply path so a few inches extend past the front of the printer Tuck the supply un...

Page 83: ...thermal transfer supply with a 4 inch wide ribbon 2 Set the printhead pressure dials to an equal setting 3 Loosen the locking screw on the end of the ribbon take up guide set the guide at the nominal...

Page 84: ...11 10 System Administrator s Guide Classification Avery Dennison Public...

Page 85: ...Classification Avery Dennison Public Specifications Accessories A 1 S P E C I F I C AT I O N S A C C E S S O R I E S For printer and supply specifications refer to the Operator s Handbook A...

Page 86: ...mm maximum Thickness 5 6 to 14 mils String Loop Length 0 63 inches 15 8mm minimum 1 5 inches 38 mm maximum String Orientation Facing operator Wind Direction Face out Cab l e Pi no ut s The following...

Page 87: ...D Encode and Verify not available with peel mode 300 dpi printhead ADK script programming for special applications Shi p pi ng t h e Pr i nt er If you need to ship the printer to a different location...

Page 88: ...A 4 System Administrator s Guide Classification Avery Dennison Public...

Page 89: ...No Image Error Ignore Config Ignore BchCtl Error Retry Adjust Length Sleep Delay LCD Contrast Ignore Fmt s Temp G Buffer Network MAC Address IP Address Subnet Mask IP Gateway Boot Method Wireless Rese...

Page 90: ...B 2 System Administrator s Guide Classification Avery Dennison Public...

Page 91: ...d is converted for use in Monarch RFID supplies tags Inlays can be made with different types of transponders interrogator The electronics module that programs the RFID inlays through the antenna LCD D...

Page 92: ...upply is loaded or needs to be loaded in the printer Located in the supply path supplies Labels and tags used for printing TID The Transponder Identification Number which contains the chip type featur...

Page 93: ......
Page 94: ...Avery Dennison Printer Systems Division 170 Monarch Lane Miamisburg OH 45342 Printer Documentation http rbis averydennison com ADTP1 US CA...

Reviews: