background image

20


INSTALLATION


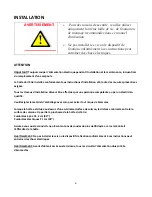
WARNING


  For safety reason, please use only the same size of 

fixing or mounting screws as recommended in this 
instruction manual. 


Failure to install the screws or unit in accordance with 
these instructions may result in electrical hazards.


Important!


Always


switch


off


the


main


power


supply


during


installation


and


maintenance


(ex


:


light


bulb


replacement).


The


cooker


hood


must


be


installed


in


accordance


with


the


installation


instructions


and


all


measurements


followed.


All


installation


work


must


be


carried


out


by


a


competent


person


or


qualified


electrician.


Please


dispose


of


the


packing


material


carefully.


Children


are


vulnerable


to


it.


When


the


hood


is


located


above


an


appliance,


the


minimum


distance


between


the


cooking


surface


for


the


lowest


part


of


the


hood


must


be:


For


Gas


range:


76.2


cm


(30’’)


For


Electric


range:


71


cm


(28’’)


Make


sure


the


ducting


has


no


bends


sharper


than


90


degrees


as


this


will


reduce


the


efficiency


of


the


hood.


Warning:


Failure


to


install


the


unit


in


accordance


with


these


instructions


may


result


in


electrical


hazards


Warning:


Before


accessing


terminals,


all


supply


circuits


must


be


disconnected.


Summary of Contents for AVF-306PS

Page 1: ...ATION GUIDE USE AND CARE MANUAL NOTE Installateur Laissez ce manuel au propriétaire Propriétaire Conservez ce guide pour référence ultérieure Installer Leave this manual with the homeowner Homeowner Keep this guide for future reference R29032019 IMPORTANT Lire et conserver ces instructions Read and save these instructions ...

Page 2: ...COMMENCER L INSTALLATION DE L APPAREIL DOIT RESPECTER TOUS LES CODES EN VIGUEUR IMPORTANT Conservez ces instructions afin de pouvoir les remettre à l inspecteur électricien de votre région INSTALLATEUR Veuillez laisser ces instructions avec l appareil pour le propriétaire PROPRIÉTAIRE Veuillez conserver ces instructions pour pouvoir vous y référer plus tard AVERTISSEMENT DE SÉCURITÉ Coupez l alime...

Page 3: ...he accidentelle Si le panneau électrique ne peut pas être verrouillé fixez y un avertissement bien en évidence telle qu une étiquette de couleur vive Les travaux d installation et de raccordement électriques doivent être effectués par une personne qualifiée conformément aux codes et aux standards de construction incluant ceux concernant la protection contre les incendies Une quantité d air adéquat...

Page 4: ...if ou que vous cuisinez des mets flambés par ex Crêpes Suzette Cerises jubilées Steaks au poivre flambés etc Ne pas laisser la graisse s accumuler sur le ventilateur les filtres ou les conduits d évacuation AVERTISSEMENT AFIN D ÉVITER TOUT RISQUE DE BLESSURES LORS D UN FEU DE CUISINIÈRE SUIVEZ CES DIRECTIVES Étouffez les flammes avec un couvercle hermétique une tôle à biscuits ou un plateau métall...

Page 5: ...es ou un manque d expérience et de connaissances que si elles sont supervisées et que les mesures de sécurité sont respectées Le nettoyage et la maintenance de l utilisateur ne doivent pas être effectués par des enfants Attention L appareil et ses parties accessibles peuvent chauffer pendant le fonctionnement Veillez à ne pas toucher les éléments chauffants Les enfants doivent rester éloignée à mo...

Page 6: ...installation doivent être effectués par une personne compétente ou par un électricien qualifié Veuillez jeter le matériel d emballage avec soin pour éviter tout risque de blessures Lorsque la hotte est située au dessus d une cuisinière surface de cuisson la distance minimale entre la la surface de cuisson et la partie la plus basse de la hotte doit être Cuisinières à gaz 76 2 cm 30 Cuisinières éle...

Page 7: ...large de 28 x 10 730 x 275 mm Image 1 Assurez vous que vous avez un espace de 1 4 35mm au pourtour du trou pour supporter la hotte lorsqu elle y sera déposée 3 Ouvrez le panneau de verre et retirer les filtres en aluminiums 4 Installer la hotte dans le cabinet pousser sur les ancrages extérieurs et serrer les vis dans le sens des aiguilles d une montre IMAGE 1 IMAGE 2 IMAGE 3 IMAGE 4 IMAGE 5 ...

Page 8: ...8 5 Installez le tuyau d évacuation sur la sortie et diriger le vers l extérieur Voir image 6 Image 6 ...

Page 9: ...en marche le rétroéclairage s éteindra le moteur s éteint et la hotte retourne en mode veille 2 2 Les lumières peuvent s allumer sans toucher au bouton de mise en marche 3 boutons des lampes Appuyer sur le rétroéclairage et les lumières s allumeront Appuyez une seconde fois et le tout s éteint 4 Boutons de gradation de vitesse 4 1Appuyer sur le rétroéclairage s allume et la hotte fonctionne à bass...

Page 10: ...élai Le bouton de délai fonctionne seulement lorsque le moteur et les lumières sont en fonction Le délai maximum de programmation est de 5 minutes et peut être répété plusieurs fois Quand le temps est écoulé les lumières et la hotte s éteignent complètement Lorsqu un délai est programmé si vous modifiez la vitesse du ventilateur le minuteur recalculera le temps de fonctionnement automatiquement ...

Page 11: ...otte 2 Appuyez sur le bouton de la poignée du filtre 3 Relâchez la poignée une fois que le filtre est en position neutre et bien aligné 4 Répétez cette procédure pour installer tous les filtres REMPLACEMENT DES LAMPES DEL Note Avant de changer les unités DEL assurez vous que l appareil est débranché Protégez vos mains en portant des gants pour éviter des blessures FILTRE ...

Page 12: ...s vis qui retiennent le panneau et le cabinet 5 Déconnecter le fil de la lampe et le fil de commutation 6 Retirez complètement le panneau avant puis à l aide d un tournevis retirer les vis du support de montage 7 Poussez la lampe DEL hors de la cavité du support de montage 8 Remplacez l unité DEL DEL 1 5W max Le code ILCOS D de cette lampe est DSS 1 5 65 S 120 33 Puissance maximale 2x1 5W Modules ...

Page 13: ...ns contactez les autorités locales ou régionales NOTE Les prochaines étapes démontrent comment réduire l impact environnemental par exemple la consommation d énergie du processus de cuisson 1 Installez la hotte dans un endroit approprié où la ventilation est efficace 2 Nettoyez la hotte régulièrement pour éviter le blocage de la circulation d air 3 N oubliez pas d éteindre la lumière de la hotte a...

Page 14: ...otifs de rayures disgracieuses SURFACE DU PANNEAU DE COMMANDE Les insertions du panneau de commande peuvent être nettoyées avec de l eau chaude savonneuse Assurez vous que le chiffon est propre et bien essoré avant le nettoyage Utilisez un chiffon doux et sec pour éliminer tout excès d humidité restant après le nettoyage IMPORTANT Utilisez des détergents neutres et évitez d utiliser des produits d...

Page 15: ...n scellés Enlever le clapet anti retour et scellés le avec du mastic Fuite du raccordement de la cheminée et du couvercle Descendre la cheminée et scellez adéquatement Lumières ne fonctionnent pas Lampes DEL défectueuses et ou brisées Remplacer les lampes DEL tel que stipulé dans ce manuel Aspiration insuffisante La distance entre la hotte et la surface de cuisson est trop élevée Replacez la hotte...

Page 16: ... ne s applique pas en cas d une mauvaise installation de mauvaise utilisation de négligence d incendie ou autres causes extérieures d altérations réparation non conforme ou encore d un usage commercial Pour contacter notre département après vente et ou de service Lundi au vendredi de 8h 30 à 16h 30 heure de l est Tel 450 963 1303 Sans frais 1 888 651 2534 Fax 450 963 8985 Site internet courriel ww...

Page 17: ...RUCTIONS BEFORE YOU BEGIN INSTALLATION OF THE UNIT MUST RESPECT ALL BUILDING CODES IMPORTANT Keep these instructions in order to provide them to the electrical inspector in your area INSTALLER Please leave these instructions with the owner of the unit OWNER Keep these instructions for future reference SECURITY WARNING Turn off the power circuit in the electrical panel and lock the front panel befo...

Page 18: ...ent power from being switched on accidentally If the service disconnecting means cannot be locked securely fasten a noticeable warning device such as a tag to the service panel Installation work and electrical wiring must be done by a qualified person in accordance with all applicable codes standards including fire rated construction Sufficient air is needed for proper combustion and exhausting of...

Page 19: ...mbéing food i e Crepes Suzette Cherries Jubilee Flambés etc Do not let grease accumulate on fan or filters WARNING TO REDUCE THE RISK OF INJURY TO PERSONS IN THE EVENT OF A COOKTOP GREASE FIRE OBSERVE THE FOLLOWING Smother flames with a close fitting lid cookie sheet or metal tray and then turn off the burner If the flames do not go out immediately EVACUATE AND CALL THE FIRE DEPARTMENT Never pick ...

Page 20: ...urements followed All installation work must be carried out by a competent person or qualified electrician Please dispose of the packing material carefully Children are vulnerable to it When the hood is located above an appliance the minimum distance between the cooking surface for the lowest part of the hood must be For Gas range 76 2 cm 30 For Electric range 71 cm 28 Make sure the ducting has no...

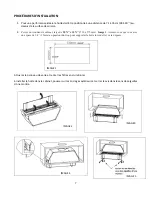
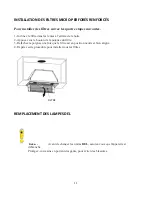
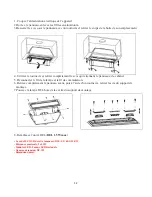
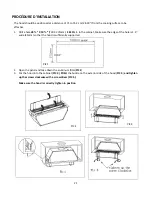
Page 21: ...n the cabinet Make sure the edge of the hole is 1 4 wide 35mm so that the hood is sufficiently supported 2 Open the panel and take down the aluminum filter PIC 2 3 Put the hood into the cabinet PIC 3 PUSH the buckle on the exterior side of the hood PIC 4 and tighten up the screws clockwise with a screwdriver PIC 5 Make sure the hood is correctly tighten in position PIC1 PIC 2 PIC 3 ...

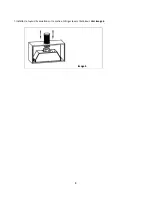
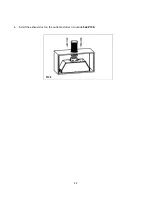
Page 22: ...22 4 Install the exhaust duct on the outlet and direct it outside See PIC 6 PIC 6 ...

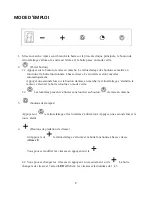
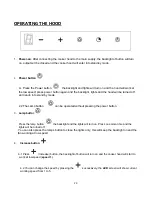
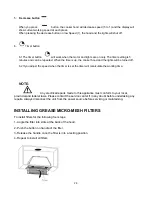
Page 23: ...n into stand by mode 2 2 The Lamp button can be operated without pressing the power button 3 Lamp button Press the lamp button the backlight and the lights will turn on Press one more time and the lights will be turned off You can also press the lamps button to close the lights only this will keep the backlight on and the fan working at low speed 4 Increase button 4 1 Press increase button the bac...

Page 24: ...f 6 2 If you adjust the speed when the timer is set the timer will recalculate the working time NOTE Any electrical repairs made to this appliance must conform to your local provincial and federal laws Please contact the service center if in any doubt before undertaking any repairs Always disconnect the unit from the power source before servicing or maintaining INSTALLING GREASE MICRO MESH FILTERS...

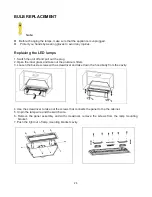
Page 25: ...pen the inner glass and take out the aluminum filters 3 Loosen the buckle screws with a screwdriver and take down the hood body from the cavity 4 Use the screwdriver to take out the screws that connects the panel to the the cabinet 5 Unpin the lamp wire and the switch wire 6 Remove the panel assembly and with screwdriver remove the screws from the lamp mounting bracket 7 Push the light out of lamp...

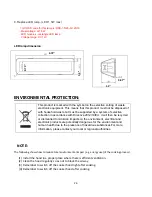
Page 26: ...U It will then be recycled or dismantled to minimize impacts on the environment electrical and electronic products are potentially dangerous for the environment and human health due to the presence of hazardous substances For more information please contact your local or regional authorities NOTE The following shows how to reduce total environmental impact e g energy use of the cooking process 1 I...

Page 27: ...med when the appliance is unused Avoid leaving alkaline or acid substances lemon juice vinegar etc on the surfaces STAINLESS STEEL The stainless steel surface must be cleaned regularly e g weekly to ensure long life expectancy Dry with a clean soft cloth A stainless steel cleaning product fluid may be used NOTE Ensure that wiping follows the grain of the stainless steel to prevent any unsightly sc...

Page 28: ...iled Contact service center Light does not work motor does not work House fuses blown Reset Replace fuses Power cord loose or disconnected Refit cord to power outlet Switch power outlet on Oil leakage No return valve and the outlet are not tightly sealed Take down the no return valve and seal with sealant Leakage from the connection of chimney and cover Take chimney down and seal Lights not workin...

Page 29: ... any repair and or replacement parts This limited warranty is not subject to improper installation accident misuse neglect fire or other external causes alterations repair or commercial use You can contact our After Sales Service Department from Monday through Friday 8h30 to 16h30 Eastern STD Time Tel 450 963 1303 Toll free 1 888 651 2534 Fax 450 963 8985 Web E mail www agiservice ca customer agin...

Reviews: