2. INSTALLATION INSTRUCTIONS (continued)
INSTALLING THE HOOD
WARNING
WHEN CUTTING OR DRILLING INTO WALL, DO NOT DAMAGE ELECTRICAL WIRING AND OTHER HIDDEN UTILITIES.
WHEN BUILDING FRAMEWORK, ALWAYS FOLLOW ALL APPLICABLE CONSTRUCTION CODES AND STANDARDS
.
IMPORTANT:
MAKE SURE THAT THE HOLES LOCATIONS ARE LEVEL AND CORRECTLY CENTERED WITH THE
VERTICAL CENTERLINE (THIS INSTALLATION INSTRUCTION APPLIES FOR CONCRETE WALL).
WARNING
DUE TO THE WEIGHT AND SIZE OF THE HOOD TWO (2) PEOPLE ARE REQUIRED TO LIFT AND POSITION THE HOOD
ONTO THE MOUNTING BRACKET.
WARNING
BE CAREFUL WHEN INSTALLING THE DECORATIVE CHIMNEY AND HOOD AS THEY MAY HAVE SHARP EDGES.
CAUTION
DO NOT REMOVE THE PROTECTIVE PLASTIC FILM COVERING THE DECORATIVE CHIMNEY AT THIS STAGE.
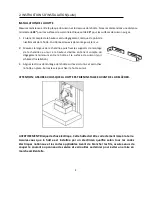
INSTALLATION
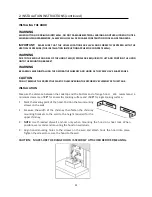
Measure the distance between the cooktop and the bottom end of range hood. We recommend a
minimum clearance of 28” for an electric cooking surface and of 30” for a gas cooking surface.
1.
Mark the leveling point of the hood. Position the two mounting
screws on the wall.
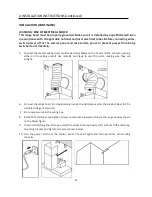
2.
Measure the width of the chimney then fasten the chimney
mounting brackets to the wall to the height required for the
upper chimney.
3.
NOTE: Use threaded drywall anchors only when mounting the hood on sheet rock. When
possible, we recommend mounting the hood on wall studs.
4.
Align hood-mounting holes to the screws on the wall and attach hook the hood into place.
Tighten the screws to secure the hood to the wall.
CAUTION: MAKE SURE THE RANGE HOOD IS SECURELY ATTACHED BEFORE RELEASING.
22


