background image


MAINTENANCE 


SAFETY WARNING: NEVER PUT YOUR HAND INTO AREA HOUSING THE FAN   


For optimal operation, clean range hood, surfaces and filters regularly. Regular care will help preserve the 

appearance of the range hood.  


CLEANING 


THE EXTERIOR SURFACES 


Clean periodically with hot soapy water and clean cotton cloth. Do not use corrosive or abrasive detergent 

or steel wool pads, which will scratch and damage the stainless steel surface. For heavier soil, use a liquid 
degreasing cleaner. Use a stainless steel cleaner to clean the surface of the hood. Avoid getting cleaning 
solution onto or into the control panel.  Follow directions of the stainless steel cleaner.   


CAUTION   


USE SOFT TOWEL TO WIPE OFF THE CLEANING SOLUTION, GENTLY RUB OFF ANY STUBBORN SPOTS.  USE DRY SOFT 


TOWEL TO DRY THE HOOD.  ALWAYS SCRUB LIGHTLY WITH CLEAN COTTON CLOTH AND IN THE DIRECTION OF THE


GRAIN.  


DO NOT ALLOW DEPOSITS TO ACCUMULATE OR REMAIN ON THE HOOD.  DO NOT USE ORDINARY STEEL WOOL OR 


STEEL BRUSHES.  SMALL BITS OF STEEL MAY ADHERE TO THE SURFACE AND CAUSE RUSTING.


DO NOT ALLOW SALT SOLUTIONS, DISINFECTANTS, BLEACHES OR CLEANING COMPOUNDS TO REMAIN IN CONTACT 

WITH STAINLESS STEEL FOR EXTENDED PERIODS.  MANY OF THESE COMPOUNDS CONTAIN CHEMICALS, WHICH MAY 

BE HARMFUL. RINSE WITH WATER AND WIPE DRY WITH A CLEAN CLOTH. 
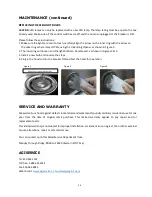


CLEANING THE GREASE 


FILTER   

The filters are intended to filter out residue and grease from cooking and are required to be kept clean. 

Filters should be cleaned after every 30 hours of use (or once a month, depending on use). Remove and 
clean by hand in soapy water or in the dishwasher. Dry filters and re-install.


If cleaning the filters in the 

dishwasher, use a non-phosphate detergent. The use of detergent with phosphate may cause discoloration 
of the filters, but will not affect their performance. This discoloration is not covered by the warranty.  


REPLACING THE FILTER


S  

If filters wear out due to prolonged use, please contact your service/parts provider for replacement filters.


NOTE: 

ALSO REPLACE DAMAGED FILTER THAT IS BENT, HAS PUNCTURED OR BROKEN MESH OR BROKEN FRAME. 


CLEANING THE STAINLESS STEEL SURFACE  

Regularly wash surface with dry cloth or clean cloth soaked in warm water and mild soap or liquid dish 

detergent.  Always clean following the grain.  Always rinse thoroughly with clear water (2-3 times) and wipe 
dry completely.  Specially designed stainless steel cleaners can also be used.  
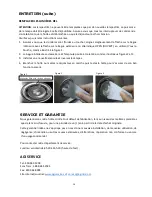
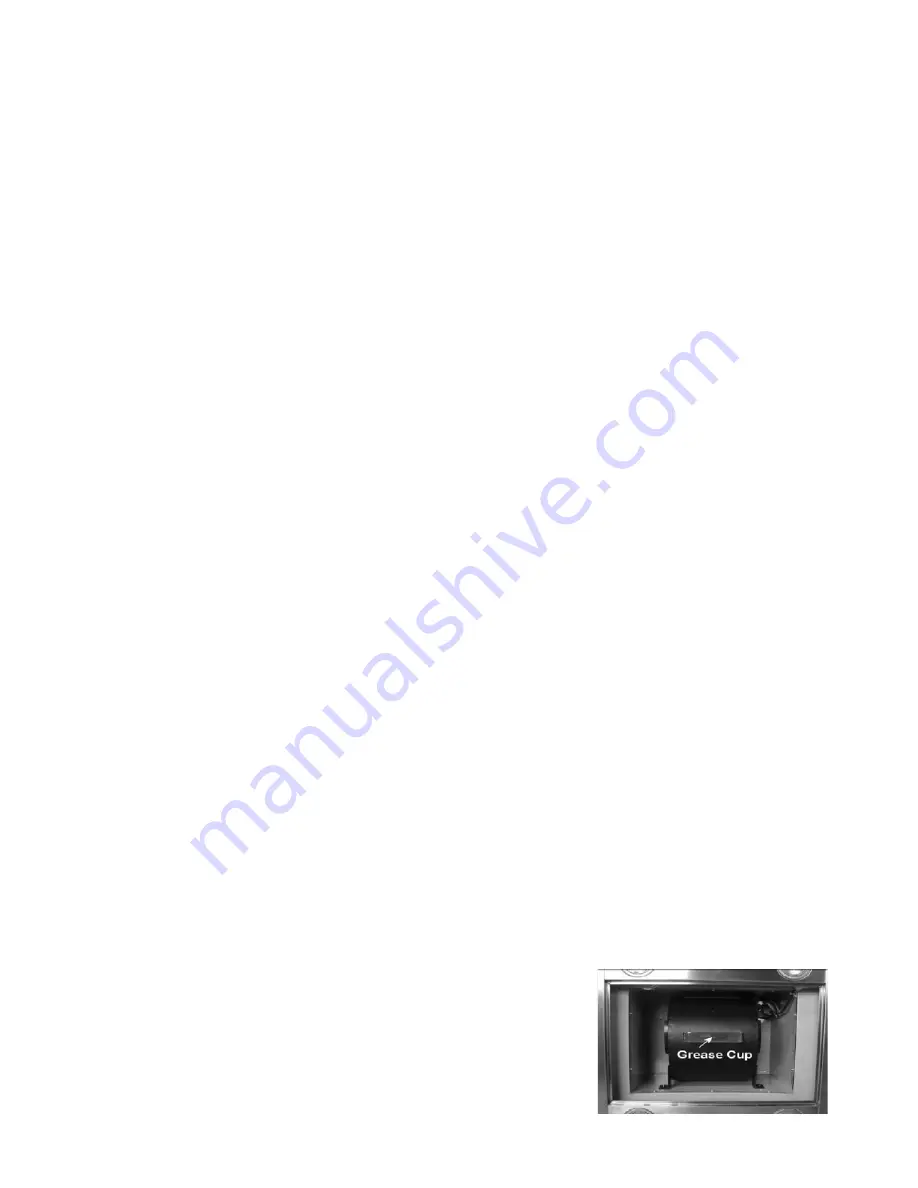
  

GREASE CUP   


Take good care of installing the grease cup correctly and to empty 
it and clean it on a regular basis.   


25


Summary of Contents for AVI-369IS IDAHO

Page 1: ...LLATION GUIDE USE AND CARE MANUAL IMPORTANT Lire et conserver ces instructions Read and save these instructions NOTE Installateur Laissez ce guide au propriétaire Propriétaire Conservez ce guide pour référence ultérieure Installer Leave this guide with the homeowner Homeowner keep this guide for future reference ...

Page 2: ... APPAREIL DOIT RESPECTER TOUS LES CODES EN VIGUEUR IMPORTANT Conservez ces instructions afin de pouvoir les remettre à l inspecteur électricien de votre région INSTALLATEUR Veuillez laisser ces instructions avec l appareil pour le propriétaire PROPRIÉTAIRE Veuillez conserver ces instructions pour pouvoir vous y référer ultérieurement AVERTISSEMENT DE SÉCURITÉ Coupez l alimentation du circuit dans ...

Page 3: ...e panneau électrique ne peut pas être verrouillé y fixer un avertissement bien en évidence telle qu une étiquette de couleur vive Les travaux d installation et de raccordement électriques doivent être effectués par une personne qualifiée conformément aux codes et aux standards de construction incluant ceux concernant la protection contre les incendies Une quantité d air adéquate est requise afin d...

Page 4: ...ivre flambés etc Nettoyez régulièrement les palmes des roues de circulation d air du ventilateur Ne pas laisser la graisse s accumuler sur le ventilateur les filtres ou les conduits d évacuation Utilisez le bon format de casserole Utilisez toujours des casseroles et des ustensiles appropriés à la dimension de la surface chauffante AVERTISSEMENT AFIN D ÉVITER TOUT RISQUE DE BLESSURES LORS D UN FEU ...

Page 5: ... protection Perceuse électrique Tournevis Phillips tête étoilée Tournevis à tête plate Marteau Clé à molette Pinces à bec Ciseaux pour couper le ruban à conduits Ruban pour conduits Marqueur ou crayon Niveau Ruban à mesurer PIÈCES INCLUSES Clapet Accumulateur de gras DIMENSIONS 5 A D F E B C ...

Page 6: ... dans une prise de courant à 3 brins 120V 60Hz correctement installée et mise à la terre Si l alimentation électrique ne répond pas aux exigences consultez un électricien avant de continuer Le câblage électrique doit être le plus près possible de l emplacement d installation La hotte doit être raccordée au câblage électrique de la maison conformément aux normes et codes nationaux et locaux MUR ENC...

Page 7: ...emplacement Trouvez l axe central en ligne avec la surface de cuisson Planifiez le circuit d évacuation vers l extérieur Planifiez le parcours le plus court et le plus rectiligne possible et utilisez aussi peu de coudes que possible Trop de coudes et de transitions réduiront la performance de la hotte Des conduits plus grands peuvent être nécessaires lors d une canalisation plus longue Installez u...

Page 8: ...n cordon équipé d un câble de mise à la terre avec fiche de mise à la terre Installez l alimentation électrique dans l espace couvert par la cheminée Positionnez la prise électrique de sorte à ce que le cordon d alimentation n interfère pas avec le conduit rond et s assurer qu elle n interfère pas avec l emplacement de fixation d un support de montage INSTALLATION DU SUPPORT DE MONTAGE AVERTISSEME...

Page 9: ...s à vis les angles intérieurs ajustez et marquez chaque extension pour obtenir la bonne hauteur pour que la hotte puisse être suffisamment éloignée de la table de cuisson 3 Fixez l extension du cadre de support sur le cadre de support inférieur à l aide de quatre boulons B et d écrous C comme indiqué sur la figure 3 Répétez cette étape pour le reste des extensions du cadre de support IMPORTANT Tou...

Page 10: ...s E à deux boulons D en le montant par le dessous de la hotte Répétez cette étape pour fixer l autre côté en utilisant deux écrous E et deux boulons D 10 Après avoir fixé solidement les quatre boulons D et les quatre écrous E raccordez l extrémité inférieure du tube du conduit à la hotte et faites glisser le couvercle inférieur de la cheminée vers le bas avec précaution afin qu il repose sur le de...

Page 11: ...umérique de délai Indique la durée de temps restant pour la fonction délai d arrêt Contrôles Rappel automatique de nettoyage Cette hotte est équipée d un rappel de nettoyage qui s active après 30 heures d utilisation Lorsque le ventilateur commence à tourner le temps de fonctionnement cumulé est affiché dans la minuterie numérique de délai Cette icône clignotera lorsque 30 heures d utilisation se ...

Page 12: ...eur est en marche appuyez sur le bouton Marche Arrêt et maintenez le enfoncé pendant plus de 3 secondes pour activer le délai L indicateur de délai d arrêt s allumera et l indicateur numérique de délai d arrêt commencera le compte à rebours quand il atteindra zéro le ventilateur s arrêtera Réglage de la lumière Appuyez une fois sur la touche Lumière pour allumer les lumières et encore une fois pou...

Page 13: ...héant rincez à l eau après l exposition et essuyez avec un chiffon propre NETTOYER LES FILTRES Les filtres à graisses doivent être nettoyés une fois par mois Pour les retirer poussez sur le loquet de métal et désengagez le de la hotte Basculez le filtre vers le bas puis le retirer Pour le nettoyage des filtres utilisez une solution d eau chaude additionnée de détergent doux Laissez les sécher puis...

Page 14: ... 3 3 Installez une nouvelle ampoule et inversez les étapes 4 Branchez la hotte ou mettez le disjoncteur en marche puis testez la hotte pour s assurer de son bon fonctionnement SERVICE ET GARANTIE Nous garantissons notre hotte contre tout défaut de fabrication tant au niveau des matières premières que de la main d œuvre pour une période de un 1 an à partir de la date d achat originale Cette garanti...

Page 15: ...OU BEGIN INSTALLATION OF THE UNIT MUST RESPECT ALL CODES IMPORTANT Keep these instructions in order to provide them to the electrical inspector in your area INSTALLER Please leave these instructions with the owner of the unit OWNER Keep these instructions for future reference SECURITY WARNING Turn off the power circuit in the electrical panel and lock the front panel before connecting the wires of...

Page 16: ...ock the panel to prevent power from being switched on accidentally If the service panel cannot be locked securely fasten a noticeable warning device such as a tag to the service panel Installation work and electrical wiring must be done by a qualified person in accordance with all applicable national and local codes and standards including fire rated construction Sufficient air is needed for prope...

Page 17: ...ies Jubilee Flambés etc Clean the unit s surfaces frequently Grease can accumulate on fan or filters Use proper pan size Always use cookware appropriate for the size of the surface element WARNING TO REDUCE THE RISK OF INJURY TO PERSONS IN THE EVENT OF A COOKTOP GREASE FIRE OBSERVE THE FOLLOWING Smother flames with a close fitting lid cookie sheet or metal tray and then turn off the burner If the ...

Page 18: ... gloves and goggles Needle nose pliers Electrical drill Scissors to cut duct tape Phillips screwdriver Duct tape Flathead screwdriver Marker or pencil Hammer Level Adjustable wrench Measuring tape Sheet metal sheers PARTS INCLUDED Flapper Oil cup DIMENSIONS B A D F E C 18 ...

Page 19: ...VIDED IN ALL TYPES OF INSTALLATIONS IF MOUNTING ON DRY WALL THE HOOD MUST BE SECURED TO A HORIZONTAL SUPPORT PREPARING THE INSTALLATION For evacuation toward the exterior only For domestic use only Do not use to evacuate dangerous or explosives fumes or materials Option 1 Vertical venting Option 2 Horizontal venting Determine the exact location of the vent hood Mark the location Find the centerlin...

Page 20: ...equipped with a cord having a grounding wire with a grounding plug Set the electrical power supply within the space covered by the decorative chimney Position the outlet offset so that the power cord will not interfere with the round duct Make sure this does not interfere with a mounting bracket fastening area or with the decorative chimney where the chimney touches the wall INSTALLING THE UNIT WA...

Page 21: ...of the support frames adjust and mark each support frame extension as necessary to achieve the proper height for the range hood to be set away from the cook top 3 Fasten the support frame extension onto the lower support frame using four B bolts and C nuts as it is shown in Figure 3 Repeat this step for rest of the support frame extensions IMPORTANT Always use first and second holes on the support...

Page 22: ... the range hood 9 Mount the hood to the lower support frame using four D bolts and four E nuts Securely fasten two E nuts to two D bolts by reaching up from the underside of the hood Repeat this step to secure the other side using two E nuts to two D bolts 10 After all four D bolts and four E nuts securely fastened connect the lower end of the duct tube to the hood and slide the lower chimney cove...

Page 23: ...30 hours of use When blower motor starts to rotate cumulative running time will be shown in Power On Elapsed Digital Timer This timer icon flashes when 30 hours of usage is up and reminds user to clean the aluminum filter After cleaning the filter and when the motor is not in use press and hold Increase button over 3 seconds to reset the timer Please note that turning off the system will not reset...

Page 24: ... and Power off delay digital timer will begin to countdown when it reaches zero the blower will shut down Adjusting the light Press Light button once to turn on the lights and once again to turn off the lights While the lights are off press and hold Light button for over 3 seconds to adjust the lights to desired intensity Level of brightness will be stored in the system s memory CAUTION DO NOT tou...

Page 25: ...EEL FOR EXTENDED PERIODS MANY OF THESE COMPOUNDS CONTAIN CHEMICALS WHICH MAY BE HARMFUL RINSE WITH WATER AND WIPE DRY WITH A CLEAN CLOTH CLEANING THE GREASE FILTER The filters are intended to filter out residue and grease from cooking and are required to be kept clean Filters should be cleaned after every 30 hours of use or once a month depending on use Remove and clean by hand in soapy water or i...

Page 26: ...b and reverse the steps 4 Plug in the hood or turn the breaker ON and test the hood for operation SERVICE AND WARRANTY We warrant our hood against defects in materials and workmanship under ordinary residential use for one year from the date of original retail purchase This limited warranty applies to any repair and or replacement parts This limited warranty is not subject to improper installation...

Reviews: