background image


2. INSTALLATION INSTRUCTIONS (continued) 

 
ELECTRICAL INSTALLATION 


WARNING 


THIS  RANGE  HOOD  MUST  BE  PROPERLY  GROUNDED.  TURN  OFF  ELECTRICAL  POWER  AT  SERVICE 
ENTRANCE BEFORE WIRING. MAKE SURE THAT THE ELECTRIC CORD IS NOT IN CONTACT WITH THE 
SHARP EDGES OF THE APPLIANCE. 


IMPROPER  GROUNDING  CAN  RESULT  IN  A  RISK  OF  ELECTRIC  SHOCK.  CONSULT  A  QUALIFIED 
ELECTRICIAN IF THE GROUNDING INSTRUCTIONS ARE NOT COMPLETELY UNDERSTOOD OR IF DOUBT 
EXISTS  AS  TO  WHETHER  THE  APPLIANCE  IS  PROPERLY  GROUNDED.    DO  NOT  USE  AN  EXTENSION 
CORD.  IF  THE  POWER  SUPPLY  CORD  IS  TOO  SHORT,  HAVE  A  QUALIFIED  ELECTRICIAN  INSTALL  AN 
OUTLET NEAR THE APPLIANCE. 


RISK OF ELECTRIC SHOCK. THIS APPLIANCE MUST BE GROUNDED.   


In the event of an electrical short circuit, grounding reduces the risk of electric shock by providing 
an escape wire for the electric current. This appliance is equipped with a cord having a grounding 
wire with a grounding plug. The plug must be connected to an independent outlet that is properly 
installed and grounded. 


A 110-120-volt, 60 Hz, AC-only, fused electrical supply is required on a separate 15-amp circuit, 
fused on both sides of the line. 


Do not ground to a gas pipe. 


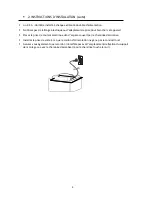
The range hood should be connected directly to the fused disconnect (or circuit breaker) box 
through flexible armored or non-metallic sheathed copper cable. A U.L. - or C.S.A. - listed strain 
relief must be provided at each end of the power supply cable. Do not use extension cord or 
adapter plug with this appliance. 


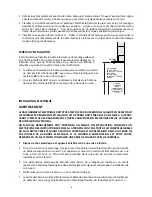
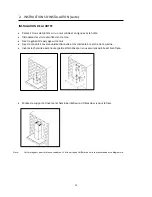
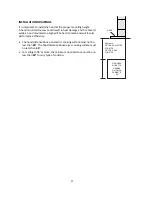
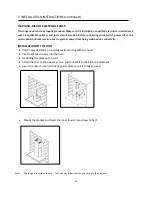
Set the electrical power supply within the space covered by the decorative chimney. 


Position the outlet offset so that the power cord will not interfere with the round duct. 


Make sure this does not interfere with a mounting bracket fastening area or with the decorative 
chimney (where the chimney touches the wall).


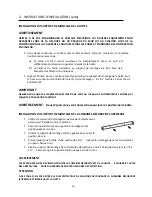
IMPORTANT 


It is the customer’s responsibility, t

o contact a qualified electrical installer. Please make assure that 

the electrical installation is adequate and is conform with National Electrical Code, ANSI/ NFPA 70  — 
latest edition*, or CSA Standards C22. 1-94, Canadian Electrical Code, Part 1 and C22. 2 No. 0-M91 - 
latest edition** and all local codes and ordinances 


22 

Summary of Contents for AVL-306CBS

Page 1: ...opriétaire Propriétaire Conserver ce guide pour référence ultérieure Installer Leave this guide with the homeowner Homeowner Keep this guide for future reference 26012020MC IMPORTANT Lire et conserver ces instructions Read and save these instructions Hotte murale Mistral Mistral Wall mounted range hood Model Modèle AVL 306CBS ...

Page 2: ...TABLE DES MATIÈRES 1 MESURES DE SÉCURITÉ IMPORTANTES 3 4 2 INSTRUCTIONS D INSTALLATION 5 10 3 MODE D EMPLOI 11 4 ENTRETIEN 12 5 SERVICE ET GARANTIE 13 2 ...

Page 3: ...fixer un avertissement en évidence telle qu une étiquette de couleur vive Les travaux d installation et de raccordement électrique doivent être effectués par une personne qualifiée conformément aux codes et aux standards de construction incluant ceux concernant la protection contre les incendies Une quantité d air adéquate est requise afin d assurer une bonne combustion et l évacuation des gaz par...

Page 4: ...rises jubilées steaks au poivre flambés etc Nettoyez régulièrement la surface de la hotte Ne pas laisser la graisse s accumuler sur le ventilateur les filtres ou les conduits d évacuation Utilisez le bon format de casserole Servez vous toujours de casseroles et d ustensiles appropriés à la dimension de la surface chauffante AVERTISSEMENT AFIN D ÉVITER TOUT RISQUE DE BLESSURES LORS D UN FEU DE CUIS...

Page 5: ... ailleurs être incomplets et ou changer sans préavis Besoin d assistance technique 1 888 651 2534 A Hauteur du plancher au plafond variable B Hauteur du plancher au comptoir standard 36 C Hauteur recommandée entre la surface de cuisson et le dessous de la hotte 28 à 30 D Hauteur de la hotte 2 E Hauteur de la cheminée 2 x 21 65 Installation Sortie Top 6 round 5 ...

Page 6: ...é AVANT D INSTALLER LA HOTTE Pour un échappement d air plus efficace nous recommandons une installation le plus rectiligne possible et d utiliser aussi peu de coudes que possible Évacuez l air à l extérieur seulement Ne pas évacuer l air dans des espaces restreints comme l intérieur des murs plafond grenier faux plafond ou garage À cause du poids et de la dimension de la hotte deux ou plusieurs pe...

Page 7: ... LES TYPES D INSTALLATION EN CAS DE MONTAGE SUR CLOISON SÈCHE GYPSE LA HOTTE DOIT ÊTRE SÉCURISÉE PAR DES SOLIVES VERTICALES EN BOIS DANS LE MUR OU PAR UN SUPPORT HORIZONTAL 2 INSTRUCTIONS D INSTALLATION PRÉPARATION Pour une utilisation à l intérieur seulement Pour usage domestique seulement Ne pas utiliser pour évacuer des vapeurs ou des matières dangereuses ou explosives Pour une meilleure évacua...

Page 8: ...EFFECTUÉ PAR DU PERSONNEL QUALIFIÉ EN RESPECTANT LES NORMES ET RÈGLEMENTS EN VIGUEUR CET APPAREIL DOIT ÊTRE RELIÉ À UNE MISE À LA TERRE AVANT D EFFECTUER LE BRANCHEMENT COUPEZ L ALIMENTATION ÉLECTRIQUE DEPUIS LE TABLEAU DE DISTRIBUTION PRINCIPAL UN MAUVAIS BRANCHEMENT PEUT ENTRAÎNER UN RISQUE D ÉLECTROCUTION CONSULTEZ UN ÉLECTRICIEN SI LES INSTRUCTIONS DE MISE À LA TERRE NE SONT PAS TOUT À FAIT CO...

Page 9: ...our brancher cet appareil Placez la prise de courant électrique dans l espace couvert par la cheminée décorative Installez la prise de sorte à ce que le cordon d alimentation ne gêne pas le conduit rond Assurez vous également que le cordon n interfère pas avec l emplacement de fixation du support de montage ou avec la cheminée décorative là où la cheminée touche le mur 9 ...

Page 10: ...surez vous que les emplacements des trous sont au niveau et correctement centrés par rapport à l axe central vertical AVERTISSEMENT Deux 2 personnes sont nécessaires pour lever et positionner la hotte INSTALLATION DU SUPPORT DE MONTAGE DE LA CHEMINÉE DÉCORATIVE SUPÉRIEURE Centrez le support de montage au dessus de l emplacement prévu puis l installer contre le plafond S assurer que les fentes du s...

Page 11: ...e perçage sur le mur Fixez le conduit à la valve unidirectionnelle et raccordez le à la sortie de la cuisine Insérez la cheminée extérieure partie alternative en vous assurant qu elle est bien fixée Montez le support et insérez la cheminée intérieure Utilisez des vis pour le fixer Note Cette image est pour référence seulement Votre unité peut différer de celle représentée dans ce diagramme 11 ...

Page 12: ...ugmenter la vitesse jusqu à atteindre la vitesse désirée Vitesse basse utilisée pour la friture légère mijoter Vitesse moyenne utilisées pour la friture moyenne cuisson au wok ébullition Vitesse élevée utilisée pour forte ébullition griller friture intense cuisson au wok ADJUSTER LE RÉGLAGE DE LA MINUTERIE Cette touche est utilisée pour régler l heure qui est affichée dans un cycle de 24 heures Po...

Page 13: ... pas laisser de solutions salines de désinfectants ou d agents de blanchiment en contact avec l acier inoxydable Plusieurs de ces composés contiennent des produits chimiques qui peuvent être dangereux Dans le cas échéant rincez à l eau après l exposition et essuyez avec un chiffon propre NETTOYER LES FILTRES Les filtres à graisses doivent être nettoyés après chaque période d usage de 30 heures ou ...

Page 14: ...e boîtier de la lumière et la hotte soulevez délicatement le boîtier de la lumière et recherchez l attache métallique Pressez sur l attache métallique et retirez la lumière Débranchez le câble d alimentation et jetez la lumière usagée Inversez les étapes pour installer une nouvelle lumière au DEL Allumez le disjoncteur et la hotte pour tester le fonctionnement 5 SERVICE ET GARANTIE Nous garantisso...

Page 15: ...TABLE OF CONTENTS 1 IMPORTANT SAFETY MEASURES 16 17 2 INSTALLATION INSTRUCTIONS 18 24 3 OPERATING THE HOOD 25 4 MAINTENANCE 26 5 SERVICE AND WARRANTY 27 ...

Page 16: ... on accidentally If the service disconnecting means cannot be locked securely fasten a noticeable warning device such as a tag to the service panel Installation work and electrical wiring must be done by a qualified person in accordance with all applicable codes standards including fire rated construction Sufficient air is needed for proper combustion and exhausting of gases through the chimney fo...

Page 17: ...es Suzette Cherries Jubilee Flambés etc Clean the unit s surfaces frequently Grease can accumulate on fan or filters Use proper pan size Always use cookware appropriate for the size of the surface element WARNING To reduce the risk of injury to persons in the event of a range top grease fire observe the following guidelines Smother flames with a close fitting lid cookie sheet or metal tray and the...

Page 18: ...be incomplete and or may change without notice Need technical support 1 888 651 2534 A Floor to ceiling height variable B Floor to counter top height standard 36 C Recommended height between cooking surface and bottom of the hood 28 to 30 D Hood height 2 E Chimney height 2x 21 65 18 Installation Duct transition Hood Top 6 round ...

Page 19: ...r or pencil Level Measuring tape The equipment may differ or may not be entirely used depending on the product type installed BEFORE INSTALLING THE HOOD For the most efficient airflow exhaust use a straight run or as few elbows as possible Vent unit to the outside only Two 2 people are required for installation Remove the range hood from the carton packaging and place on a flat surface for assembl...

Page 20: ... of 28 above an electric cooking surface and a minimum of 30 above a gas cooking surface if the instructions for installation of the gas hob specify a greater distance this has to be taken into account The exhaust air must not be discharged into a chimney which is used for exhausting fumes from other appliances that burn gas or other fuels Determine the exact location of the vent hood Mark the loc...

Page 21: ...ach and will lose its performance efficiency The hood distance above an electric cooking surface must not be less than 28 The hood distance above a gas cooking surface must no less than 30 For ceilings of 9 or more the minimum hood distance must be no less than 30 for any type of cooktop Clearance 28 FOR AN ELECTRIC COOKTOP 30 FOR A GAS COOKTOP STANDARD HEIGHT OF A RANGE OR LOWER CABINET IS 36 HOO...

Page 22: ...operly installed and grounded A 110 120 volt 60 Hz AC only fused electrical supply is required on a separate 15 amp circuit fused on both sides of the line Do not ground to a gas pipe The range hood should be connected directly to the fused disconnect or circuit breaker box through flexible armored or non metallic sheathed copper cable A U L or C S A listed strain relief must be provided at each e...

Page 23: ...TIVE PLASTIC FILM COVERING THE DECORATIVE CHIMNEY AT THIS STAGE INSTALLING THE UPPER CHIMNEY MOUNTING BRACKET Measure the distance between the cooktop and the bottom end of range hood We recommend a minimum clearance of 28 for an electric cooking surface and of 30 for a gas cooking surface 1 Mark the leveling point of the hood Position the two mounting screws on the wall 2 Measure the width of the...

Page 24: ...prevent power from being switched on accidentally INSTALLATION OF THE UNIT Drill 2 holes of 0 8mm on a sturdy wall and inline with the hood Insert expended screws into the hole Fix drilling template on the wall Attach the duct to the one way valve and connect it to the kitchen outlet vent Insert the outer funnel alternative part make sure it is firmly secured Mount the bracket and insert the inner...

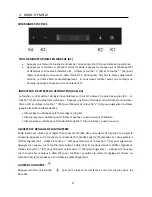
Page 25: ...ase and the plus button K4 to increase the speed until desired speed is attained Low speed used for light frying low cooking Medium speed used for frying wok cooking boiling High speed used for heavy boiling grilling intensive frying wok cooking ADJUSTING THE TIMER SETTING This button is used to set time and time is displayed in a 24 hour cycle To set the timer press the timer button K1 for four 4...

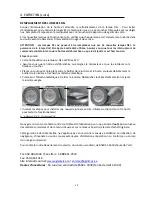
Page 26: ...eel brushes Small bits of steel may adhere to the surface and cause rusting Do not allow salt solutions disinfectants bleaches or cleaning compounds to remain in contact with stainless steel for extended periods Many of these compounds contain chemicals which may be harmful Rinse with water after exposure and wipe dry with a clean cloth CLEANING GREASE FILTER The filters will eliminate vapors and ...

Page 27: ...dy gently pry up the light housing and search for the metal clip Apply force to the metal clip and pull out the light fixture Disconnect the power cable and discard the used light fixture Reverse the steps to install a new LED light fixture Turn the breaker or hood ON to test for operation 5 SERVICE AND WARRANTY We warrant our hood under ordinary residential use for one 1 year against defects in m...

Reviews: