background image

19 


WARNING:  

TO REDUCE THE RISK OF FIRE, USE ONLY METAL DUCTWORK. 

 
WARNING

: TO REDUCE THE RISK OF A RANGE TOP GREASE FIRE


Never leave a range unattended.  


Boilovers  cause  smoking  and  greasy  spillovers  that  may  ignite.  Heat  oils  slowly  on  low  or 
medium setting. 


Always turn hood ON when cooking at high heat or when flambéing food (i.e. Crepes Suzette, 
Cherries Jubilee, Flambés, etc. …). 


Do not let grease accumulate on fan or filters. 


WARNING

:  TO REDUCE THE RISK OF INJURY TO PERSONS, IN THE EVENT OF A COOKTOP 

GREASE FIRE, OBSERVE THE FOLLOWING: 


Smother flames with a close-fitting lid, cookie sheet, or metal tray, and then turn off the burner.  


If the flames do not go out immediately, EVACUATE AND CALL THE FIRE DEPARTMENT. 


Never pick up a flaming pan - you may BURN YOURSELF


DO NOT USE WATER, including wet dishcloths or towels - a violent steam explosion will result. 


Use an extinguisher ONLY if: 

A.


You know you have a class ABC extinguisher, and you already know how to operate 
it. 

B.


The fire is small and contained in the area where it started. 

C.


The fire department has been called. 

D.


You can fight the fire with your back to an exit.  


Always cover the pans when cooking with a gas stove. 


When the unit is operating, the air in the room is eliminated by the hood. Please make sure that 
appropriate ventilation measures are observed. The hood eliminates the smells in the room, but 
not steam. 


This hood is designed for domestic use only. 


If the supply cord is damaged have it replaced by the manufacturer, its service agent or a 
qualified electrician. 


This unit should only be used by children 8 years and over and persons with physical, sensory or 
mental capabilities, reduced or a lack of experience and knowledge unless they are supervised 
and security measures are followed. 


CAUTION : The appliance and its components can become hot during operation.  


Frequently clean your unit using the method described in the Care and Maintenance section. 


For safety reason, only use only the same size of fixing or mounting screws as recommended in this 
instruction manual. 


Summary of Contents for AVP286PPS

Page 1: ...INSTALLATION GUIDE USE AND CARE MANUAL NOTE Installateur Laissez ce manuel au propriétaire Propriétaire Conservez ce guide pour référence ultérieure Installer Leave this manual with the homeowner Homeowner Keep this guide for future reference IMPORTANT Lire et conserver ces instructions Read and save these instructions 21 04 2021MC R27042021MC ...

Page 2: ...2 Table des matières 1 MESURES DE SÉCURITÉ IMPORTANTES 3 5 2 INSTRUCTIONS D INSTALLATION 6 11 3 MODE D EMPLOI 12 13 4 MISE AU REBUT 13 5 ENTRETIEN 13 14 6 DEPANNAGE 15 7 GARANTIE 16 ...

Page 3: ...er sa remise en marche accidentelle Si le panneau électrique ne peut pas être verrouillé fixez y un avertissement bien en évidence telle qu une étiquette de couleur vive Les travaux d installation et de raccordement électriques doivent être effectués par une personne qualifiée conformément aux codes et aux standards de construction incluant ceux concernant la protection contre les incendies Une qu...

Page 4: ... sur le ventilateur les filtres ou les conduits d évacuation AVERTISSEMENT AFIN D ÉVITER TOUT RISQUE DE BLESSURES LORS D UN FEU DE CUISINIÈRE SUIVEZ CES DIRECTIVES Étouffez les flammes avec un couvercle hermétique une tôle à biscuits ou un plateau métallique et ensuite éteindre le brûleur Si les flammes ne s éteignent pas immédiatement ÉVACUEZ LES LIEUX ET APPELEZ LES POMPIERS Ne prenez jamais une...

Page 5: ...e si elles sont supervisées et que les mesures de sécurité sont respectées ATTENTION L appareil et ses composantes peuvent devenir chauds pendant le fonctionnement Nettoyez périodiquement votre appareil en suivant la méthode décrite dans le chapitre ENTRETIEN ET NETTOYAGE Pour des raisons de sécurité veuillez utiliser uniquement la même taille de vis de fixation ou de montage que recommandée dans ...

Page 6: ...ransitions réduiront la performance de la hotte Des conduits plus grands peuvent être nécessaires lors d une canalisation plus longue Installez un capuchon de toit ou de mur Reliez le conduit de métal au capuchon puis acheminez le conduit jusqu à l emplacement de la hotte Scellez les joints avec du ruban adhésif de métal de 2 pouces de largeur Option 1 AVERTISSEMENT Pour des raisons de sécurité ve...

Page 7: ... réduirait l efficacité de la hotte AVERTISSEMENT NE PAS INSTALLER LES VIS OU LE DISPOSITIF DE FIXATION CONFORMÉMENT À CES INSTRUCTIONS PEUT ENTRAÎNER DES CHOCS ÉLECTRIQUES AVERTISSEMENT AVANT D OBTENIR ACCÈS AUX TERMINAUX TOUS LES CIRCUITS D ALIMENTATION DOIVENT ÊTRE DÉCONNECTÉS AVERTISSEMENT CET APPAREIL DOIT ÊTRE CORRECTEMENT MIS À LA TERRE Cette hotte doit être branchée dans une prise de coura...

Page 8: ...E DOIT ÊTRE EFFECTUÉ PAR DU PERSONNEL QUALIFIÉ EN RESPECTANT LES NORMES ET RÈGLEMENTS EN VIGUEUR CET APPAREIL DOIT ÊTRE RELIÉ À UNE MISE À LA TERRE AVANT D EFFECTUER LE BRANCHEMENT COUPEZ L ALIMENTATION ÉLECTRIQUE DEPUIS LE TABLEAU DE DISTRIBUTION PRINCIPAL UN MAUVAIS BRANCHEMENT PEUT ENTRAÎNER UN RISQUE D ÉLECTROCUTION CONSULTEZ UN ÉLECTRICIEN SI LES INSTRUCTIONS DE MISE À LA TERRE NE SONT PAS TO...

Page 9: ...u dans le cabinet large de 26 9 16 x 17 675 X 430mm Assurez vous que vous gardez un espace de 1 4 35mm au pourtour du trou pour supporter la hotte lorsqu elle y sera installée Modèle AVP3410PPS Percez un trou de 32 7 8 x 17 835mm x 430mm Assurez vous que vous gardez un espace de 1 4 35mm au pourtour du trou pour supporter la hotte lorsqu elle y sera installée 3 Enlever les filtres ...

Page 10: ...se des aiguilles d une montre et ajustez le support à la bonne hauteur selon l épaisseur de la planche 5 Placez la hotte dans l armoire APPUYEZ la boucle sur le côté extérieur de la hotte et serrez l écrou à papillons à la main dans le sens des aiguilles d une montre ...

Page 11: ... 1 888 651 2534 A Hauteur du plancher au plafond variable B Hauteur du plancher au comptoir standard 36 C Hauteur recommandée entre la surface de cuisson et le dessous de la hotte 28 à 30 D Hauteur de la hotte incluant transition et boîte électrique 14 1 8 E Hauteur de la cheminée N A Installation Sortie Haut 6 Rond Du lundi au vendredi de 8h30 à 16h30 HNE Dimensions AVP286PPS AVP3410PPS AVP286PPS...

Page 12: ...e vitesse Grillade friture intense et cuisson au Wok AJUSTER LA VITESSE Appuyez sur le bouton de mise en marche pour mettre l appareil sous tension Appuyez sur les différents boutons de vitesses pour augmenter ou diminuer la vitesse L écran d affichage inscrit quelle vitesse est en cours d utilisation MODE D ARRÊT AUTOMATIQUE Lorsque la hotte est en fonction appuyer sur le bouton de mise en marche...

Page 13: ...Ne pas utiliser d agent de rinçage REMPLACEMENT DES LAMPES NOTE Avant de changer les lampes assurez vous que l appareil est débranché Protégez vos mains en portant des gants pour éviter des blessures IMPORTANT L ampoule peut être remplacée par le fabricant son revendeur ou un technicien qualifié Toujours couper l alimentation électrique avant d effectuer toute opération sur l appareil Protégez vos...

Page 14: ... la santé humaine étant donné la présence de substances dangereuses Pour plus d informations contactez vos autorités locales ou régionales NOTE Les prochaines étapes démontrent comment réduire l impact environnemental par exemple la consommation d énergie du processus de cuisson 1 Installez la hotte dans un endroit approprié où la ventilation est efficace 2 Nettoyez la hotte régulièrement pour évi...

Page 15: ...lisez un chiffon doux et sec pour éliminer tout excès d humidité restant après le nettoyage ACIER INOXYDABLE La surface d acier inoxydable doit être nettoyé régulièrement normalement hebdomadairement pour en assurer une plus longue durée Sécher avec un chiffon doux propre en suivant le grain Un liquide de nettoyage pour acier inoxydable peut être utilisé IMPORTANT Lors du nettoyage utiliser des dé...

Page 16: ...son est trop élevée Replacez la hotte à distance recommandée Hotte inclinée Les vis de fixation ne sont pas bien serrées Serrez les vis correctement jusqu à l alignement de la hotte ATTENTION Toute réparation électrique de cet appareil doit être effectuée conformément aux lois locales provinciales et fédérales En cas de doute veuillez contacter le service à la clientèle avant d entreprendre toute ...

Page 17: ...Table of content 1 IMPORTANT SAFETY INSTRUCTIONS 18 19 2 INSTALLATION INSTRUCTIONS 20 25 3 OPERATING THE HOOD 26 27 4 ENVIRONMENTAL PROTECTION 27 5 CARE MAINTENANCE 27 28 6 TROUBLESHOOTING 29 7 WARRANTY 30 ...

Page 18: ... such as a tag to the service panel Installation work and electrical wiring must be done by a qualified person in accordance with all applicable codes standards including fire rated construction Sufficient air is needed for proper combustion and exhausting of gases through the chimney chimney of fuel burning equipment to prevent back drafting Follow the heating equipment manufacturer s guideline a...

Page 19: ...isher and you already know how to operate it B The fire is small and contained in the area where it started C The fire department has been called D You can fight the fire with your back to an exit Always cover the pans when cooking with a gas stove When the unit is operating the air in the room is eliminated by the hood Please make sure that appropriate ventilation measures are observed The hood e...

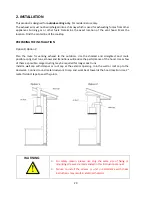
Page 20: ...ghtest duct route possible Long duct runs elbows and transitions will reduce the performance of the hood Use as few of them as possible Larger ducting may be required for longer duct runs Install a wall cap with damper or roof cap at the exterior opening Join the wall or roof cap to the ductwork Connect round metal ductwork to cap and work back towards the hood location Use 2 metal foil duct tape ...

Page 21: ...or as few elbows as possible Vent unit to the outside only To reduce risk of fire and to properly exhaust air be sure to duct air outside do not vent exhaust air into spaces within walls ceilings attics crawl spaces and or garages Two 2 persons may be necessary to securely lift and position the hood Remove the range hood from the carton packaging and place on a flat surface for assembly CAUTION TH...

Page 22: ...LY GROUNDED TURN OFF ELECTRICAL POWER AT SERVICE ENTRANCE BEFORE WIRING CHECK TO MAKE SURE THAT THE ELECTRIC CHORD IS NOT IN CONTACT WITH THE SHARP EDGES OF THE APPLIANCE IMPROPER GROUNDING CAN RESULT IN A RISK OF ELECTRIC SHOCK CONSULT A QUALIFIED ELECTRICIAN IF THE GROUNDING INSTRUCTIONS ARE NOT COMPLETELY UNDERSTOOD OR IF THERE IS DOUBT AS TO WHETHER THE APPLIANCE IS PROPERLY GROUNDED DO NOT US...

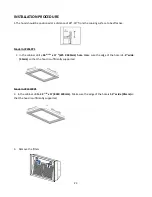
Page 23: ...VP286PPS 2 In the cabinet drill a 26 9 16 x 17 675 X 430mm hole Make sure the edge of the hole is 1 4 wide 35mm so that the hood is sufficiently supported Model AVP3410PPS 2 In the cabinet drill a 32 7 8 x 17 835X 430mm Make sure the edge of the hole is 1 4 wide 35mm so that the hood is sufficiently supported 3 Remove the filters ...

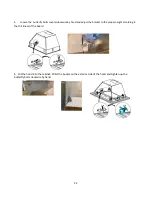
Page 24: ...terclockwise by hand and adjust the bracket to the proper height according to the thickness of the board 5 Put the hood into the cabinet PUSH the buckle on the exterior side of the hood and tighten up the butterfly bolts clockwise by hand ...

Page 25: ...888 651 2534 A Floor to ceiling height variable B Floor to counter top height standard 36 C Recommended height between cooking surface and bottom of the hood 28 to 30 D Hood height including transition height 4 16 E Cabinet height N A Installation Duct transition Monday to Friday from 8h30 to 16h30 EST Dimensions AVP286PPS AVP3410PPS top 6 Round AVP286PPS Haut 6 Rond AVP3410PPS top 10 round ...

Page 26: ... frying and wok cooking Controls Adjusting the blower motor speed Press Power button once to turn on the system Press the speed buttons to increased or decreased speed The Blower Speed Indicator shows the blower motor speed level from 1 to 4 quietest to strongest Adjusting the timer function Turn the hood on at any speed Press the Power Off Delay button on off button to enter timer mode A 3 flashe...

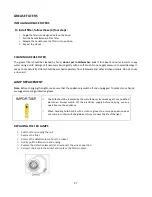
Page 27: ...a rinse aid LAMP REPLACEMENT Note Before changing the lights make sure that the appliance is switch off and unplugged To protect your hands we suggest wearing protective gloves IMPORTANT The bulb should be replaced by the manufacturer its service agent or a qualified electrician Always switch off the electricity supply before carrying out any operations on the appliance When handling bulb hold it ...

Page 28: ...not disassemble the appliance The appliance should not be serviced by the user At the end of its life the appliance should not be disposed with household waste Check with you Local Authority or retailer for recycling information 5 CARE AND MAINTENANCE CAUTION Before maintenance or cleaning is carried out the hood should be disconnected from the main power supply Ensure that the hood is switched of...

Page 29: ...a fan switch position Fan switch failed Contact service center Motor failed Contact service center Light does not work motor does not work House fuses blown Reset Replace fuses Power cord loose or disconnected Refit cord to power outlet Switch power outlet on Oil leakage Examine valve outlet verify that are tightly sealed Take down the check valve and seal with sealant Leakage from exhaust duct an...

Page 30: ...parts This limited warranty is not subject to improper installation accident misuse neglect fire or other external causes natural disasters alterations repair or commercial use For inquiries regarding warranty and or service please contact the service department at 1 888 651 2534 toll free or For Montreal surroundings 450 963 6710 or by email to service agintl qc ca Opening hours From Monday to Fr...

Reviews: