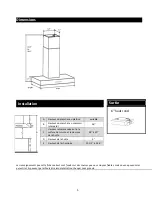
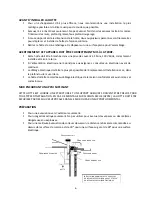
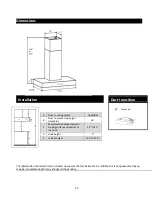
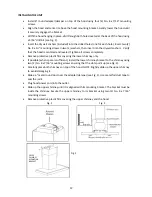
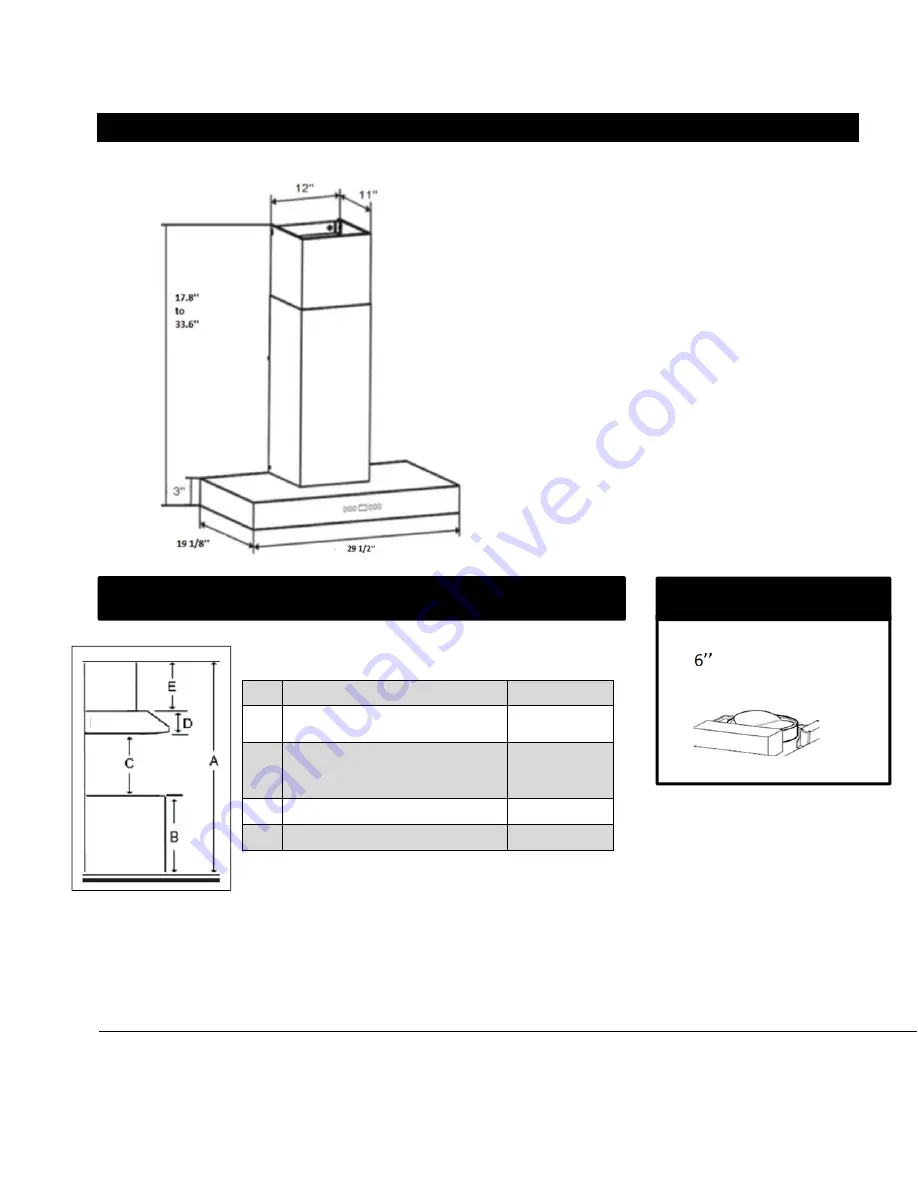
background image


Dimensions


The


information


contained


herein


is


based


on


sources


that


we


believe


to


be


reliable,


but


is


not


guaranteed


by


us,


may


be


incomplete


and/or


may


change


without


notice

.


A


Floor


to


ceiling


height


VARIABLE


B


Floor


to


counter


top


height


(standard)


36’’


C


Recommended


height


between


cooking


surface


and


bottom


of


the


hood


28’’


to


30’’


D


Hood


height


3’’


E


Cabinet


height


20


½


to


33.6’’


Installation


Duct


transition

hood


15

Top


round


Summary of Contents for LOUISIANA AVL-306CS2

Page 1: ...LLATION GUIDE USE AND CARE MANUAL Installateur Laissez ce manuel au propriétaire Propriétaire Conservez ce guide pour référence ultérieure Installer Leave this manual with the homeowner Homeowner Keep this guide for future reference R 26 11 2018 MCT IMPORTANT Lire et conserver ces instructions Read and save these instructions ...

Page 2: ...IONS AU COMPLET AVANT DE COMMENCER L INSTALLATION DE L APPAREIL DOIT RESPECTER TOUS LES CODES FÉDÉRAUX ET LOCAUX EN VIGUEUR IMPORTANT Conservez ces instructions afin de pouvoir les remettre à l inspecteur électricien de votre région AVERTISSEMENT DE SÉCURITÉ Coupez l alimentation du circuit dans le panneau électrique et verrouillez le panneau avant de raccorder les fils de cet appareil Exigence 12...

Page 3: ...vent être effectués par une personne qualifiée conformément aux codes et aux standards de construction incluant ceux concernant la protection contre les incendies Une quantité d air adéquate est requise afin d assurer une bonne combustion et l évacuation des gaz par la cheminée dans le cas des équipements alimentés au gaz afin de prévenir les retours de cheminée Conformez vous aux instructions et ...

Page 4: ...ilée Tournevis à tête plate Marteau Clé à molette Pinces à bec Ciseaux pour couper du ruban pour conduit Ruban pour conduits Marqueur ou crayon Niveau Ruban à mesurer PIÈCES INCLUSES Type A Pour feuille de gypse Longueur 1 3 5 Qté 4 pièces Type B Pour connecter à type A Longueur 1 3 10 Qté 4 pièces Type C Pour transition Longueur 1 2 Qté 66 pièces 4 ...

Page 5: ...r et ils peuvent par ailleurs être incomplets et ou changer sans préavis A Hauteur du plancher au plafond variable B Hauteur du plancher au comptoir standard 36 C Hauteur recommandée entre la surface de cuisson et le dessous de la hotte 28 à 30 D Hauteur de la hotte 3 E Hauteur de la cheminée 20 1 2 à 33 6 Installation Sortie 6 haut rond 5 ...

Page 6: ...ue doit être le plus près possible de l emplacement d installation et ce dans le plafond ou le mur arrière La hotte doit être raccordée au câblage électrique de la maison conformément aux normes et codes locaux MUR ENCADRANT UN APPUI SUFFISANT CETTE HOTTE EST LOURDE UNE STRUCTURE ET UN SUPPORT ADÉQUATS DOIVENT ÊTRE PRÉVUS POUR TOUS TYPES D INSTALLATION EN CAS DE MONTAGE SUR CLOISON SÈCHE GYPSE LA ...

Page 7: ...ATION ÉLECTRIQUE AVERTISSEMENT LE RACCORDEMENT ÉLECTRIQUE DOIT ÊTRE EFFECTUÉ PAR UN PERSONNEL QUALIFIÉ EN RESPECTANT LES NORMES ET RÈGLEMENTS EN VIGUEUR CET APPAREIL DOIT ÊTRE RELIÉ À UNE MISE À LA TERRE AVANT D EFFECTUER LE BRANCHEMENT COUPEZ L ALIMENTATION ÉLECTRIQUE DEPUIS LE TABLEAU DE DISTRIBUTION ÉLECTRIQUE PRINCIPAL UN MAUVAIS BRANCHEMENT PEUT ENTRAÎNER UN RISQUE D ÉLECTROCUTION CONSULTEZ U...

Page 8: ... Après la finition du mur centrez et mettez au niveau le support de montage de la hotte puis le fixez au cadre mural à l aide de trois 3 vis de montage N 8 x 1 fournies Bien serrer les vis 8 ...

Page 9: ...hotte est centrée et à niveau Serrez complètement lesvis Retirez le film protecteur de plastique recouvrant la cheminée décorativeinférieure Si possible lorsque l espace le permet assemblez le support de montage de la cheminée décorative supérieure à celui ci à l aide de deux 2 vis de montage N 8 x 7 16 en vous assurant que les fentes soient placées vers le haut voir Fig 3 Placez avec soin déposer...

Page 10: ...s trois 3 dernières secondes du temps réglé la hotte émet trois sons Dans les 60 secondes qui suivent le mode de délai touchez ce bouton et la hotte quittera le mode délai 60 secondes C BOUTON Lorsqu en mode veille appuyez une fois sur la touche et la hotte démarre à la vitesse F1 Touchez à nouveau ce bouton pour garder la même vitesse En mode travail touchez ce bouton pour diminuer les vitesses d...

Page 11: ...filtre vers le bas puis le retirer Pour le nettoyage des filtres utilisez une solution d eau chaude additionnée de détergent doux Laissez sécher puis réinstallez Les filtres sont également lavables au lave vaisselle Si vous nettoyez les filtres au lave vaisselle utilisez un détergent sans phosphate L utilisation d un détergent avec phosphate pourrait entraîner une décoloration des filtres mais san...

Page 12: ...CTIONS 14 19 OPERATING THE HOOD 20 MAINTENANCE 21 SERVICE AND WARRANTY 21 APPROVED FOR RESIDENTIAL TYPE DEVICES FOR RESIDENTIAL USE ONLY Security warning Turn off the power circuit in the electrical panel and lock the front panel before connecting the wires of this unit ...

Page 13: ...ion work and electrical wiring must be done by a qualified person in accordance with all applicable codes standards including Fire rated construction Sufficient air is needed for proper combustion and exhausting of gases through the chimney chimney of fuel burning equipment to prevent back drafting Follow the heating equipment manufacturer s guideline and safety standards such as those published b...

Page 14: ...ewdriver Hammer Adjustable wrench Sheet metal sheers PARTS INCLUDED Needle nose pliers Scissors to cut duct tape Duct tape Marker or pencil Level Measuring tape Type A For sheet rock only Length 1 3 5 Qty 4 pcs Type B Connect to type A Length 1 3 10 Qty 4 pcs Type C For Ducting Transition Length 1 2 Qty 66 pcs 13 14 ...

Page 15: ...aranteed by us may be incomplete and or may change without notice A Floor to ceiling height VARIABLE B Floor to counter top height standard 36 C Recommended height between cooking surface and bottom of the hood 28 to 30 D Hood height 3 E Cabinet height 20 to 33 6 Installation Duct transition hood 15 Top round ...

Page 16: ...nstallations If mounting on dry wall the hood must be secured to vertical studs in the wall or to a horizontal support PREPARING THE INSTALLATION For safety and optimum performance the vent hood must be installed above the cooking surface at a minimum of 26 above an electric range and of 30 above a gas cooking range unless the instructions for installation of the gas hob specify a greater distance...

Page 17: ...TRUCTIONS ARE NOT COMPLETELY UNDERSTOOD OR IF THERE IS DOUBT AS TO WHETHER THE APPLIANCE IS PROPERLY GROUNDED DO NOT USE AN EXTENSION CORD IF THE POWER SUPPLY CORD IS TOO SHORT HAVE A QUALIFIED ELECTRICIAN INSTALL AN OUTLET NEAR THE APPLIANCE This appliance must be plugged into an outlet that is properly installed and grounded In the event of an electrical short circuit grounding reduces the risk ...

Page 18: ...INSTALLING THE HOOD MOUNTING BRACKET 18 ...

Page 19: ...Remove protective plastic film covering the lower chimney only If possible when space is sufficient install the lower chimney bracket to the chimney using two 2 No 8 x 7 16 mounting screws ensuring that the slots point up see Fig 3 Carefully place both chimneys on top of the hood NOTE Slightly slide up the upper chimney to avoid damaging it Slide a 6 metal round duct over the adapter damper see Fi...

Page 20: ...e DDD sounds Within 60 seconds of the delay mode touch this button and the hood will exit the 60 seconds delay mode C BUTTON In standby mode touch the button once and the range hood will start at F1 speed Touch this button again it will keep the same speed In working mode touching this button can decrease speeds from F5 to F1 D BUTTON In standby mode touch the button once and the range hood will s...

Page 21: ... and clean by hand in soapy water or in the dishwasher Dry filters and re install If cleaning the filters in the dishwasher use a non phosphate detergent The use of detergent with phosphate may cause discoloration of the filters but will not affect their performance This discoloration is not covered by the warranty REPLACING THE FILTERS If filters wear out due to prolonged use please contact your ...

Reviews: