background image

a

This document provides instructions for replacing the Avid Unity LANshare LP enclosure 
and the Avid MEDIArray LP enclosure. The replacement enclosure does not include the 16 
data drives (accessible from the front). You need to use the 16 data drives from the enclosure 
you are replacing. Depending on which enclosure you are replacing, the process might 
require you to swap the internal system drive and any optional adapter boards you might 
have installed. Avid recommends that you read all the information in this document 
thoroughly before replacing the enclosure.

You need to return your old enclosure to Avid using the packaging that came with the 
replacement enclosure. Specific return instructions are included with your replacement 
enclosure, and varies by location.

The replacement enclosure comes the Windows

®

 XP operating system installed. You have 

the followings options for getting the replacement enclosure operational. Procedures to 
support these options are included in this document.

Avid Unity LANshare LP Enclosures

If your Avid Unity LANshare LP enclosure has additional adapter boards installed, you 
need to move them from the old enclosure to the new. 

Move the internal system drive from your old enclosure into the new enclosure. Your 
Avid Unity software should run as it did before. If you are prompted for a Windows 
Product Key Certificate of Authenticity, use the number provided on the side of the new 
enclosure. The Avid Unity LANshare LP runs on the Windows 2003 operating system.

Install the data drives from your old enclosure into the new enclosure.

The Windows operating system is expected to detect a new system board and require 
you to Authenticate the operating system. Authenticate the Windows operating system 
using the new Windows Product Key Certificate of Authenticity provided with the new 
enclosure, and install your Avid Unity software version on the new enclosure. 

Avid Unity

 LANshare LP and 

Avid MEDIArray

 LP

Enclosure Replacement Procedure

Summary of Contents for Avid MEDIArray LP

Page 1: ...ng the replacement enclosure operational Procedures to support these options are included in this document Avid Unity LANshare LP Enclosures If your Avid Unity LANshare LP enclosure has additional ada...

Page 2: ...Data Drives 6 Remove the Enclosure From the Rack 7 Moving the Adapter Boards 9 Swapping the System Drive 10 Windows Product Key Certificate 13 Activating the Windows Operating System 13 Windows Activa...

Page 3: ...upported Slot Locations The following illustration represents the rear of the Avid Unity LANshare LP and Avid MEDIArray LP enclosure The table following the figure lists the standard and optional boar...

Page 4: ...This slot contains an Alacritech SEN2001XT gigabit Ethernet network controller board Use this network connection for your gigabit switch MEDIArray LP drive enclosure The ATTO CTFC 41XS adapter board...

Page 5: ...formation is needed see the Avid Unity LANshare LP Guide and Avid MEDIArray LP Setup Guide Disconnecting Cables Before removing the old Avid Unity enclosure from the rack you need to remove all the ca...

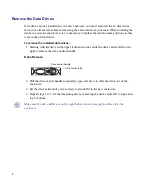
Page 6: ...rting with the drive in the upper left hand corner slide the drive carrier latch to the right to release the drive carrier handle Drive Release 2 Pull the drive carrier handle completely open and use...

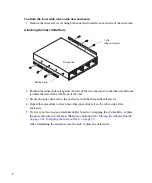
Page 7: ...nner rail is attached to the enclosure the other rail is attached to the rack Front Panel Screws 3 Press the plastic spring clip down on the inside of the slide rail on both sides of the enclosure Sep...

Page 8: ...t 3 Secure the inner slide rail to the enclosure with the three slide rail screws 4 Repeat this procedure to attach the other inner slide rail on the other side of the enclosure 5 If you are not movin...

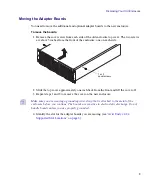
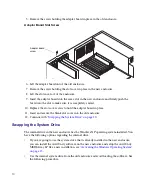
Page 9: ...2 Slide the top cover approximately one inch back from the front and lift the cover off 3 Repeat steps 1 and 2 to remove the cover on the new enclosure n Make sure you are wearing a grounding wrist st...

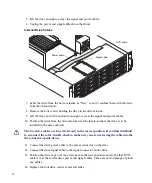
Page 10: ...sert and secure the blank slot cover into the old enclosure 12 Continue with Swapping the System Drive on page 10 Swapping the System Drive The internal drive in the new enclosure has the Windows XP o...

Page 11: ...ack from the front and lift the cover off 3 Repeat steps 1 and 2 to remove the cover on the new enclosure n Make sure you are wearing a grounding wrist strap that is attached to the metal of the enclo...

Page 12: ...e drive is to be installed in the new enclosure c The two drive cables are keyed to fit only in the correct position If you find it difficult to reconnect the cable double check to make sure you are n...

Page 13: ...s Product Key Certificate of Authenticity provided with the new enclosure Instructions for running the Product Recovery DVD are provided in the Avid Unity Setup Guides Activating the Windows Operating...

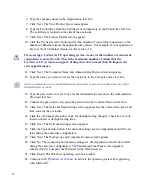
Page 14: ...ecommends you use an Administrator password to prevent unauthorized use of the Administrator account 13 Type the password you want to use for the Administrator account in the Administrator Password te...

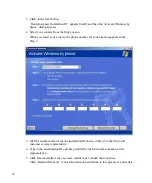
Page 15: ...er on the side of the enclosure n An Internet connection is not recommended in most Avid media networks These instructions explain how to activate the Windows operating system using the telephone If y...

Page 16: ...er for your location appears in the Step 2 5 Dial the number and provide the installation ID shown in Step 3 to the Microsoft customer service representative 6 Type in the confirmation ID number provi...

Page 17: ...roduct and are not available for all products For more information regarding Avid s service offerings visit www avid com support or call Avid Sales at 800 949 AVID 800 949 2843 Program availability an...

Page 18: ...gidesign Audio Engine Digidesign Intelligent Noise Reduction DigiDrive DigiLink DigiMeter DigiSerial Digital Nonlinear Accelerator DigiTranslator DINR DNxchange do more DVD Complete D Verb Eleven Equi...

Reviews: