background image

12

Where is the on/off switch on the Avid MEDIAswitch?

This switch is on the rear panel of the box.

I’m seeing some strange results with a port; sometimes the device and Avid MEDIAswitch
communicate and sometimes not.

Be sure that you have firmly attached the copper cable to the Avid  MEDIAswitch port and that
you’ve properly tightened both screws on either side of the cable connector. Otherwise, a loose
connection can cause sporadic results.
If you have an optical port, swap out the cable. Optical cables, if bent more than the
recommended radius (maximum radius is no more than 30 degrees), can break, causing sporadic
results. Bending can also add attenuation, which could result in signal loss. Also, an optical port
takes up to 10 and a half seconds to become fully operational. A marginally functioning optical
cable might cause a situation in which you will see an LED blinking pattern that starts after 10
seconds, then stops, then starts. This might be because the Avid  MEDIAswitch is recycling the
hardware, then starting to function, then quitting and recycling again. In this instance, swapping
out the optical cable is also recommended.

Summary of Contents for MEDIAswitch

Page 1: ...MEDIAswitch For MediaShare Fibre Channel ...

Page 2: ...Microsoft Windows NT 4 0 SLIP Configuration 14 Windows NT 4 0 SLIP Connection 18 Loop InSite Introduction 20 Product Overview 20 Features 20 Loop InSite Installation and Removal 21 Software Installation 21 Software Removal 21 Loop InSite Site View and Overview 22 Real Time Status of Fibre Channel Site 22 Color Coding Priorities and Indications 22 Loop InSite Front Panel Information Display 24 Pull...

Page 3: ...that connects to the MediaShare F C storage subsystem needs a MediaShare F C controller board This board allows the Avid system to mount the MediaShare F C drives and access the media files and other data stored on the drives in the MSDE through the MediaShare F C MEDIAswitch MediaShare F C Drive Enclosure The MediaShare F C drive enclosure holds the files channel drives that store data in the Med...

Page 4: ...e Channel environment stability MediaShare F C Cables MediaShare F C uses copper cables to connect the Avid systems and the MediaShare F C MSDEs to the MEDIAswitch Copper cables are fully shielded 75 ohm twin axial cables with the shield fully bonded to a DB 9 connector at each end They can be used when the distance from the Avid system to the hub or the hub to the MediaShare F C MSDEs does not ex...

Page 5: ...rear bracket to the rack channel with two 10 32 machine screws Mounting the Switch The switch has two mounting rails that slide over the rear brackets To install the switch 1 Position the switch so that the mounting rails slide over the extensions on the rear brackets 2 From the front of the rack slide the switch into the rack until the faceplate touches the rack front channel 3 Secure the switch ...

Page 6: ...with the thumbscrews on the cable connector Connecting MSDEs To connect the MSDEs to the switch 1 Locate the cables from two of the MSDEs 2 Attach one cable to switch port 7 and one cable to switch port 8 Secure the cable with the thumbscrews on the cable connector 3 Follow the instructions in Creating a Daisy Chain of MSDEs to daisy chain remaining MSDEs to the MSDEs connected to ports 7 and 8 ...

Page 7: ... 9 pin connector on the other end of the cable to the PRI 9 pin connector on the LCC on the back of the second MSDE Secure the cable with the thumbscrews on the cable connector Powering Up the System Avid strongly recommends that you use the following power up sequence to ensure that all components are properly recognized and configured 1 MEDIAswitch Allow the switch approximately 15 seconds to co...

Page 8: ...r On Self Test POST Diagnostics LED Indications Common Questions and Problems Overview The MEDIAswitch is designed for continuous long running operation As such the unit is self contained with no field replaceable units The Avid MEDIAswitch front panel has eight ports eight status LED s for the ports a management MGMT port an Auxiliary AUX port a fault FLT LED and a power PWR LED ...

Page 9: ...DIAswitch for the fundamental integrity of the box itself of memory flash SRAM and DRAM of the ports and of related circuitry When the internal self tests complete successfully all the port LED s turn off which means that the Avid MEDIAswitch is ready for operation The LED s then begin to show port status Ports that have failed will be indicated by a fast double blink about two double blinks and a...

Page 10: ...are Then it will re initialize the ports and start the process over again For a point to point connection when the port is activated its LED will begin blinking it may take up to 10 seconds for some hardware devices to properly set up and begin communicating During this time and until the communication begins the LED will blink A blinking Power LED indicates that a power supply has gone offline or...

Page 11: ...uld be a possible configuration problem Check that you ve correctly specified the port type to match the device type 3 Frames are being rejected from the local device to the remote device this would be detected and reported via SNMP in the Link Status view In this case check one of the following a Make sure ports are configured correctly for the proper devices and that the Stealth Route Table was ...

Page 12: ...port swap out the cable Optical cables if bent more than the recommended radius maximum radius is no more than 30 degrees can break causing sporadic results Bending can also add attenuation which could result in signal loss Also an optical port takes up to 10 and a half seconds to become fully operational A marginally functioning optical cable might cause a situation in which you will see an LED b...

Page 13: ...net port on the Avid MEDIAswitch front panel 2 Attach the other end of the RJ45 ethernet cable to an ethernet hub port For a direct ethernet connection you will need an ethernet crossover cable 1 Attach the RJ45 end of a crossover ethernet cable to the ethernet port on the Avid MEDIAswitch front panel 2 Attach the other end of the ethernet crossover cable to your laptop or PC Host to MEDIAswitch S...

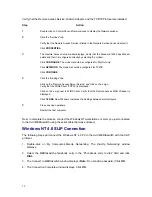
Page 14: ...3 Windows NT prompts where the installation media is located in the Files Needed dialog box Specify the location of the installation media and click OK Exit the NT install upgrade screen if necessary 4 Double click on Dial Up Networking Windows NT copies the necessary Dial Up Networking files from the installation media to the hard drive then searches for RAS capable devices If there are no RAS de...

Page 15: ...st configured Standard 19200 bps Modem ComX Click PROPERTIES 2 In the General tab make sure the Maximum speed is set to 19200 Click the Connection tab Make sure that the data bits parity and stop bits are set to 8 none and 1 respectively Click the No Call preferences boxes Click ADVANCED 3 The Advanced Connection Settings dialog box displays Make sure the Use flow control check box is cleared no f...

Page 16: ...witch management port s IP address is factory set to 192 168 2 1 Enter the IP address 192 168 2 2 an address in the same subnet as the default Avid MEDIAswitch SLIP IP address in the My IP address field of the IP Address dialog box Click NEXT 8 The Name Server Addresses dialog box displays Leave the fields empty Click NEXT 9 The New Phonebook Entry Wizard dialog box displays Click FINISH 10 The Di...

Page 17: ...me server addresses are not set The suggested IP address 192 168 2 2 of step 7 should be present Clear the Force IP header compression check box if it is checked Frame size should be set to 1500 After all settings have been verified click OK 15 In the Edit Phonebook Entry dialog box click the Script tab Verify that None is selected in the After dialing login area Click BEFORE DIALING 16 The Before...

Page 18: ... on the sign Verify that the WINS Client TCP IP is displayed Click on the sign next to WINS Client Verify that the Remote Access WAN Wrapper is displayed Click CLOSE Now Windows computes the bindings between protocol layers 5 Close any open windows Restart the host computer Next to complete the process connect the Windows NT workstation or server you just connected to the Avid MEDIAswitch using th...

Page 19: ...switch double check your cabling connections Redial If Windows hangs because of the way NT handles serial port configuration you might have to backtrack and manually hang up the connection then redial 5 You now have a SLIP connection to the Avid MEDIAswitch ...

Page 20: ...ication which includes both a powerful textual and Graphical User Interface GUI to ease configuration management Loop InSite is used to manage the Avid MEDIAswitch Loop InSite is an intuitive easy to use and extremely useful loop analysis and management tool It offers the user real time visibility of loop status and displays the current status information in a color pictorial At a glance the user ...

Page 21: ...ory by default To ensure that the Hub View windows display properly 1 Right click on the display and choose Properties 2 In the Properties dialog box select the Settings tab 3 Under Font Size ensure that Small Fonts is selected small fonts 100 and click OK Software Removal To remove uninstall the Loop InSite software 1 From the Windows Start menu select Settings then Control Panel 2 In the Control...

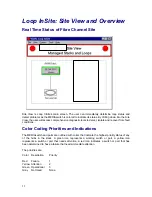
Page 22: ...e and recover from fault conditions Color Coding Priorities and Indications The MEDIAswitch and ports are outlined with colors that indicate the highest priority status of any of the hubs in the stack A green icon represents a working switch or port a yellow icon represents a switch or port that needs attention a red icon indicates a switch or port that has been determined to have a failure that n...

Page 23: ...ickly determine the health of the entire site A gray icon is used to indicate a stack or loop that is not being used If everything is green or gray no more attention is needed Yellow or red signals a problem that should be further investigated ...

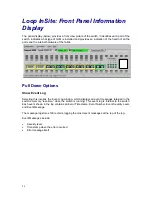
Page 24: ...Options Show Event Log Selecting this invokes the Event Log window which displays all event messages retained in the switch s memory real time while the switch is running This event log is internal to the switch Each event shown in the log contains an Event Timestamp Event Number Event Severity Level and Event Message The message log stores 100 records logging the most recent messages at the top o...

Page 25: ...25 ...

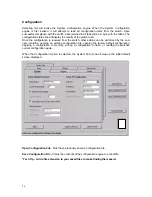
Page 26: ...e switch other actions can be performed by the end user including opening an existing configuration file opening the factory default configuration applying a configuration to memory writing a configuration to flash or reading the switches current configuration again When the Configuration Option is selected the System Tab shown below is the initial default screen displayed Open Configuration File ...

Page 27: ...d what level of messages trip the Fault LED A message is logged when the event is equal to or greater than the message severity setting The levels of messages are Emergency Alert Error Warning Notify Info Critical To set the message severity settings Use the pull down arrow in the Message Severity window to select Debug Use the pull down arrow in the Fault LED Severity window to select Emergency C...

Page 28: ...ll down arrow in the Connected Device type window to select JBOD 11 Enter 0 in JBOD8 option 12 Enter 5 in JBOD10 option 13 Use the pull down arrow in the Backup Port to select None 14 Enter 0 as the Fabric number if option is available 15 Repeat steps 8 through 14 for port 8 swapping the entries the in steps 11 and 12 16 Click the Apply to Memory button when you are finished This will download the...

Page 29: ... match the following chart Ports 1 6 Port 7 Port 8 Port Type Stealth Loop Stealth Loop Stealth Loop Connected Device Type host jbod jbod Backup Port None None None Fabric Number 0 0 0 JBOD8 0 0 5 JBOD10 0 5 0 Enable LIP if Storage is Added yes no no ...

Page 30: ...d 2 for ports 2 through 6 4 Select Port 7 in the Port Browser section 5 Select ports 1 6 ONLY in the Port Enabler section 6 Click the Apply to Memory button when you are finished This will download the configuration data to memory 7 Click the Write to Flash button if the entire configuration is complete and you want to make all the changes active on the switch This will make all the configuration ...

Page 31: ...the following chart port 1 port 2 port 3 port 4 port 5 port 6 port 7 port 8 host host host host host host jbod jbod port 1 host x x port 2 host x x port 3 host x x port 4 host x x port 5 host x x port 6 host x x port 7 jbod x x x x x x port 8 jbod x x x x x x ...

Page 32: ... connecting its DB25F end to the DB25M to DB9 adapter then to an asynchronous terminal or to a PC in terminal emulation mode 4 If you plan to run the Diagnostic External LoopBack Test be sure that you have the necessary copper or optical Fibre Channel loopback plugs and be sure that you insert them before powering the MEDIAswitch on 5 Power the MEDIAswitch on You will see an information display si...

Page 33: ...e This option lets you switch firmware An alternative method is to do this through the Loop InSite Configuration Utility The MEDIAswitch allows for two boot images of the firmware to be stored in flash memory Image 1 is the latest version at the time of manufacture and is installed in the factory Image 2 comes from the factory initially empty This is in preparation for letting you download a newer...

Page 34: ...er Requirements Volts 100 240 VAC 3 0A max Hz 50 60 Environmental Conditions Operating temperature 0 40 C Storage temperature 40 75 C Relative humidity 8 80 non condensing Vibration 0 5g 5 500Hz Sine Shock 4 0g 11ms Sine Altitude 10 000 feet Data Transmission Range and Interconnects 30 meters Copper 500 meters SW Optical OFC non OFC 10K meters LW Optical ...

Reviews: