background image

Chapter 3: DADman Software

9

Chapter 3: DADman Software

Use DADman software on an Avid-qualified computer (macOS or Windows) to configure and control one or more MTRX and/or 
Pro Tools | MTRX Studio units over Ethernet. DADman is a channel strip–oriented, software control interface for MTRX and 
MTRX Studio units on your system’s network. It shows all connected units in the Device List from left to right. Connected units 
are shown in sequence according to the unit ID number. Each unit has a colored border surrounding the functions of the unit.

The settings of a MTRX are always stored in the unit itself. DADman shows the current status of all settings on each connected 
MTRX or MTRX Studio. DADman lets you save Configuration files on your computer to backup and store all MTRX and MTRX 
Studio settings and network configurations. DADman can be set to automatically load the last used settings on launch. If no Con-
figuration file is loaded on launch, connections to MTRX and MTRX Studio units in the Device List must be reestablished after 
launch.

DADman can also be controlled remotely from various external sources. DADman can be connected by MIDI to Pro Tools so that 
MTRX units can emulate Pro Tools | PRE hardware. Configure the PRE settings in Pro Tools to control MTRX pre amps from 
Pro Tools software. For more information, see Appendix B, “Controlling Pro Tools | MTRX Preamps from Pro Tools (Mac 
Only).”

Assigning the IP Address for your Computer and MTRX

Before using DADman with MTRX units on your network, you must set the network configuration for each unit in your system, 
one at a time. You can use fixed IP addresses or IP addresses assigned by DHCP.

Fixed IP Address

You must have a preferred range of IP addresses, and a network mask for the computer network and any connected MTRX and 
MTRX Studio units.

To use a fixed IP address:

1

Configure your computer IP address and network mask using the Mac System Preferences or the Windows Control Panel to 
10.0.7.25 | 255.255.255.0.

2

Launch DADman.

3

Choose 

Settings > Device List

.

4

Click 

Refresh

 to discover any connected MTRX (and MTRX Studio) units on the network.

5

Right-click the MTRX (or MTRX Studio) unit you want and choose 

Network Settings

.

When using MTRX units in Pro Tools systems with EUCON peripherals (such as S6), use a dedicated Network Interface for EUCON 
peripherals and connect all other network devices to a separate Network Interface (for MTRX/DADman, Dante audio, local network, 
internet, and so on). Using separate Network Interfaces is especially important when streaming audio over Dante.

Summary of Contents for Pro Tools MTRX

Page 1: ...PRO TOOLS MTRX Operation Guide...

Page 2: ...Bonjour the Bonjour logo and the Bonjour symbol are trademarks of Apple Computer Inc Thunderbolt and the Thunderbolt logo are trademarks of Intel Corporation in the U S and or other countries This pr...

Page 3: ...ting Pro Tools MTRX Firmware 18 Chapter 4 Network Fundamentals 19 What is a network 19 Infrastructure 20 Addressing 20 Chapter 5 Pro Tools MTRX Back Panel Connections 22 Digital I O Connections 23 Ana...

Page 4: ...endix D SPQ Expansion Card Operation 45 SPQ Overview 45 Inspecting the SPQ Card and Firmware Versions 46 DADman and Monitoring 47 General Delay 48 EQ 49 Configuring Bass Management 52 Configuring Cust...

Page 5: ...rds for up to 576 channels of DigiLink I O with a single MTRX each DigiLink card provides up to 64 channels of DigiLink I O in addition to the built in DigiLink ports Pro Tools MTRX Overview Pro Tools...

Page 6: ...ow latency digital audio using Dante 64 channels at 44 1 kHz or 16 channels at 192 kHz DigiLink Expansion Card Pro Tools MTRX DigiLink Card provides 2 DigiLink ports to connect to HDX cards HD Native...

Page 7: ...ol from Audinate MTRX sample clock circuit For details on how to configure the routing matrix see Pro Tools MTRX Operation MTRX block diagram Ext Clock sync sources Clock generator DPLL Word Clock AES...

Page 8: ...Used in Pro Tools Documentation Pro Tools documentation uses the following conventions to indicate menu choices keyboard commands and mouse commands The names of Commands Options and Settings that app...

Page 9: ...ind out how you can learn in a classroom setting at an Avid certified training center or view video tutorials and webinars www avid com education Video Tutorials The Get Started Fast with Pro Tools se...

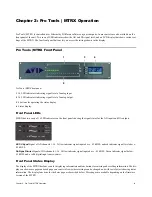
Page 10: ...the front panel showing the signal status for the AD inputs and DA outputs AD OL Signal Signal of AD channels 1 16 Yellow indicates signal input above 42 dB FS and red indicates signal level above 0 5...

Page 11: ...rate or it shows Intern for internal sample rate control Sync Source Shows the external synchronization clock source or shows Intern when the MTRX is using the internal clock Unit ID Name Shows the u...

Page 12: ...mode and the Status LED is lit green The Status LED turns off but the unit remains in recovery mode and the IP address settings of the unit is set to DHCP If there is no DHCP server on the network the...

Page 13: ...units can emulate Pro Tools PRE hardware Configure the PRE settings in Pro Tools to control MTRX pre amps from Pro Tools software For more information see Appendix B Controlling Pro Tools MTRX Preamp...

Page 14: ...s You must have a network with a DHCP server to allocate the IP addresses To use an automatic IP address 1 Configure your computer IP address to DHCP using the Mac System Preferences or the Windows Co...

Page 15: ...ose File Load 2 In the Open dialog navigate to and select the Configuration file that you want to load 3 Click Open Preferences and Options To set Preferences Mac or Options Windows for DADman 1 Choos...

Page 16: ...ed by the Unit ID number stored in each unit The ID number for any unit can be changed by editing the Unit ID field in the Device List window Settings Device List You can name each MTRX unit separatel...

Page 17: ...e the mouse scroll wheel or with the Up and Down Arrows on your computer keyboard Note that using the mouse adjusts the gain by 0 1 dB increments but the Up and Down Arrow keys adjusts the gain by 1 0...

Page 18: ...to and from Pro Tools all I O expansion cards installed in the unit are also shown here You can route any input channel mono to one or more output channels within the same unit All routing configurati...

Page 19: ...tal input ports like AES EBU or Pro Tools output channels DigiLink and the output destination you want Outputs are listed in the columns on the top such as an installed analog output expansion card DA...

Page 20: ...rce of the MTRX Sync Out Word clock Word clock base This parameter sets whether the Word Clock output should only follow the base sample rate 44 1 kHz 48 kHz or follow the actual sample rate 44 1k 48k...

Page 21: ...s setting is only relevant when routing incoming AES EBU or MADI channels to a MADI output In Default mode the MADI Channel status bits are defined by the MTRX whereas in Transparent mode the channel...

Page 22: ...ave this set to Auto However there may occasionally be compatibility issues with third party products in which case setting it to As AD may solve any problems Updating Pro Tools MTRX Firmware To updat...

Page 23: ...ble This is also referred to as CAT5 CAT5e or CAT6 There are also other CAT types but the three mentioned here are the most common UTP cables are normally terminated in an RJ45 connector Other types o...

Page 24: ...r networks They handle all traffic that is destined for the outside world as well as taking care of any traffic coming from the out side Only one router is allowed in a network Most routers nowadays a...

Page 25: ...nter IP addresses manually IP addresses consist of 4 bytes numbers usually written with a decimal point between them for example 192 168 0 1 This means IP addresses can range from 0 0 0 0 to 255 255 2...

Page 26: ...Native or another I O 10 Word Clock synchronization output BNC connector 11 Word Clock or Video Black Burst synchronization input configurable BNC connector 12 AES11 AES3 synchronization input female...

Page 27: ...and the left part is the transmitter Note that only optical MADI connections support MTRX Hotlink functionality AES11 Sync Input Female XLR Connector Pin 1 TX Pin 2 TX Pin 3 RX Ethernet RJ45 Connecto...

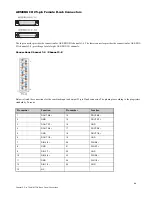
Page 28: ...channels Connections Channel 1 4 Channel 5 8 Below is listed the connections for the combined input and output 25 pin D sub connector The pinning is according to the proprietary standard by Tascam Pi...

Page 29: ...ools MTRX Pristine 8 DA card 8 channel Line DA Card These are interfaced using 25 pin D sub connectors on the card This connector type is used for both the analog input card and the analog output card...

Page 30: ...Chapter 5 Pro Tools MTRX Back Panel Connections 26 Example System Configurations 10 AIN OUT 2 23 AIN OUT 2 11 GND 24 AIN OUT 1 12 AIN OUT 1 25 GND 13 N C Pin no Func Pin no Func...

Page 31: ...mpedance differential 10 k Ohm Max input level Adjustable from 9 dBu to 30 dBu in steps of 0 1 dB Microphone input gain range accuracy Adjustable from 18 to 70 dB in steps of 0 1 dB 0 25 dB accuracy M...

Page 32: ...ord Clock All digital inputs Video Sync word clock connector PAL NTSC SECAM DSD sample rates 8224 5 6448 Mhz 64 128 fs Dynamic range A 128 dB THD N A 110 dB 3dB FS 0 00031 Cross talk 120 dB Max output...

Page 33: ...hassis air flow from front to rear Environmental Specifications Chassis standard 19 2 RU Chassis depth without connectors mounted 35 0 cm 13 8 Chassis body width 43 5 cm 17 2 Weight not including I O...

Page 34: ...I Setup AMS for Pro Tools PRE control of MTRX units 1 Do one of the following In Pro Tools choose Setup MIDI MIDI Setup Launch Audio MIDI Setup from the Finder Applications Utilities Audio Midi Setup...

Page 35: ...m Predefined IAC Driver Bus 2 Channel 1 in the pop up menu for the first Mic Line AD card in the system 5 Select Send To Predefined IAC Driver Bus 1 Channel 1 in the pop up menu for the first Mic Line...

Page 36: ...ools are mirrored in DADman From Pro Tools Mic Preamps view you can control the following MTRX Mic Pre parameters Mic DI Select the microphone input setting for the corresponding channel in MTRX Line...

Page 37: ...DAD man software To create a new profile 1 Launch DADman software 2 Choose Settings Monitor Profile 3 Click Groups the Groups page is not shown 4 Select the unit you will use for monitoring 5 Select E...

Page 38: ...sclosure triangle for Sources and click on New Input set 10 Click and hold to Rename New Input set 11 In the Mode column right click on Stereo and choose a desired input format width from the Set grou...

Page 39: ...35 12 In the Channel column right click assign channel and choose the type of I O to source the input from...

Page 40: ...36 13 Optionally add input trims for each channel ranges from 100 to 12 in 1 100 of a dB 14 To add additional sources right click on Sources and choose either Add new source or Add existing source...

Page 41: ...Right click on Outputs and choose Add new set 2 Click to expand the Outputs disclosure triangle then click New Output Set to Rename 3 In the Mode column right click Stereo and choose a format width f...

Page 42: ...labels and trims 6 To add additional output sets right click Outputs choose Add new set and repeat the previous steps Adding Fold down To add Fold down to an output set 1 Click the Fold down tab at th...

Page 43: ...lick on the Fold down to rename remove or add additional Fold downs 6 Click back on the Groups tab of the Monitor Profile Configuration window to return to the monitor settings 7 Right click on Fold d...

Page 44: ...ecify Pre or Post Fader operation right click on Meters choose Set meter mode then choose the desired mode Adding a Talkback Input To add a Talkback Mic input 1 Click to highlight Talkback at the top...

Page 45: ...mary Control Room monitor for EUCON right click Monitor then choose Control Room from the Set EuCon mode sub menu Right click Monitor again and choose Master from the Set monitor mode sub menu 6 To ad...

Page 46: ...uring Sources for Pro Tools MTRX If you are using a Pro Tools MTRX with S6 you need to first configure DADman software and then configure sources in the S6 Mon itoring page To configure DADman 1 Launc...

Page 47: ...g or press the Setup 2 switch in the Mon itor Controls section of the Master Module All available sources are listed in the Source Select section in the center of the Monitoring screen Available sourc...

Page 48: ...input sources Sources can be duplicated and put in any order 5 To see additional available sources scroll the Source Select list up or down To see additional input source slots such as 9 16 in the Sou...

Page 49: ...ualizing of cue and monitor signals You can easily save and recall all configurations in the DADman monitor profile You can also configure general delay for a control room set up as well as an individ...

Page 50: ...s The installed firmware version and unit configuration can be inspected in the Device list as shown below The MTRX firmware version and the Dante module firmware version if installed can be seen by s...

Page 51: ...47 DADman and Monitoring To enable monitoring 1 Choose Settings Monitor Profile Configuration 2 Select the unit to control 3 Check Enable monitor DADman Monitoring disabled...

Page 52: ...owest increment is also one sam ple so depending on the sample rate this results in different time values At 48 kHz a sample is 20 83 ms so the value set will be rounded to the nearest sample value or...

Page 53: ...lable resources are increased accordingly DADman EQ Management Window EQ view shows the assigned EQ for the selected stereo speaker channel of the selected output speaker set The channel delay knob co...

Page 54: ...e drop down menu Frequency Gain and Q can be set for the selected EQ filter and the curve in the view will reflect the setting Frequency Gain and Q Values can be set with the mouse or by clicking the...

Page 55: ...le editor An additional curve is shown in the graph reflecting the presence of the LFE chan nel When a speaker set format with one or more speaker SUB channels is selected like 5 1 with one LFE channe...

Page 56: ...also applied in Pro Mon In order to configure the Bass Management setup in general or to make a starting point for a more complex Bass Management system such as with multiple subwoofer speakers config...

Page 57: ...n the configuration window described above with the param eters listed out for each speaker channel Each filter parameter can be edited individually for each channel Note the column Level sub 0 dB ind...

Page 58: ...existing default Preset for mats In the Custom formats editor group formats using the well defined role tags can be created thus making almost any speaker map ping possible A speaker output can also...

Page 59: ...annel immersive formats on more speakers in a higher channel count speaker set up The following figure shows the fold down and speaker match configuration window The two pairs of button scroll right l...

Page 60: ...le into the current profile The monitor profile can be loaded partially by using the Input from profile function shown in the following picture This opens the import window as shown in the following p...

Page 61: ...Fold down Source Set This defines a group format related to sources It includes allocated physical inputs as well as gain adjust settings Output Set This defines a group format related to speaker outp...

Page 62: ...his is still the case for any signal routed through an MTRX SPQ card a DSP FPGA expansion card for MTRX but the whole system delay increases automatically to 7 samples SPQ filter processing requires a...

Page 63: ...For Technical Support visit www avid com support...

Reviews: