background image

Installation Instructions

15

Part 0130-05337-01 Rev. B

Installing the Compaq W8000 into the Rack

3. Secure the Compaq W8000 system to both front mounting rails 

with screws and teflon washers. Insert a screw through the 
rack-mount bezel into the front of the rack enclosure and tighten.

Figure 11

Securing the System in the Rack

This completes the installation if your Compaq W8000 into a rack 
enclosure. See your Avid product’s setup guide for cabling and other 
setup information.

Rack-mount shelf

Bezel screw

Teflon washer

Summary of Contents for Rack-Mount Kit

Page 1: ...n The rack mount kit includes a new front bezel that secures the Compaq W8000 to your rack enclosure The new rack mont bezel does not include the two USB connectors the microphone jack and the headph...

Page 2: ...lling the Rack Mount Front Bezel 13 Installing the Compaq W8000 into the Rack 14 Technical Support Information 16 Symbols and Conventions These installation instructions use the following special symb...

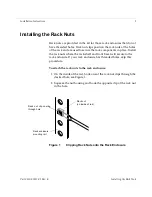
Page 3: ...ll the rack nuts where the rack shelf and front bezel will secure to the rack enclosure If your rack enclosure has threaded holes skip this procedure To attach the rack nuts to the rack enclosure 1 On...

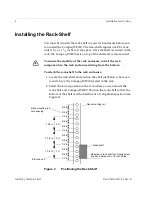
Page 4: ...the bottom To attach the rack shelf to the rack enclosure 1 Locate the rack shelf and position the shelf just below where you want to have the Compaq W8000 located in the rack 2 Select the lowest posi...

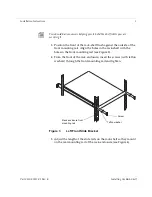
Page 5: ...nting rail Align the holes in the rack shelf with the holes in the front mounting rail see Figure 3 4 From the front of the rack enclosure insert the screws with teflon washers through the front mount...

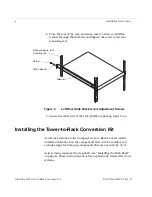
Page 6: ...the other side of the rack shelf by repeating steps 3 to 6 Installing the Tower to Rack Conversion Kit Avid s instructions for the Compaq Tower to Rack Conversion Kit includes information on the comp...

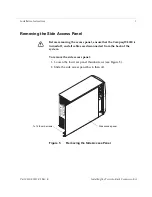
Page 7: ...removing the access panel ensure that the Compaq W8000 is turned off and all cables are disconnected from the back of the system To remove the side access panel 1 Loosen the four rear panel thumbscrew...

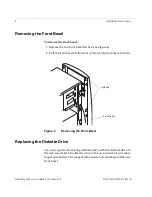
Page 8: ...e Figure 6 2 Pull the front bezel off the front of the system from the latch side Figure 6 Removing the Front Bezel Replacing the Diskette Drive You must replace the existing diskette drive with the d...

Page 9: ...access to the cables 3 Disconnect the signal and power cables from the back of the diskette drive Figure 7 Installing the Rack Mount Diskette Drive 4 Remove the diskette drive from the drive cage To...

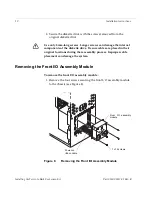
Page 10: ...l components of the diskette drive Be sure cables are placed in their original locations during the reassembly process Improper cable placement can damage the system Removing the Front I O Assembly Mo...

Page 11: ...rd 4 Remove the front I O assembly module from the chassis 5 Disconnect the power on ribbon cable from the system board n Most Avid systems will have expansion boards and a fan assembly installed that...

Page 12: ...igure 9 Attaching the Rack Mount Plate 2 Pull the power switch connector cable through into the chassis to the system board 3 Connect the power switch connector cable to the system board in the same l...

Page 13: ...ure the rack mount front bezel to the front of the Compaq W8000 with the eight screws provided in the kit see Figure 10 Figure 10 Attaching the Rack Mount Bezel 2 Reattach the side access panel and se...

Page 14: ...or damage to the equipment at least two people are needed to install the Compaq W8000 into a rack safely To install the Compaq W8000 system into the rack enclosure 1 Position the Compaq W8000 system h...

Page 15: ...ith screws and teflon washers Insert a screw through the rack mount bezel into the front of the rack enclosure and tighten Figure 11 Securing the System in the Rack This completes the installation if...

Page 16: ...As an Avid customer you are entitled to access technical support information and product information as well as the latest news from our Web based Knowledge Center Simply navigate to www avid com sup...

Page 17: ...5 245 432 5 267 351 5 309 528 5 325 200 5 355 450 5 396 594 5 440 348 5 452 378 5 467 288 5 513 375 5 528 310 5 557 423 5 568 275 5 577 190 5 583 496 5 584 006 5 627 765 5 634 020 5 640 601 5 644 364...

Page 18: ...AirSPACE AirSPACE HD AniMatte AudioSuite AutoSync AVIDdrive AVIDdrive Towers AvidNet Avid Production Network AvidProNet AvidProNet com AVIDstripe Avid Unity AVX DAE D Fi D fx Digidesign Audio Engine...

Reviews: