background image

Chapter 3: Using Studio Monitor Express

9

Windows Patching Tab

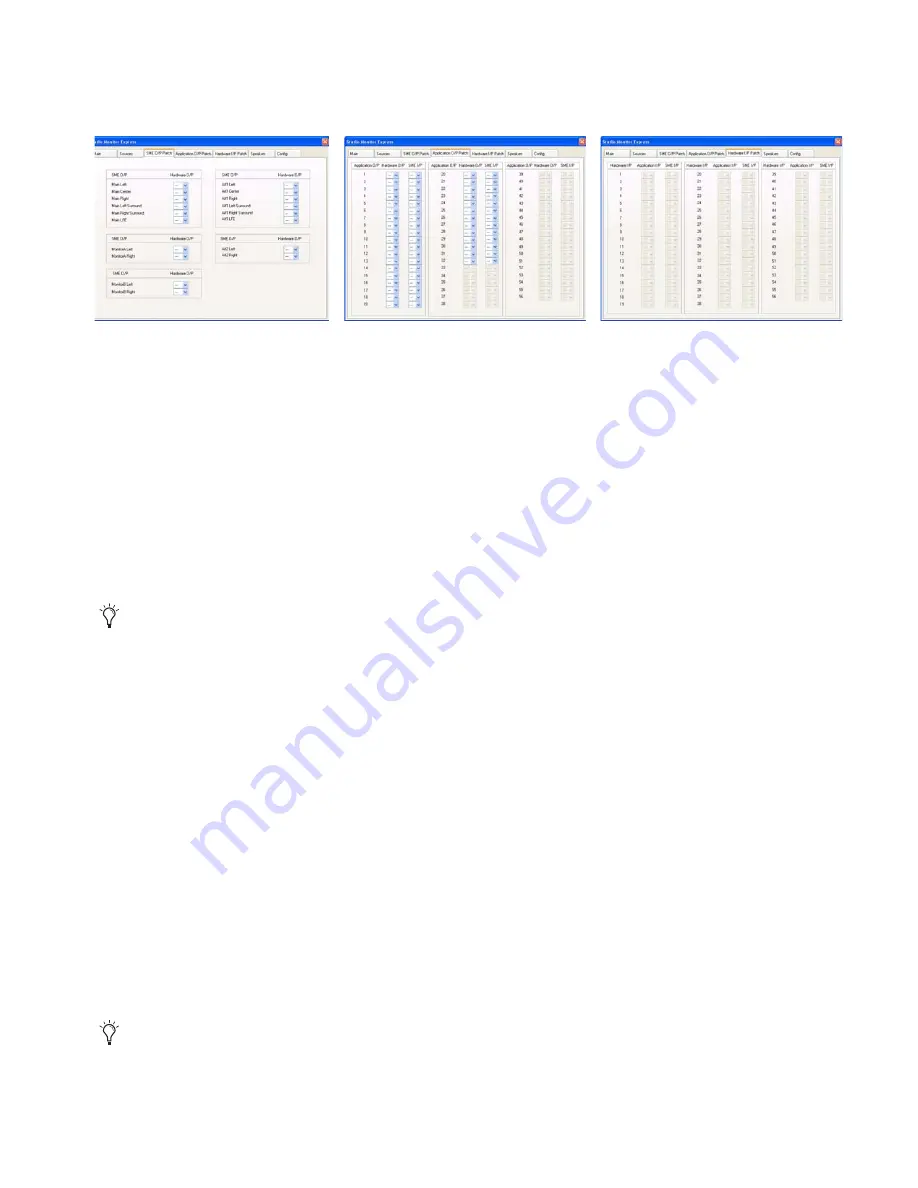
On Windows, the Patching features are grouped into sub-tabs: 

SME O/P Patch, Application O/P Patch, 

and

 Hardware I/P Patch

.

SME O/P Patch

The 

SME O/P Patch

 tab routes the assigned SME Monitor outputs to audio I/O hardware. Select the desired outputs from the 

Hard-

ware O/P

 drop-down menus.

Application O/P Patch

The

 Application O/P Patch

 tab routes application outputs (such as output channels from Nuendo) to hardware outputs and/or 

SME 

Inputs

.

• The 

Hardware O/P

 drop-down lets applications using the SME ASIO driver route signal directly to physical outputs (

bypassing


SME).

• The 

SME I/P

 drop-down lets applications using the SME ASIO driver route signal into the SME mixer. It is possible to select 

both a 

Hardware

 output and 

SME Input

 simultaneously, creating a mult.

Use these selectors to assign monitor channels for main and alternate speakers, cue mix feeds for headphones, and other output 
destinations. If the main outputs from your DAW application are 

Hardware O/Ps 1–6

, they would typically be routed to 

SME O/Ps 

1–6

. However, it is also possible to route the speaker outs to a different order (such as SMPTE format) than your monitors. 

You can also use these controls as a virtual pathbay. For example, to change the layout (format) of a 5.1 output from 
L-C-R-Ls-Rs-LFE to L-R-Ls-Rs-C-LFE, change the output routing using the pop-up menus in the 

Patching tab 

in SME instead of 

physically repatching the outputs to your monitors.

Hardware I/P Patch

The Hardware I/P Patch tab routes audio from the hardware inputs (Hardware I/P) on your workstation sound card to the Appli-
cation I/P and/or inputs of SME’s mixer inputs (SME I/P).

To pass audio from a physical input to an application, the hardware inputs (Hardware I/P) must be patched to Application I/P in-
puts. We recommend a one-to-one patch to make it easier to track the mapping between physical inputs and channel inputs in 
your DAW. However, it is possible to re-route a hardware input to a different input. For example, if the kick drum is on the 24th 
physical input and you want it to appear to your DAW that it’s on the 1st input, select 

1

 from the Hardware I/P 24’s Application 

I/P pop-up menu.

Here is another example. If a CD player is routed to hardware inputs 40 and 41, select

 1 

and

 2

 from the 

Hardware I/P 40

 and 

41


SME I/P dropdown menus respectively. This routes the CD player to Mixer inputs 1 and 2. For steps to create stereo mixer inputs 
in the Sources tab, see “Sources” on page 6.

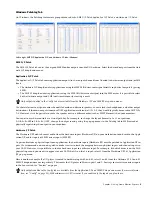
Left to right, SME O/P, Application O/P, and Hardware I/P tabs (Windows)

Only outputs enabled in the Config tab are available from the Hardware O/P and SME I/P drop-down menus.

Only outputs enabled in the Config tab are available from the Application I/P and SME I/P drop-down menus (For more informa-
tion, see “Config” on page 11). SME minimizes its CPU resources if you enable only the inputs you plan to use. 

Summary of Contents for Studio Monitor Express

Page 1: ...Studio Monitor Express Version 2 6...

Page 2: ...OMF OMF Interchange PRE ProControl Pro Tools M Powered Pro Tools Pro Tools HD Pro Tools LE QuickPunch Recti Fi Reel Tape Reso Reverb One ReVibe RTAS Sibelius Smack SoundReplacer Sound Designer II Stri...

Page 3: ...and Compatibility 1 About This Guide 1 About www avid com 2 Chapter 2 Installing Studio Monitor Express 3 Removing Studio Monitor Express 3 Chapter 3 Using Studio Monitor Express 5 Main 5 Sources 6 Pa...

Page 4: ...Studio Monitor Express iv...

Page 5: ...pped with your unit It includes a Euphonix Monitor Core Audio Driver Mac and ASIO driver Windows to integrate with applications you want to use with SME System Requirements and Compatibility Avid can...

Page 6: ...o help you get the most out of your system The following are just a few of the services and features available Product Registration Register your purchase online Support and Downloads Contact Avid Cus...

Page 7: ...rt the Installer disc into your computer 2 Double click the Studio Monitor Express installer application located inside the Extras folder 3 Follow the on screen instructions to complete the installati...

Page 8: ...nel 2 Under Programs click Uninstall a program 3 Select Studio Monitor Express from the list of installed applications 4 Click the Change button 5 Select the Modify button 6 Click Next 7 Deselect Stud...

Page 9: ...ings and a Source display for three available monitor outputs Control Room Monitor A and Monitor B Source Maps Sources created in the Sources tab to Control Room Monitor A and B To route a Source to a...

Page 10: ...ig tab page 13 Fix Sets the signal to the Fixed Level set on the Config tab correlates to the Dim button in Artist Control Setup Control Room Touch screen Phase Reverses the phase of the left channel...

Page 11: ...io output driver 2 In the SME Sources tab do all of the following Create a Stereo source Name it for the application such as Nuendo On Mac only Set the Start Channel to 1 This creates a stereo monitor...

Page 12: ...puts Inputs The Inputs section has eight selectable inputs from the application s outputs Application Out and eight selectable inputs from hardware inputs Audio Device In installed in your workstation...

Page 13: ...e the output routing using the pop up menus in the Patching tab in SME instead of physically repatching the outputs to your monitors Hardware I P Patch The Hardware I P Patch tab routes audio from the...

Page 14: ...own controls Control Room Main Alt1 Alt2 Monitors A and B To lower trim speaker levels Drag the corresponding faders to the left Level is displayed in the Trim field to the right of the fader Double c...

Page 15: ...Fixed output levels Audio Device This menu selects the Core Audio driver for the sound card to use with SME Set Dim Level Sets the program signal s absolute Dim Level when the Control Room Setup Touc...

Page 16: ...level and must maintain a fixed output level CPU Usage This meter shows SME CPU usage Sample Rate This shows the current sample rate to which SME is locked This is only an indicator since the sample r...

Page 17: ...riate 2 In the SME Patching tab assign the Audio Device In to the I O channel to which you connected your mic preamp 3 In the SME Sources tab create and name a Source for Talkback 4 In the Main Tab cl...

Page 18: ...ro Serra Boulevard Daly City CA 94014 3886 USA Technical Support USA Visit the Online Support Center at www avid com support Product Information For company and product information visit us on the web...

Reviews: