background image

Chapter 3: Connecting and Using the MADI Card

19

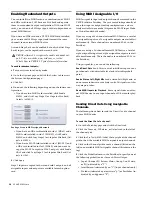
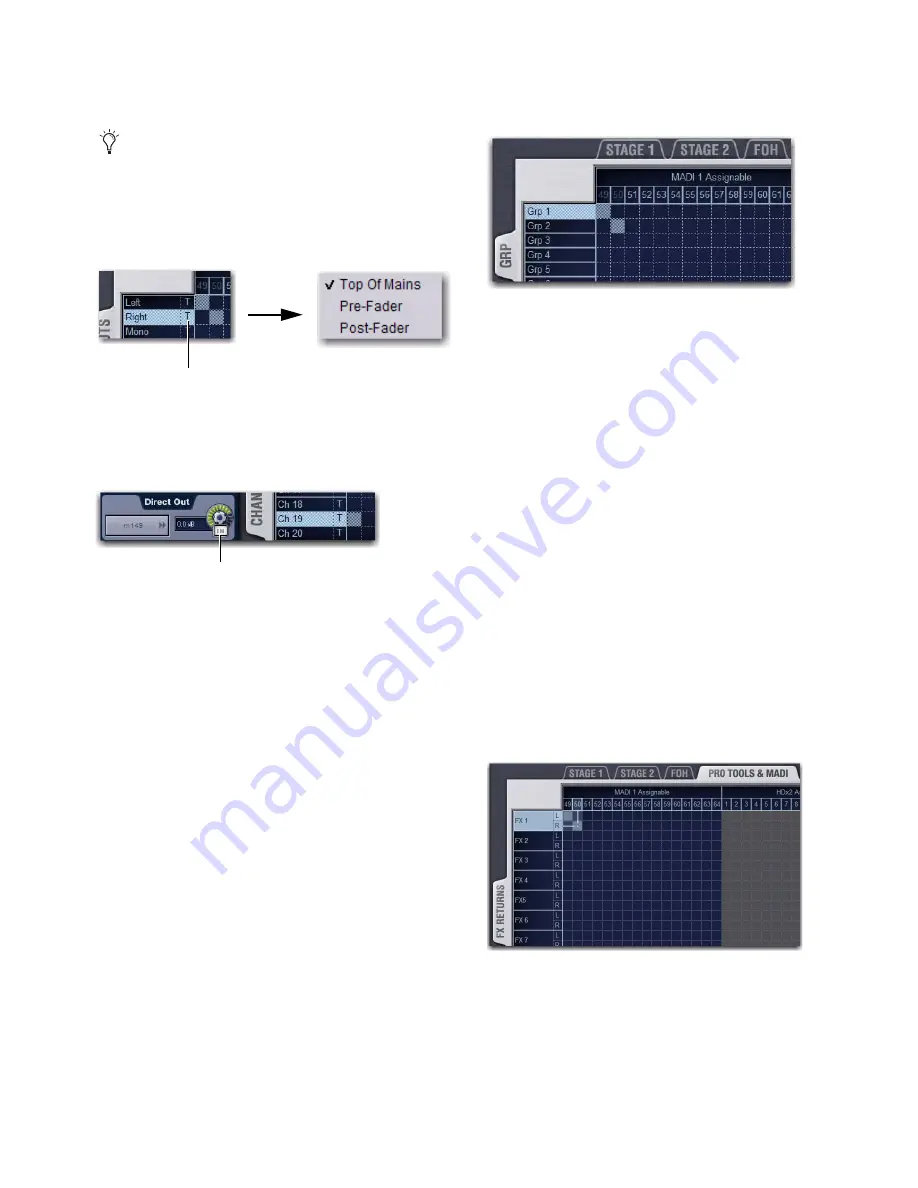
The available Direct Output pickoff points for input channels 
and FX Returns can be configured globally as pre- or post-fader 
in the 

Options > Pickoffs

 page.

6  

Activate and set the level for each Direct Output by clicking 

its In button and dragging its on-screen encoder in the Direct 
Out section.

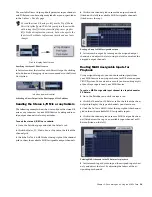
Sending the Stereo L/R Mix or any Submix

The following example shows how to send your the stereo L/R 
mix or any submixes to your MADI device. Sending audio us-
ing output channels is always post-fader.

To send the stereo L/R Mix or a submix:

1  

Go to the Patchbay page and click the 

Outputs

 tab.

2  

Click the 

Mains

PQ, Matrix, Aux, 

or 

Grp

 tab to the left of the 

channel grid.

3  

Click the 

Pro Tools & MADI 

tab at the top right of the channel 

grid to show the available MADI assignable output channels.

4  

Click in the channel grid to route the output channels 

(listed on the left) to available MADI assignable channels 
(listed across the top). 

5  

Activate each output by turning on the assigned output 

channels, and adjust the level using the level controls of the 
assigned output channels.

Routing MADI Assignable Inputs for 
Playback

Using assignable inputs, you can route audio signals from 
your MADI device to any input channel or FX Return on your 
VENUE system. You can do this even if you are sending a split 
of your Stage inputs to an your MADI device.

To route a MADI assignable input channel to a input channel or 
FX Return:

1  

Go to the Patchbay and click the 

Inputs

 tab.

2  

Click the 

Channels

 or

 FX Returns

 tab to the left of the chan-

nel grid to display the type of channels you want to use.

3  

Click the 

Pro Tools & MADI 

tab at the top right of the channel 

grid to show the available MADI assignable inputs.

4  

Click in the channel grid to route a MADI assignable chan-

nel (listed across the top to an available input channel or FX 
Return (listed on the left). 

5  

Activate each input by turning on the assigned input chan-

nels, and adjust the level by adjusting the faders of the as-
signed input channels.

To send the stereo L/R mix pre-EQ, use the Top of Mains 
Direct Out pickoff point. This lets you capture the mix with-
out hearing the effect of any inserted plug-ins or graphic 
EQs. Pre-Fader captures any inserts, but no changes to the 
fader level. Post-Fader captures any inserts and any fader 
changes.

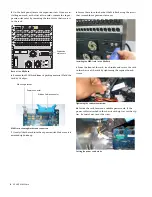
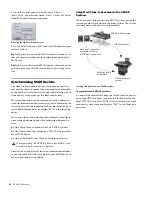
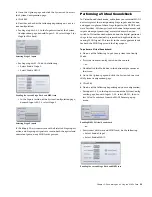
Specifying the channel Pickoff source

Activating a Direct Output in the Directs page of the Patchbay

Click to display Pickoff menu

In button and level control

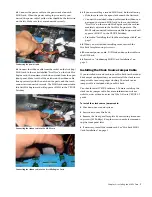
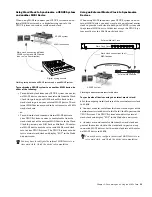
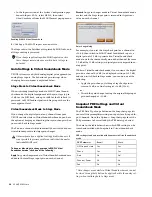
Routing a Group to MADI assignable outputs

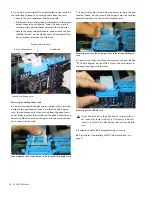
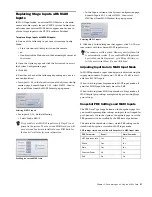
Patching MADI channels to the FX Returns for playback

Summary of Contents for VENUE MADI

Page 1: ...PN 9321 62800 00 REV B 10 10 VENUE MADI Card for VENUE Systems...

Page 2: ...MediaComposer MIDI I O MIX MultiShell Nitris OMF OMF Interchange PRE ProControl Pro Tools M Powered Pro Tools Pro Tools HD Pro Tools LE QuickPunch Recti Fi Reel Tape Reso Reverb One ReVibe RTAS Sibel...

Page 3: ...n 4 Mix Rack MADI Card Installation 5 Confirming MADI Card Installation 9 Chapter 3 Connecting and Using the MADI Card 11 Making Audio Connections 11 Synchronizing MADI Devices 12 Using MADI 14 Sendin...

Page 4: ...annel and 56 channel MADI formats pro viding automatic input format detection and user selectable output format Provides Signal Present and Optical Source LEDs giving vi sual feedback for verifying co...

Page 5: ...visit the Avid website www avid com Compatibility Information Avid can only assure compatibility and provide support for hardware and software it has tested and approved For a list of Avid qualified c...

Page 6: ...nsole icon To transfer Console Settings only click the Settings icon To transfer Show Folders click the Show Folders icon To transfer individual Shows click the Shows icon To transfer all Preset Folde...

Page 7: ...8 Gently slide the card into the expansion slot Make sure it is oriented right side up 9 Secure the MADI card to the back panel of the FOH Rack us ing the two screws that secured the slot cover to th...

Page 8: ...the FOH Rack front panel faceplate 15 Reconnect power audio FOH Link and any other cables to the FOH Rack 16 Proceed to Confirming MADI Card Installation on page 9 Mix Rack MADI Card Installation This...

Page 9: ...of the Mix Rack using the screws that secured the expansion slot cover 9 From the front of the rack reach inside and secure the card to the chassis of the rack by tightening the captive thumb screws...

Page 10: ...ond Mix Engine card will appear as MADI 2 in the VENUE Patchbay Proceed to Installing the Clock Source Jumper Cable on page 7 14 When you are finished installing cards reattach the Mix Rack faceplate...

Page 11: ...he ports and that each connec tor is connected securely 7 Connect the cable s second blue connector to the to the port labeled Snake on the second Mix Engine card the card im mediately adjacent to the...

Page 12: ...n In systems that include an FOH Rack the MADI card con nected to the first Mix Engine card appears as MADI 1 and the card connected to the second Mix Engine card ap pears as MADI 2 In systems that in...

Page 13: ...VENUE MADI Card 10...

Page 14: ...t the top of the patching grid 5 To select the MADI format for any your MADI device con nected to the MADI card outputs click the box above the top row of the patching grid that says MADI 1 Assignable...

Page 15: ...g three example of configura tions using a dedicated word clock connection between de vices Using Word Clock to Synchronize Two VENUE Systems Using Word Clock to Synchronize a VENUE System and an othe...

Page 16: ...you may want to use an external master clock to provide word clock to both your VENUE system and the external MADI device All devices except the VENUE sys tem must be set to a 48kHz word clock rate T...

Page 17: ...ble I O on page 18 Available I O The following table shows the input and output channels that are available for a single MADI card in each mode For 64 channel format MADI devices For 56 channel format...

Page 18: ...anges such as channel assignments and input and output processing are carried over when you switch to Virtual Soundcheck mode and the digital portion of the gain for each channel is preserved and appl...

Page 19: ...Rack gain for a channel to 30 dB then switch to MADI Virtual Soundcheck inputs a digital gain of 2 2 dB is preserved in Virtual Soundcheck mode to yield the same overall gain on that channel because...

Page 20: ...t mode input channel gain is adjusted using the input gain encoders Digital gain 20 dB to 18 dB is avail able for all MADI inputs When switching from Stage mode to MADI input mode all gains for MADI i...

Page 21: ...Mode or Virtual Soundcheck mode If you are using a 64 channel external MADI device a total of 16 assignable inputs and 16 assignable outputs are available si multaneously These channels are numbered 4...

Page 22: ...route audio signals from your MADI device to any input channel or FX Return on your VENUE system You can do this even if you are sending a split of your Stage inputs to an your MADI device To route a...

Page 23: ...VENUE MADI Card 20...

Page 24: ...ls including lead known to the State of California to cause cancer and birth defects or other reproductive harm Wash hands after handling DECLARATION OF CONFORMITY We Avid 2001 Junipero Serra Boulevar...

Page 25: ...ter 6 Clean only with dry cloth 7 Do not block any ventilation openings Install in accordance with the manufacturer s instructions 8 Do not install near any heat sources such as radiators heat registe...

Page 26: ...ro Serra Boulevard Daly City CA 94014 3886 USA Technical Support USA Visit the Online Support Center at www avid com support Product Information For company and product information visit us on the web...

Reviews: