S6L Control Surface: Replacing the PSU Bay
11
5. Complete the Installation
After installing the new PSU bay, do each of the following to re-assemble the S6L control surface.
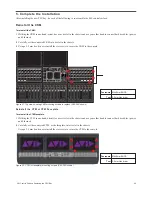
Reinstall the CKM
To reinstall the CKM:
1
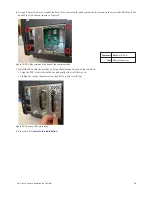
Holding the CKM in one hand, orient it as over its slot in the chassis and use your other hand to connect both its cables (power,
and Ethernet).
2
Carefully set the connected CKM into its slot in the chassis.
3
Using a 2.5 mm hex driver, reinstall the six screws to secure the CKM to the console.
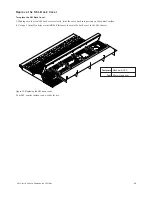
Reinstall the CTM or CTM Faceplate
To reinstall the CTM/faceplate:
1
Holding the CTM in one hand, orient it as over its slot in the chassis and use your other hand to connect both its cables (power,
and Ethernet).
2
Carefully set the connected CTM, or the faceplate, into its slot in the chassis.
Using a 2.5 mm hex driver, reinstall the six screws to secure the CTM to the console.
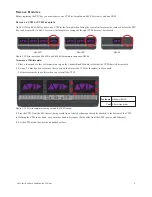
Figure 21. Top view showing CKM mounting screws to replace (S6L-24D shown)
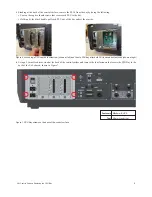
Figure 22. CTM (or faceplate) mounting screws (S6L-24D shown)
60
40
30
20
10
5
0
6
12
60
40
30
20
10
5
0
6
12
Select
Solo
Select
Solo
Select
Solo
Select
Solo
Select
Solo
Select
Solo
Select
Solo
Select
Solo
B
A S
Menu
Safe
Mute
Y
X
Y
X
Y
X
Y
X
Y
X
Y
X
Y
X
Y
X
B
A S
Menu
Safe
Mute
B
A S
Menu
Safe
Mute
B
A S
Menu
Safe
Mute
B
A S
Menu
Safe
Mute
B
A S
Menu
Safe
Mute
B
A S
Menu
Safe
Mute
B
A S
Menu
Safe
Mute
60
40
30
20
10
5
0
6
12
60
40
30
20
10
5
0
6
12
60
40
30
20
10
5
0
6
12
60
40
30
20
10
5
0
6
12
60
40
30
20
10
5
0
6
12
60
40
30
20
10
5
0
6
12
60
30
21
15
9
3
0
3
9
15
60
30
21
15
9
3
0
3
9
15
60
30
21
15
9
3
0
3
9
15
60
30
21
15
9
3
0
3
9
15
60
30
21
15
9
3
0
3
9
15
60
30
21
15
9
3
0
3
9
15
60
30
21
15
9
3
0
3
9
15
60
30
21
15
9
3
0
3
9
15
Nom
60
40
30
20
10
5
0
6
12
60
40
30
20
10
5
0
6
12
Select
Solo
Select
Solo
Select
Solo
Select
Solo
Select
Solo
Select
Solo
Select
Solo
Select
Solo
B
A S
Menu
Safe
Mute
Y
X
Y
X
Y
X
Y
X
Y
X
Y
X
Y
X
Y
X
B
A S
Menu
Safe
Mute
B
A S
Menu
Safe
Mute
B
A S
Menu
Safe
Mute
B
A S
Menu
Safe
Mute
B
A S
Menu
Safe
Mute
B
A S
Menu
Safe
Mute
B
A S
Menu
Safe
Mute
60
40
30
20
10
5
0
6
12
60
40
30
20
10
5
0
6
12
60
40
30
20
10
5
0
6
12
60
40
30
20
10
5
0
6
12
60
40
30
20
10
5
0
6
12
60
40
30
20
10
5
0
6
12
60
30
21
15
9
3
0
3
9
15
60
30
21
15
9
3
0
3
9
15
60
30
21
15
9
3
0
3
9
15
60
30
21
15
9
3
0
3
9
15
60
30
21
15
9
3
0
3
9
15
60
30
21
15
9
3
0
3
9
15
60
30
21
15
9
3
0
3
9
15
60
30
21
15
9
3
0
3
9
15
Nom
MIX
MIX
MIX
PLUG-INS
DYNAMICS
EQ
INPUT
CHANNEL
In
Sel
In
Sel
In
Sel
In
Sel
In
Sel
In
Sel
In
Sel
In
Sel
In
Sel
In
Sel
In
Sel
In
Sel
In
Sel
In
Sel
In
Sel
In
Sel
In
Sel
In
Sel
In
Sel
In
Sel
In
Sel
In
Sel
In
Sel
In
Sel
In
Sel
In
Sel
In
Sel
In
Sel
In
Sel
In
Sel
In
Sel
In
Sel
MIX
MIX
MIX
PLUG-INS
DYNAMICS
EQ
INPUT
CHANNEL
In
Sel
In
Sel
In
Sel
In
Sel
In
Sel
In
Sel
In
Sel
In
Sel
In
Sel
In
Sel
In
Sel
In
Sel
In
Sel
In
Sel
In
Sel
In
Sel
In
Sel
In
Sel
In
Sel
In
Sel
In
Sel
In
Sel
In
Sel
In
Sel
In
Sel
In
Sel
In
Sel
In
Sel
In
Sel
In
Sel
In
Sel
In
Sel
VENUE |
S6L
Solo
Solo
Home
Config
VCAs
Outputs
Layouts
Inputs
Flip
Recall
Trans
F1
F2
F3
F4
F5
NEXT
PREV
Store
Y
X
Y
X
AFL
Dim
In
Sel
SNAPSHOTS
Talk
Back
Multi
Select
Encoder
Assign
Select
Clear
Tap
Tempo
Multi
Assgn
Default
Fine
OK
Cancel
Over
Write
Mix to
Mon
Solo
Clear
60
40
30
20
10
5
0
6
12
60
40
30
20
10
5
0
6
12
8
All
Preview
ASSIGNABLE ENCODER
MONITORING
Push A/B
Hold SIP
SHIFT
ALT
CTRL
ESC
Mute
Mute
A
B
Nom
30
21
15
9
3
0
3
9
15
30
21
15
9
3
0
3
9
15
Inputs/Outputs
Next
Global Controls
0.0 dB
L
Left
0.0 dB
Kick
Mute Group 1
Mute Group
Function Keys
Mute Group 2
Mute Group 3
Mute Group 4
Mute Group 5
Mute Group 6
M1
M2
M3
M4
M5
M6
001/011
reset all inputs
0.0 dB
CH 1
Kick
Ch 1-16
1-16
Aux 1-8
1-8
Aux 9-16
Aux 17-24
Aux 25-32
25-32
VCA 1-8
1-8
VCA 9-16
9-16
Ch 17-32
17-32
9-16
Ch 33-48
33-48
17-24
Ch 49-64
49-64
Ch 65-80
65-80
Ch 81-96
81-96
Fasteners:
Tool:
M4x8mm BHCS
2.5mm Hex driver
Fasteners:
Tool:
M4x8mm BHCS
2.5mm Hex driver


