background image

25

EN

EN

SMART WIFI BULB

F - TECHNICAL AND LEGAL INFORMATION

3 - WARRANTY

•  This product is guaranteed for parts and labour 

for 2 years from the date of purchase. Proof of 
purchase must be retained for the duration of 
the warranty period.

•  The warranty does not cover damage caused 

by negligence, knocks or accidents. The parts 
of this product must not be opened or repaired 
by any persons not employed by Avidsen. The 
warranty will be void if the device is tampered 
with.

• Avidsen undertakes to keep a stock of 

spare parts for this product throughout the 
contractual warranty period.

4 - HELP AND SUGGESTIONS

• If, despite the care we have taken in designing 

our products and drafting these instructions, 
you do encounter diffi culties when installing 
your product or you have any questions, we 
urge you to contact one of our specialists who 
will be glad to help.

• If you encounter operating problems during 

the installation or a few days afterwards, it is 
essential that you are in front of your installation 
when contacting us, so that one of our 
technicians can diagnose the source of the 
problem, as it will probably be the result of a 
setting that is incorrect or an installation that is 
not to specifi cation. If the problem is caused by 
the product itself, the technician will give you 
an RMA number so that you can return the unit 
to the shop.

  Without this RMA number, the shop may refuse 

to exchange your product.

Contact our after sales service team technicians:

0,35 € / min

0 892 701 369

Monday to Friday, 9AM to 12PM and 2PM to 6PM 
CET.

Need some help?

Avidssy

will answer your questions on 
www.avidsen.com

(toll-free, 24/7)

5 - PRODUCT RETURNS - AFTER SALES 
SERVICE

If, despite the care we have taken in designing and 
manufacturing your product, it needs to be returned 
to our customer service centre, you can check the 
progress of the work on our website at the following 
address: https://www.avidsen.com/nos-services

6 - EC DECLARATION OF CONFORMITY

Avidsen hereby declares that the equipment 
designated below:
Avidsen HomeLight reference 127007 complies 
with the RED 2014/53/EU directive and that 
its conformity has been assessed pursuant to 
applicable standards:

Directive 2014/35/EU: (protection of users’ health 
and safety)
- EN 62311:2008
- EN 60950-1:2006 + A11:2009 + A1:2010 
+ A12:2011 + A2:2013EN 62368-1:2014 + 
A11:2017
- EN 62560:2012 + A1:2015
- EN 62493:2015

Directive 2014/30/EU: (protection requirements 
relating to electromagnetic compatibility).
- EN 301 489-1 V2.2.0
- EN 301 489-17 V3.2.0
- EN 55015:2013 + A1:2015
- EN 61547:2009
- EN 61000-3-3:2013
- EN 61000-3-2:2014

Directive 2014/53/EU: (effi cient use of the radio 
spectrum, in order to avoid harmful interference).
- EN 300 328 V2.1.1

Drafted in Tours on 05/11/2019
Alexandre Chaverot, CEO

Summary of Contents for 127007

Page 1: ...EN Smart WiFi Bulb HomeLight ref 127007 www avidsen com V1 Google Play Free available on Available on the Google Play Free available on Available on the Free available o n Avidsen Home V1 ...

Page 2: ...TION AND CREATING AN ACCOUNT 07 4 PAIRING THE BULB 08 5 RESETTING THE SMART BULB 10 D USING THE PRODUCT 12 1 USING THE HOMELIGHT BULB 12 2 BENEFIT AND USE OF PARTS IN THE AVIDSEN HOME APPLICATION 12 2 1 CREATING A FAMILY 12 3 USING THE PRODUCT WITH GOOGLE HOME 13 3 1 IF YOU HAVE AN ANDROID SMARTPHONE WITH GOOGLE ASSISTANT 13 3 2 IF YOU HAVE AN ANDROID SMARTPHONE WITHOUT GOOGLE ASSISTANT OR AN IPHO...

Page 3: ...G THE I M GOING SCENARIO 16 5 2 CREATING AN AUTOMATION 18 5 2 1 PROGRAMMING THE LIVING ROOM LIGHTING AUTOMATION 20 E TECHNICAL AND LEGAL INFORMATION 24 1 TECHNICAL CHARACTERISTICS 24 2 RADIO CHARACTERISTICS 24 3 WARRANTY 25 4 HELP AND ADVICE 25 5 PRODUCT RETURNS AFTER SALES SERVICE 25 6 EC DECLARATION OF CONFORMITY 25 ...

Page 4: ......

Page 5: ... the device Your product does not require any specific maintenance Use a soft slightly damp cloth to clean your product Do not use abrasive or corrosive substances Do not spray any products directly onto the unit 3 RECYCLING This logo denotes that devices no longer in use should not be disposed of as household waste They are likely to contain hazardous substances that are dangerous to both health ...

Page 6: ...6 SMART WIFI BULB EN B PRODUCT DESCRIPTION 1 CONTENTS OF THE KIT 1 E27 base smart bulb 2 Quickstart 1 x 1 2 x 1 ...

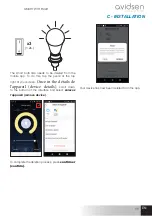
Page 7: ... THE MOBILE APP AND CREATING AN ACCOUNT Once the bulb has been inserted follow the instructions below to pair it Download the Avidsen Home app from the Android Play Store or Apple App Store Launch the app and log in if you already have an account If not press CREER UN NOUVEAU COMPTE CREATE A NEW ACCOUNT and let the application guide you After accepting the privacy policy you can create an account ...

Page 8: ...m folder If you do not receive a code before the countdown has ended press renvoyer return and check the email address or telephone number entered To complete your registration set a password between 6 and 20 characters long with letters and numbers only then press Terminé Finished The application will redirect you directly to your account home page where you can start pairing your devices 4 PAIRI...

Page 9: ...tting the bulb chapter Then press VOYANT DE CONFIRMATION DANS LE FLASH CONFIRMATION LIGHT FLASHES Select your 2 4 GHz WiFi network N B your smartphone must be connected to the WiFi network to which the bulb will be connected enter your network password and press CONFIRMER CONFIRM IMPORTANT if a location authorisation request message appears you need to accept it for your Android or iOS device to r...

Page 10: ...ne and connected Google Assistants and Alexa the bulb must have power Turning the bulb off at the wall switch for example means that it will not be possible to turn on the bulb using the At Home app and the assistants 5 RESETTING THE SMART BULB The following instructions may help you if you have any problems during the pairing procedure To reset the bulb you need to switch the power off and back o...

Page 11: ...p To do this tap the pencil at the top right of your screen Once in the détails de l appareil device details scroll down to the bottom of the interface and select enlevez l appareil remove device To complete the deletion process press confirmer confirm Your device has now been deleted from the app ...

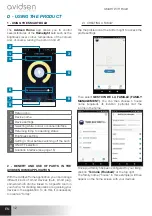
Page 12: ... OF PARTS IN THE AVIDSEN HOME APPLICATION With the Avidsen Home application you can manage different kinds of smart devices bulb smart plug camera which can be linked to a specific room in your home for creating scenarios or organising your devices in the application To do this it is necessary to create a family 2 1 CREATING A FAMILY Tap the profile icon at the bottom right to access the profile s...

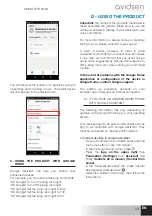
Page 13: ...al modules in one area we recommend that you avoid using a group name suggested by Google Home bedroom office living room etc when naming your command module In the event of problems with the Google Home application or configuration of the device in Google Home contact Google support The setting up procedure depends on your smartphone and requires an Internet connection 3 1 IF YOU HAVE AN ANDROID ...

Page 14: ...ur phone or tablet install and launch the Google Home app and log in to the account corresponding to your Google Home speaker In the lower right hand corner press Compte Account Next press Configurer ou ajouter Set up or add and then Configurer un appareil Set up device Press Vous avez déjà configuré des appareils Have something already set up In the list that appears press Avidsen Home Then enter...

Page 15: ...connect an automated device In the Amazon Alexa app press the menu at the top left and select Ajouter un appareil Add a device Select the type of device you want to connect Select the brand and follow the instructions on the screen Use voice command to connect an automated device Once a skill is installed say Alexa find new devices After 45 seconds Alexa will give you the devices found For more in...

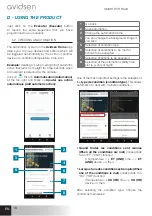
Page 16: ...for more details 2 Allows you to insert a pause of an adjustable time period in the performance of actions 3 Displays the list of products already linked in the app and the possible actions The Choisissez votre automatisation Choose your automation function allows you to call on an automation that has already been saved and enable or disable it while the new scenario is running 5 1 1 PROGRAMMING T...

Page 17: ...ctions for the camera and the plug will then appear in the scenario list You will then have to press Sauvegarder Save at the top right to complete the scenario The scenario you have just created will appear on the list on theScénario Scenario tab of the app If you wish to access the details or delete it click on the icon at the top right of its name If you checked the Apparaît sur la première page...

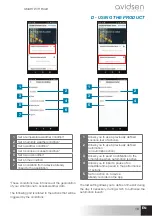
Page 18: ... 3 5 4 2 6 7 8 1 Go back 2 Save automation 3 Change the automation name 4 You can change the background image if you wish 5 Selection of condition type 6 Selection of conditions to be met for actions to be executed 7 Selection of actions to be executed 8 Selection of the automation validity time slot e g only at night One of the most important settings is the selection of the type de condition con...

Page 19: ...er data The following part is related to the actions that will be triggered by the conditions 1 3 5 2 4 1 Allows you to use a previously defined scenario set of actions 2 Allows you to use a previously defined automation an automatic action 3 Allows you to send a notification to the smartphone when automation is active 4 Allows you to insert a pause of an adjustable time period in the performance ...

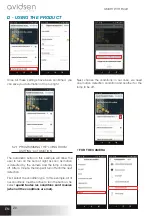
Page 20: ...lb at night as soon as motion is detected by the camera and the lamp is already off After a minute the lamp will turn off until the next detection First select the condition type In this example all of our conditions must be active to turn the bulb on So select quand toutes les conditons sont réunies when all the conditions are met Next choose the conditions in our case we need one motion detectio...

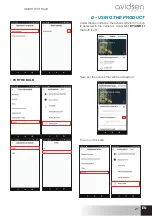
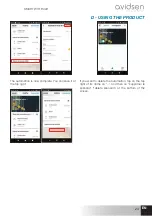
Page 21: ...LB D USING THE PRODUCT FOR THE BULB Under these conditions the actions will start if motion is detected in the camera s visual field ET AND if the bulb is off Now set the actions that will be carried out To turn on the bulb ...

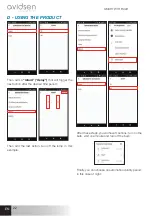
Page 22: ...gger the next action after the desired time period Then add the last action turn off the lamp in this example After these steps you will have 3 actions turn on the bulb wait one minute and turn off the bulb Finally you can choose an automation validity period in this case at night ...

Page 23: ...ING THE PRODUCT The automation is now complete You can save it at the top right If you want to delete the automation tap on the top right of its name on and then on supprimer le scénario delete scenario at the bottom of the screen ...

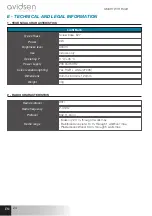
Page 24: ...dio range Masonry 20 m through 3 walls max Reinforced concrete 10 m through 1 wall floor max Plasterboard Wood 30 m through 5 walls max Operating T 0 C 45 C Power supply 230 Vac 50 Hz Colour variation lighting Yes RGB white 2700K Dimensions 34mm x 60mm x 120mm Weight 40g 1 TECHNICAL CHARACTERISTICS 2 RADIO CHARACTERISTICS Brightness level 900lm Protocol 802 11 b g n ...

Page 25: ...e technician will give you an RMA number so that you can return the unit to the shop Without this RMA number the shop may refuse to exchange your product Contact our after sales service team technicians 0 35 min 0 892 701 369 Monday to Friday 9AM to 12PM and 2PM to 6PM CET Need some help Avidssy will answer your questions on www avidsen com toll free 24 7 5 PRODUCT RETURNS AFTER SALES SERVICE If d...

Page 26: ...Avidsen 19 avenue Marcel Dassault ZAC des Deux Lions 37200 Tours France ...

Reviews: