background image

2

English

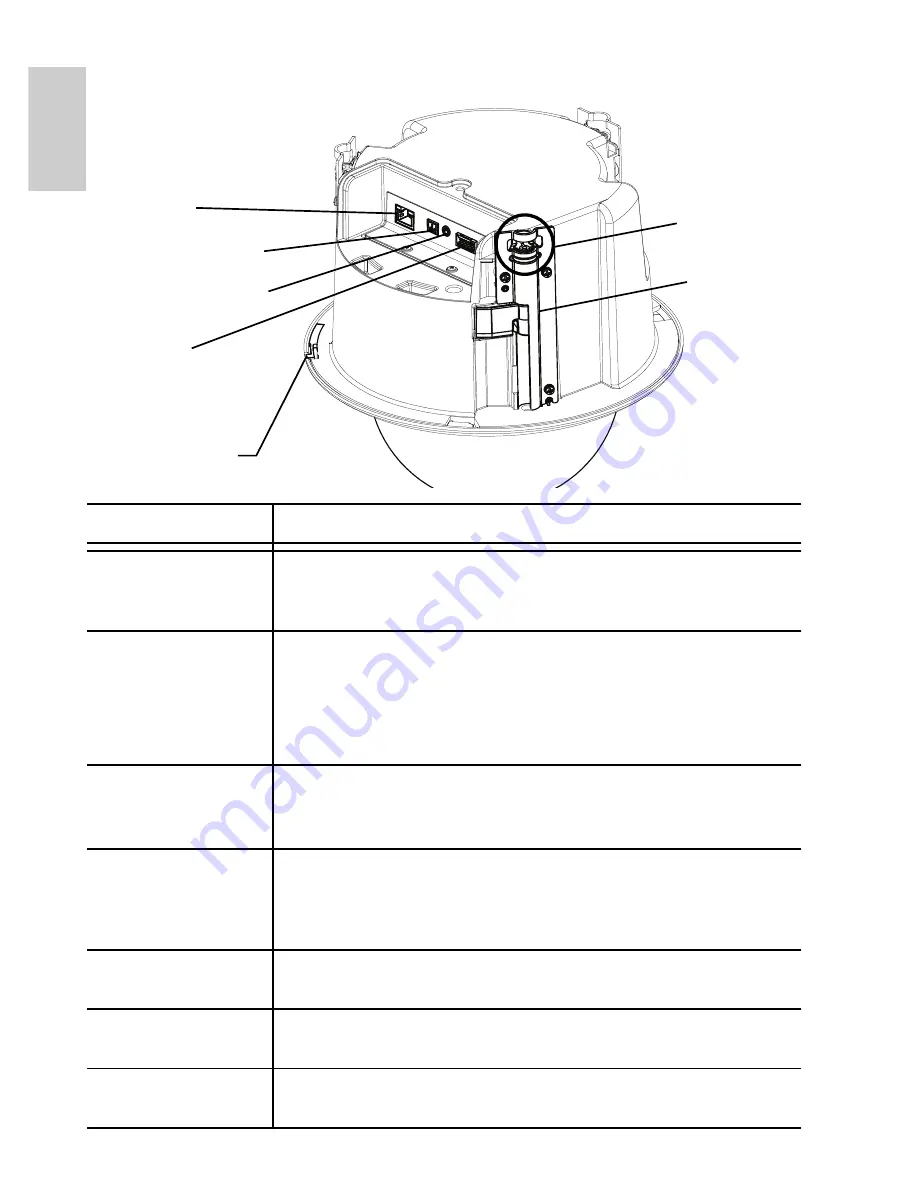
Side View

Feature

Description

Power Connector 
Block

Accepts a terminal block with either AC or DC power 
connection. DC input can be either polarity. Only 
required when Power over Ethernet is not available.

Ethernet Port

Accepts an Ethernet connection to a network. Server 
communication and image data transmission occurs 
over this connection. Also receives power when it is 
connected to a network that provides Power over 
Ethernet.

Audio/Video 
Connector

Accepts a mini-jack connector (3.5 mm). See the 
section about connecting microphones and monitors 
for more information.

I/O Terminals

Provides connections to external input/output devices. 
See the section about connecting external devices for 
more information.

Cover Release 

Tab

Allows you to unlock and remove the dome cover.

Clamps

Three spring loaded locking mechanisms that secure 

the camera to the mounting surface.

Lanyard Anchor

Safety lanyards can attach to anchors at the top of each 
clamp to help prevent the camera from falling.

Power Connector Block

Ethernet Port

I/O Terminals

Cover Release Tab

Clamps

Audio/Video Connector

Lanyard 
Anchor

Summary of Contents for 1.0W-H3PTZ-DC20

Page 1: ...Installation Guide Avigilon High Definition H 264 PTZ IP Dome Camera Models 1 0W H3PTZ DC20 and 2 0W H3PTZ DC20 920 0074A Rev1 ...

Page 2: ......

Page 3: ...E802 3at Type 2 compliant Power Sourcing Equipment PSE rated 42 5 57 VDC 25 5W min Any external power supply connected to this product may only be connected to another Avigilon product of the same model series External power connections must be properly insulated Do not connect directly to mains power for any reason The Warning symbol indicates the presence of dangerous voltage within and outside ...

Page 4: ...rts Refer all servicing to qualified personnel Servicing may be required when the device has been damaged such as from a liquid spill or fallen objects has been exposed to rain or moisture does not operate normally or has been dropped Do not use strong or abrasive detergents when cleaning the device body Use only accessories recommended by Avigilon Caution Failure to observe the following instruct...

Page 5: ...nse will be required to take whatever measures may be required to correct the interference Changes or modifications made to this equipment not expressly approved by Avigilon Corporation or parties authorized by Avigilon Corporation could void the user s authority to operate this equipment Disposal and Recycling Information When this product has reached the end of its useful life please dispose of ...

Page 6: ...pecifications and materials contained herein and shall not be responsible for any damages including consequential caused by reliance on the materials presented including but not limited to typographical and other errors relating to the publication Intellectual Property Notice No license is granted by implication or otherwise under any industrial design industrial design rights patent patent rights...

Page 7: ...ing Cables 6 Assigning an IP Address 7 Accessing the Live Video Stream 7 Mounting the PTZ Dome Camera 8 Installing the Dome Cover 8 For More Information 9 Cable Connections 10 Connecting External Power 10 Connecting to External Devices 11 Connecting to Microphones Speakers and Video Monitors 12 LED Indicators 13 Reset to Factory Default Settings 14 Setting the IP Address Through the ARP Ping Metho...

Page 8: ...English ...

Page 9: ... Product serial number and part number label Link LED Indicates if there is an active connection in the Ethernet port Connection Status LED Provides information about device operation See LED indicators for more information Connection Status Serial Number Label Link LED ...

Page 10: ...onnector Accepts a mini jack connector 3 5 mm See the section about connecting microphones and monitors for more information I O Terminals Provides connections to external input output devices See the section about connecting external devices for more information Cover Release Tab Allows you to unlock and remove the dome cover Clamps Three spring loaded locking mechanisms that secure the camera to...

Page 11: ...Installation Steps Complete the following procedures to install the dome camera 1 Preparing the Camera for Installation on page 4 2 Cutting the Mounting Hole on page 5 3 Optional Attaching the Back Panel for Plenum Installation on page 5 4 Connecting Cables on page 6 5 Assigning an IP Address on page 7 6 Accessing the Live Video Stream on page 7 7 Mounting the PTZ Dome Camera on page 8 8 Installin...

Page 12: ...ss the cover release tab and twist the dome cover until it is released from the base The dome cover can only move in one direction 3 Remove the protective material inside the dome cover 4 Using the provided screw driver push each of the clamps into the dome camera until the spring is fully compressed then turn the clamp into the ready position 3X Ready Position ...

Page 13: ... If you are installing the dome camera into a plenum space install the back panel to meet plenum compliance 1 Attach a conduit connector to the cable entry hole on the back panel Install the conduit and its fitting as instructed by the manufacturer 2 Pull the required cables through the conduit then through the cable entry hole in the back panel 3 After you make the cable connections screw the bac...

Page 14: ...and Video Monitors 3 Connect power using one of the following methods Power over Ethernet PoE Plus IEEE 802 3at Class 4 Connect a PoE Plus compliant injector or switch to the Ethernet network cable External Power Connect an external Class 2 or LPS or Limited Power Source with output rated 24 VAC 10 24 VA minimum or 24 VDC 10 20 W minimum For more information see Connecting External Power NOTE The ...

Page 15: ...pplication Camera s web browser interface http camera IP address ARP Ping method For more information see Setting the IP Address through the ARP Ping Method Network Video Management software application for example Avigilon Control Center NOTE The default camera username is admin and the default password is admin Accessing the Live Video Stream Live video stream can be viewed using one of the foll...

Page 16: ...the camera from falling 2 Push the PTZ dome camera into the mounting hole 3 Use the provided screw driver and release the clamps to secure the camera into place Installing the Dome Cover 1 Align the notches on the dome cover with the release tab on the base The dome cover should be flush against the camera base 2 Slide the dome cover clockwise until it locks into place NOTE Be careful not to scrat...

Page 17: ... the device is available in the following guides Avigilon Camera Installation Tool User Guide Avigilon Control Center Client User Guide Avigilon High Definition H 264 Web Interface User Guide The manuals are available on the Avigilon website http avigilon com support and downloads ...

Page 18: ...wer connector block complete the following steps 1 Remove the power connector block from the device 2 Remove the insulation from 6 mm of the power wires Do not nick or damage the wires 3 Insert the two power wires into the two terminals on the power connector block The connection can be made with either polarity Use a small slotted 5 64 or 2 mm blade width screwdriver to loosen and tighten the ter...

Page 19: ...o energize a relay coil with up to 50 mA If more than 50 mA is required an external power supply up to 25 VDC at 120 mA can be used Table External I O Connector Pin Description 1 12 VDC 50 mA max output for relay drive 2 Relay ground return 3 Relay input 1 4 Relay input 2 5 Relay output 1 6 Relay output 2 GND 3 3V GND MAX 50 mA GND GND 12V 3 3V GND 1 2 3 4 5 6 MAX 120 mA MAX 120 mA RELAY RELAY SWI...

Page 20: ...supports line level mono audio input and an NTSC or PAL video output The video output signal is determined by the camera flicker control setting When the camera flicker control is set to 60 Hz the video output signal is NTSC When the flicker control is set to 50 Hz the video output signal is PAL Use the Avigilon Camera Installation Tool to configure the camera s flicker control in the Image and Di...

Page 21: ...Table LED Indicators Connection State Connection Status LED Description Obtaining IP Address One short flash every second Attempting to obtain an IP address Discoverable Two short flashes every second Obtained an IP address but is not connected to the Network Video Management software Upgrading Firmware Two short flashes and one long flash every second Updating the firmware Connected On Connected ...

Page 22: ...OTE Be careful not to scratch the dome bubble Figure The firmware revert button between the status LEDs 1 Ensure the camera is powered on 2 Remove the dome cover 3 Using a straightened paperclip or similar tool gently press and hold the firmware revert button for two seconds 4 Re install the dome cover Caution Do not apply excessive force Inserting the tool too far will damage the device Firmware ...

Page 23: ...n the Serial Number Tag for reference 2 Open a Command Prompt window and enter the following commands a arp s New Camera IP Address Camera MAC Address For example arp s 192 168 1 10 00 18 85 12 45 78 b ping l 123 t New Camera IP Address For example ping l 123 t 192 168 1 10 3 Reboot the camera 4 Close the Command Prompt window when you see the following message Reply from New Camera IP Address ...

Page 24: ...ylic clear Body Plastic plenum rated UL 2043 Housing Recessed mount Finish Plastic RAL 9003 Tilt 186 E flip 0 05 360 sec Pan 360 endless 0 05 450 sec Presets 100 named presets Tours 10 named guard tours Electrical Power Consumption 20 W Power Source VAC 24 V 10 VDC 24 V 10 PoE IEEE 802 3at Class 4 PoE Plus compliant Power Connector 2 pin terminal block Environmental Operating Temperature 10 C to 5...

Page 25: ...E VALIDLY WAIVED No oral or written information advice or representation provided by Avigilon its distributors dealers agents or employees shall create another warranty or modify this warranty This warranty states Avigilon s entire liability and your exclusive remedy against Avigilon for any failure of this product to operate properly In no event shall Avigilon be liable for any indirect incidenta...

Reviews: