background image

36

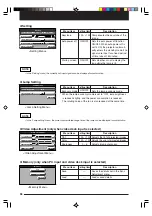
 Setting

Quit

S e t t i n g

Auto power off

O N

OFF

/

Keystone

0

Start up screen

O N

OFF

/

Input signal 1024 X   768

60Hz

48.2KHz

Standard

<Setting Menu>

NOTE

• In the “Setting” menu, the currently set input signals can be displayed for confirmation.

 Lamp Setting

Quit

Lamp Setting

Economy mode

O N

OFF

/

Lamp usage time

10 H

<Lamp Setting Menu>

NOTE

• In the “Lamp setting” menu, the current accumulated usage time of the lamp can be displayed for confirmation.

 Video Adjustment (only when video deck input is selected)

Sharpness

Quit

Vi d e o   a d j u s t m e n t

0

Color

0

Tint

0

R

R

R

G

G

G

Standard

<Video Adjustment Menu>

 Memory (only when PC input and video deck input is selected)

M e m o r y

S ave

L o a d

Q u i t

<Memory Menu>

Menu Item

Tint

Color

Sharpness

Setting Item

-100 ~ +100

-100 ~ +100

0 ~ 6

Description

Adjusts the tint of projected images.

Adjusts the color of projected images.

Adjusts image sharpness.

Menu Item

Save

Load

Setting Item

Description

Saves the details set in the Sync
Adjustment menu.

Loads saved details.

Menu Item

Keystone

Auto power off

Startup screen

Setting Item

-100 ~ +100

ON/OFF

ON/OFF

Description

Compensates the keystone of the
image.

Sets the auto power off function
ON/OFF. When auto power off is
set to ON, the projector automati-
cally enters the standby mode if no
signals are input for a fixed period
of time (about 15 minutes).

Sets whether or not to display the
logo while the lamp is lit.

Menu Item

Economy mode

Setting Item

ON/OFF

Description

Sets the lamp economy mode.

* When the lamp economy mode is set to “ON”, lamp brightness

is reduced slightly, and the power consumption is reduced.
The rotating noise of the fan is also reduced at the same time.

Summary of Contents for MP-15E

Page 1: ...e Center Electronics Equipment Division 2 28 2 Hongo Seya ku Yokohama Zip code 246 0015 Tel 81 45 304 8233 To customers Enter the name and date of the store where you purchased this product This information will be useful when you ask your dealer for repair Date of Purchase year month day Store of Purchase Telephone Number 7000468 R015Eq NIPPON AVIONICS CO LTD ...

Page 2: ...OHP Pickup unit actual Pickup speed object Pickup size projection section PC Signal system Analog Video signal RGB Input Sync Signal Input Output Terminals Connection Cable Video Signal system Input Terminal Monitor Video signal Output Sync Signal Output Terminal PC Audio Signal Video Input Terminal Monitor Audio Signal Output Output Terminal Audio Output Operating Range of Temperature and Humidit...

Page 3: ...o the projector through the air vents Do not place any object containing water on top of or next to the projector If foreign matter gets inside the projector If foreign matter such as water or metal gets inside immediately pull out the power plug It is dangerous to continue using the projector when foreign matter gets inside Return the projector to the dealer where it was purchased for servicing D...

Page 4: ...The air vents lamp cover and peripheral surfaces may be hot during opera tion or just after the light is turned off Do not touch those for a long time Do not block the lens front Do not block the lens front during operation The powerful rays passing through the lens may cause fire or burns if you put anything in front of the lens or block the lens with your hand during operation CAUTION Installati...

Page 5: ... components cleaned by a retailer about once a year There is a risk of fire or faulty operation if the inside of the projector gets dusty and is not cleaned for a long time For best effect the projector should be serviced before the wet season brings damp conditions Cleaning charges are at the discretion of the retailer If not using the projector for a long period If you do not plan to use the pro...

Page 6: ... do the followings Do not put anything heavy on the projector Do not step on the projector rack or stand Do not hold or hang on the projec tor Doing so may cause the projector to turn over or break resulting in injury Especially be careful if small kids are near Do not use the rack unless the casters are locked when placing the project on a rack with casters Doing so may cause the projector to mov...

Page 7: ...ions Operation of this equipment in a residential area is likely to cause harmful interference in which case the user will be required to correct the interference at his own expense FCC WARNING Changes or modifications not expressly approved by the party responsible for compliance could void the user s authority to operate the equipment For FCC compatibility use only cables specified by AVIO to co...

Page 8: ...en are not Projected 21 Input Signal Compatibility Table PC video input 22 Connecting to a Video Deck or Laser Disc Player 25 Basic Operation 26 Basic operation of PC or video input 26 When you have finished using the projector 28 Basic Operations in the OHP Mode 29 PC Zoom 32 Compensating Keystone 33 Performing Various Adjustments 34 Basic Operation 38 About the Memory Menu 42 Maintenance 44 Prot...

Page 9: ...her indicator LEDs are also located here See pages 12 and 13 Air Vent A3 bottom of main unit Air is taken in through this vent Adjustable Feet These feet are for adjusting the tilt angle as well as the left and right balance of the projected image Turning them counterclockwise raises the main unit and turning them clockwise lowers the main unit See page 16 Anti theft Lock See the NOTE on the next ...

Page 10: ...gy Group 2855 Campus Drive San Mateo CA 94403 U S A Phone 650 572 2700 Fax 650 572 9675 Document Pickup Section Place documents or printed matter here to project images when OHP is selected See page 29 Air Vent B Air is discharged from the inside to the outside through this vent Remote Control Sensor Power Input Terminal Plug the power cord into this terminal See page 18 Speakers I O Terminal Sect...

Page 11: ...nal S VIDEO Video Deck Input Terminal Input terminal for the PC analog RGB signals When OHP is selected OHP images are output When PC VIDEO is selected and during standby input PC video is output as it is Audio input terminal for a PC stereo compatible Audio input terminals for a video deck stereo compatible Input terminal for video deck NTSC PAL SECAM Input terminal for video deck Y C Audio outpu...

Page 12: ...main unit is projected These buttons adjust the OHP zoom ratio Pressing the left button reduces the image and pressing the right button enlarges the image These buttons adjust the OHP brightness Pressing the left button darkens the screen and pressing the right button lightens the screen When OHP is selected this button freezes unfreezes the pro jected image This button cannot be used in the PC an...

Page 13: ...s and adjustment values are stored to memory if buttons are not operated for about 15 seconds For details of menu adjustment see page 34 onwards Press this button to display the menu screen or select menus For menu setting details see page 34 onwards Press these buttons to select and adjust items selected by the MENU button This button can also be used to adjust the volume when the menu screen is ...

Page 14: ...ivated neither the PORTRAIT button nor the brightness adjustment button are operable To perform these operations first switch off the FREEZE button Set the PORTRAIT display of the output screen or cancel it when OHP is selected These buttons adjust the OHP magnification in the OHP mode Adjusts the magnification of the PC in the PC mode The left button reduces the image while the right button enlar...

Page 15: ...and marks 3 Slide the cover into position on the battery compartment CAUTION Handling the remote controller Do not subject the remote controller to strong impact shock Keep the remote controller away from water Wipe the remote controller immediately if it gets wet Avoid heat or hot water Remove the dry cells when you are not using the remote controller for a long period of time Do not mix new and ...

Page 16: ... extreme angles by turning only one side of the adjustable feet Doing so may cause the main unit to slip or fall down resulting in accidents or failures Vent A1 takes in air to cool the inside of the projector As air is taken in by large suction force cloth or paper may be sucked in against the vent If this happens the temperature inside may build up and cause accident or failure The rubber feet m...

Page 17: ...te and is difficult to view In a bright room use a curtain or other means to darken the area around the screen Do not install the projector where it will be subject to excessive humidity dust or cigarette smoke Otherwise image quality may deteriorate as dirt builds up on the lens mirrors and other optical components Do not install the projector in a small room with poor air circulation or any plac...

Page 18: ...TANDBY button 3 Turn the direction of the lens so that it is perpendicular to the screen Turn the unit to the left or right so that the top and bottom lines of the screen are parallel 4 Adjust the adjustable feet to move the projected image to the desired height Adjust the tilt angle between 0 to 7 The position of the projected image can be moved up or down by adjusting tilt 90 Adjustable feet ...

Page 19: ...ni D SUB 15 pin VGA Each maker PowerBook G3 The monitor output needs to be mini D SUB 15 pin PowerBook excluding iBook DUO 100 140 145B 150 170 etc PowerBook DUO Cannot be connected to models without monitor output such as iBook PowerBook 100 140 145B 150 170 etc G3 G4 The monitor output needs to be mini D SUB 15 pin Each model excluding monitor integrated type The monitor integrated type such as ...

Page 20: ...als The following shows the relationship between the pins and the input and output signals q RED VIDEO y GND 1 GND w GREEN VIDEO u GND 2 e BLUE VIDEO i GND 3 H SYNC r GND o 4 V SYNC t 0 GND 5 NOTE This projector uses a 15 pin RGB input and an analog type output terminals For this reason it cannot be connected to a digital output type personal computer ...

Page 21: ...re not input to MP 15E No PC signal appears on the MP 15E display Check the following if No PC signal appears 1 Restart the computer The connection of MP 15E may not be recognized by the personal computer if MP 15E is connected after the PC is started up If the connection is not recognized images are not projected because no external output signals from the PC are output 2 Check the functions of t...

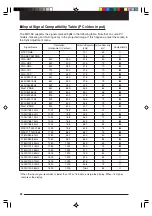
Page 22: ...8 75Hz 1024 768 60 0 75 1024 768 85Hz 1024 768 68 7 85 MAC19 1024 768 1024 768 60 2 75 MAC21 1152 864 1152 864 68 7 75 1280 960 60Hz 1280 960 60 0 60 1280 960 85Hz 1280 960 85 9 85 1280 1024 60Hz 1280 1024 64 0 60 1280 1024 75Hz 1280 1024 80 0 75 1280 1024 85Hz 1280 1024 91 1 85 1600 1200 60Hz 1600 1200 75 0 60 1600 1200 65Hz 1600 1200 81 3 65 1600 1200 70Hz 1600 1200 87 5 70 1600 1200 75Hz 1600 1...

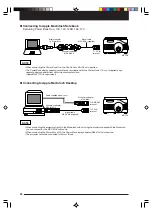
Page 23: ...utput terminal on PC To speaker input terminals To RGB input connector on monitor To analog RGB connector on PC The connector cable model No differs according to the type of PC R L V OUT IN PC AUDIO VIDEO IN S VIDEO TEST RGB OUT PC IN Rear of MP 15E main unit Signal cable MPC VGA supplied To PC IN terminal MP 15E Connecting to an IBM Desktop and Compatible DOS V NOTE When connecting the projector ...

Page 24: ...intosh Desktop NOTE When connecting the projector directly to the Macintosh without using the monitor supplied with the Macintosh you can connect by the MPC MAC cable only When connecting the Power Mac 6100 the Power Mac display adapter M2681LL A is required The projector cannot be connected to iMac or iBook Cable supplied with monitor Conversion adapter MPA MAC Conversion adapter MPA MAC P Signal...

Page 25: ...IDEO are connected S VIDEO is given higher display priority Before using the video deck or laser disk player close the document cover Otherwise the glass on the document pickup section may vibrate and cause a rattling sound Laser Disk Player Video Deck Or To Audio Output Terminal R L V OUT IN PC AUDIO VIDEO IN S VIDEO TEST RGB OUT PC IN Terminal Section on Rear of MP 15E To Video Output Terminal ...

Page 26: ...ge 49 2 Select the external input device Select the video source to be displayed from OHP PC video deck NOTE When PC video is selected and the device is not connected or the connected device is not turned on a blue display appears and No input is displayed 3 Adjust the zoom Adjust the screen size by turning the zoom adjustment ring on the projector lens VIDEO PC OHP Remote Control Operation ON STA...

Page 27: ...projection lens until the projected image is sharp 5 Compensate keystone See Compensating Keystone on page 33 6 Adjust the PC zoom See PC Zoom on page 32 7 Adjust the volume Remote Control Operation Remote Control Operation Remote Control Operation KEYSTONE ZOOM VOLUME ...

Page 28: ...ight for one minute is displayed 9 Disconnect the power cord The power indicator LED on the operation panel goes out CAUTION Do not disconnect the power cord before turning off the lamp or before the lamp LED goes out Doing so might shorten the life of the lamp Disconnect the power cord from the power outlet if you are not going to use the projector for a long period of time Allow at least about t...

Page 29: ...rojected even if the document cover is not closed However unwanted objects will also be picked up making the projected image difficult to view 2 Adjust the zoom ratio You can adjust the zoom between 1x to 2x Pressing the button on the left reduces the image and pressing the button on the right enlarges the image 1 2 3 Main Unit Operation ZOOM Remote Control Operation ZOOM 3 Move the zooming positi...

Page 30: ...tion even if the document is moved When images are frozen the FREEZE LED lights green When images are frozen zoom moving of the zooming position and keystone compensation are possible Bright ness however cannot be compensated 6 Switch to portrait display The output screen is switched to the portrait display mode by turning the PORTRAIT button ON when projecting portrait documents The left and righ...

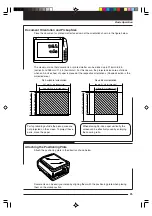
Page 31: ...ize paper vertically the screen can be effectively used by enlarging the zooming ratio Parts protruding outside the pickup area are not projected on the screen To project these parts move the paper 297 mm 11 6 in paper size 288 mm 11 3 in pickup size 210 mm 8 3 in paper size 216 mm 8 5 in pickup size A4 horizontal orientation 288 mm 11 3 in pickup size 210 mm 8 3 in paper size 216 mm 8 5 in pickup...

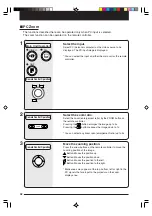
Page 32: ...n enlarges the image up to 4x Pressing the button reduces the image down to 1x You can select any zoom ratio enlargement ratio up to 4x 3 Move the zooming position Press the arrow buttons on the remote controller to move the zooming position of the image Button Moves the position up Button Moves the position down Button Moves the position to the left Button Moves the position to the right Blank ar...

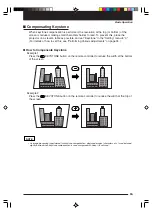
Page 33: ... of how to set this see Performing Various Adjustments on page 34 How to Compensate Keystone Example 1 Press the KEYSTONE button on the remote controller to reduce the width at the bottom of the screen Example 2 Press the KEYSTONE button on the remote controller to reduce the width at the top of the screen NOTE As image processing is performed for keystone compensation displayed images characters ...

Page 34: ...N OFF Lamp usage time 0 H MENU SET Image adjustment Sync adjustment Setting Projection mode Language selection Lamp setting Memory Quit Volume MENU Image adjustment Video adjustment Setting Projection mode Language selection Video select Quit Volume MENU Brightness Red Blue Standard Quit Image adjustment 0 0 0 Contrast 0 Blue Quit Image adjustment 0 Red 0 Gamma PHOTO TEXT Standard Phase Horizontal...

Page 35: ...ot be adjusted within the range 100 to 100 depending on the PC input signal Menu Item Gamma Red Blue Setting Item PHOTO TEXT 100 100 100 100 Description The TEXT setting compensates for text documents and the PHOTO setting compensates for photo documents Select the setting to suit the document you are projecting Adjusts the shade of the color red Adjusts the shade of the color blue Menu Item Clock...

Page 36: ... Setting Item 100 100 100 100 0 6 Description Adjusts the tint of projected images Adjusts the color of projected images Adjusts image sharpness Menu Item Save Load Setting Item Description Saves the details set in the Sync Adjustment menu Loads saved details Menu Item Keystone Auto power off Startup screen Setting Item 100 100 ON OFF ON OFF Description Compensates the keystone of the image Sets t...

Page 37: ...0 PAL B G H I NTSC 3 58 SECAM NTSC 4 43 Video Select Menu Menu Item Projection mode Setting Item Standard Rear Description Adjusts the projection mode according to the installation method front standard projection or rear projection Menu Item Video select Setting Item AUTO PAL B G H I NTSC3 58 SECAM NTSC4 43 PAL M PAL N PAL 60 Description Selects the input signal type Menu Item Volume Setting Item...

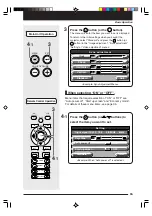
Page 38: ...ich is described on page 42 1 Press the MENU button or the MENU button The main menu is displayed Image adjustment Sync adjustment Setting Lamp setting Projection mode Language selection Memory Quit Volume MENU Example When PC input is selected 2 Press the MENU button or buttons to select the item you want to set Image adjustment Volume Setting Lamp setting Projection mode Language selection Memor...

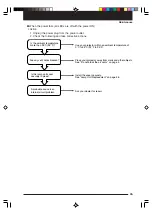
Page 39: ...stment menus Phase Horizontal Vertical Standard Quit Sync adjustment 0 9 15 Clock 0 Example Sync Adjustment Menu Main Unit Operation MENU SET ADJUST VOLUME Remote Control Operation 4 1 Press the MENU button or buttons to select the item you want to set Quit Setting Auto power off O N OFF Keystone 0 Start up screen O N OFF Input signal 1024 X 768 60Hz 48 2KHz Standard Example When Auto power off is...

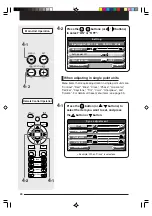
Page 40: ...stone Tint Color Sharpness and Volume For details of these menu items see page 35 4 1 Press the MENU button or buttons to select the item you want to set and press the button or button Example When Clock is selected 4 1 Remote Control Operation 4 2 4 2 Press the buttons or buttons to select ON or OFF Quit Setting Auto power off O N OFF Keystone 0 Start up screen O N OFF Input signal 1024 X 768 60H...

Page 41: ...LUME 5 Remote Control Operation Others Other menu items include Language selection Projection mode and Video select For details of menu items see page 35 4 2 Press the buttons or buttons to adjust the setting 5 Press the MENU button or buttons to select Quit and then press the SET button or button This returns the display to the main menu The display automatically disappears and adjustment values ...

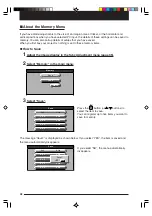
Page 42: ...to Save 1Adjust the image display in the Sync Adjustment menu page 35 2 Select Memory in the main menu Memory Save Load Quit 3Select Save Press the MENU button or buttons to select the item to save You can register up to five items you want to save to memory The message Save is displayed as shown below If you select YES the item is saved and the menu automatically disappears If you select NO the m...

Page 43: ...is displayed as shown below If you select YES the item is loaded and the menu automatically disappears If you select NO the menu automatically disappears Load 1024 x 768 0 x 0 0 x 0 1280 x 720 60Hz 0 Hz 0 Hz 0 Hz 60Hz 0 x 0 0 Hz 1024 x 768 0 x 0 0 x 0 0 x 0 1280 x 720 60Hz 0 Hz 0 Hz Load Load N O YES NOTE Even if selected the selected channel is canceled and signal identification is switched to au...

Page 44: ...see page 46 When the ALARM LED is lit Action 1 Unplug the power plug from the power outlet 2 Check the following and take corrective actions Use your projector within an ambient temperature of 0 C to 35 C 32 F to 95 F Is the ambient temperature more than 35 C 95 F Are any vent holes blocked Is the air filter clogged A probable cause is an internal circuit problem When the ALARM LED is OFF your pro...

Page 45: ... an ambient temperature of 0 C to 35 C 32 F to 95 F Is the ambient temperature more than 35 C 95 F Are any vent holes blocked Is the lamp unit cover securely in place A probable cause is an internal circuit problem Ask your dealer for repair Install the cover securely See Lamp Unit Replacement on page 46 Place your projector away from walls and other objects See Do not block the air vents on page ...

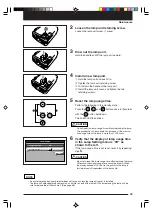
Page 46: ...d in the Lamp setting menu for confirmation For details see page 36 When the LAMP LED is lit without the lamp lighting When the cumulative usage time of the lamp is more than 1000 hours WARNING Do not replace the lamp unit immediately after you have turned the projector off The lamp becomes very hot and may cause a burn injury Turn off the lamp unplug the plug from the power outlet and then wait a...

Page 47: ...y of a lamp explosion increases if the cumula tive usage time of the lamp is more than 1000 hours 6 Verify that the display of lamp usage time in the Lamp Setting menu is 0H as shown to the left If the lamp usage time is not reset reset it by repeating step 5 CAUTION Be sure to reset the lamp usage time after replacing the lamp Otherwise the correct usage time cannot be known When the display exce...

Page 48: ...side surface of the sponge as shown in the illustration 3 Mount the air filter Follow step 1 in reverse order CAUTION Caring for the Air Filter and Cautions Do not wash the air filter with water or other liquids This may cause the filter to clog Do not wipe the air filter with a cloth or a wet rag as this too may cause the filter to clog Always vacuum from the outside of the air filter If you vacu...

Page 49: ...correctly set Verify the functions of the PC Verify that the projector is placed properly Keystone compensation may be applied Check the focus Make sure that the projection distance is within the focusing distance Keystone compensation may be applied Adjust Phase in the Sync Adjustment menu Perform the automatic sync adjustment by pressing the AUTO SYNC button Check the setting of the Sync Adjustm...

Page 50: ...sult your dealer Repairs can be performed at cost to the user if the functions of the product can be maintained WARRANTY SERVICE PROCEDURE Before asking for service check the Troubleshooting section once again If as a result of this check you think that a fault has developed contact the dealer from whom you purchased the product When asking for service provide your dealer with the following inform...

Page 51: ...OHP Pickup unit actual Pickup speed object Pickup size projection section PC Signal system Analog Video signal RGB Input Sync Signal Input Output Terminals Connection Cable Video Signal system Input Terminal Monitor Video signal Output Sync Signal Output Terminal PC Audio Signal Video Input Terminal Monitor Audio Signal Output Output Terminal Audio Output Operating Range of Temperature and Humidit...

Page 52: ...e Center Electronics Equipment Division 2 28 2 Hongo Seya ku Yokohama Zip code 246 0015 Tel 81 45 304 8233 To customers Enter the name and date of the store where you purchased this product This information will be useful when you ask your dealer for repair Date of Purchase year month day Store of Purchase Telephone Number 7000468 R015Eq NIPPON AVIONICS CO LTD ...

Reviews: