background image


- 4 - 

System Configuration: ..............................................................................................................................18


Advance Settings ......................................................................................................................................18


Information ...............................................................................................................................................18


Log Out .....................................................................................................................................................18


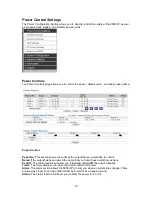
Power Control Settings ...............................................................................................................................19


Power Controls .........................................................................................................................................19


Scheduler Settings ....................................................................................................................................21


Ping Settings .............................................................................................................................................24


PC Control Settings ..................................................................................................................................28


Ethernet to RS232 .....................................................................................................................................30


System Configuration ..................................................................................................................................31


User Management .....................................................................................................................................31


Change Password ......................................................................................................................................32


Network Settings ......................................................................................................................................33


PPPOE Settings ........................................................................................................................................34


Date & Time .............................................................................................................................................35


Advance Configuration ...............................................................................................................................36


Maintenance ..............................................................................................................................................36


DDNS .......................................................................................................................................................37


IP Server & CNT ......................................................................................................................................37


Telnet & Snmp Settings ............................................................................................................................38


Email Settings ...........................................................................................................................................38


Blacklist ....................................................................................................................................................39


Information ..................................................................................................................................................40


System ......................................................................................................................................................41


Log ............................................................................................................................................................41


Http Command .........................................................................................................................................43


XML Information .....................................................................................................................................46


8.) CONTROLLING THE DEVICE ...................................................................... 47


CGI HTTP Commands ...............................................................................................................................47


Serial Com (RS-232) Control......................................................................................................................47


Serial Port (RS-232) .................................................................................................................................47


Telnet ............................................................................................................................................................49


9.) FREQUENTLY ASKED QUESTIONS (F.A.Q) .............................................. 50


Summary of Contents for IP Power 9258 HP

Page 1: ...1 IP Power 9258 HP User Manual Firmware Version 1 16 Date Released 01 10 2013...

Page 2: ...ssible damage from using power adapters not 4 Do not shake the IP Power 9258 HP in any fashion 5 Please contact the dealer If IP Power 9258 HP is not working properly 6 Place the product in a well ven...

Page 3: ...ents 7 3 INTERFACE DESCRIPTION 8 Front View 8 Rear View 9 Rear View 9 4 HARDWARE SETUP 10 5 SOFTWARE SETUP 11 Installing IP Power Software 11 Using IP Edit 12 IP Service 15 6 HARDWARE INTERFACE 16 Res...

Page 4: ...User Management 31 Change Password 32 Network Settings 33 PPPOE Settings 34 Date Time 35 Advance Configuration 36 Maintenance 36 DDNS 37 IP Server CNT 37 Telnet Snmp Settings 38 Email Settings 38 Blac...

Page 5: ...irtually anywhere The various applications of the 9258 HP includes Power Management Server Management Internet Controllable Timer System Integration Remote Power Control in Remote locations etc Minimu...

Page 6: ...ing user 9 Log capabilities to store device information and usage 10 Hardware Watchdog design to make sure devices are working properly 11 IP Blacklist capability to block unwanted IP Address 12 CNT T...

Page 7: ...7 Package Contents 1 9258 HP Unit x 1 2 9258 HP Installation CD 4 RJ45 Cable x 1 Optional 5 Input Power Cable Optional...

Page 8: ...to original manufacture settings hold down the reset button with a pen or a pin for 10 second s until hear a long beep sound Restart Button The restart button just resets the device by turning off an...

Page 9: ...be controlled by the 9258 HP Ports 1 4 1 Input Power Ports The input power sends power to the 9258 HP 1 Power Switch The Power switch turns on the device power Fuse System To prevent electrical surges...

Page 10: ...ct the power adapters of under control electric equipment to corresponding out port of IP Power 9258 HP 5 Turn on the computer and the power adapter of IP Power 9258 HP For 220 250V please use power c...

Page 11: ...tup the device IP Edit Required IP Power Software IP Power Center Installing IP Power Software 1 Place the Media Link IP Family CD into the CD DVD Rom drive The CD should auto run but if it does not g...

Page 12: ...eature included the device can easily be found without having to remember long complicated IP addresses Instead this technology allows the user to use a name method to find his or her device through t...

Page 13: ...ter being used it cannot be accessed a Quick Easy Setup Recommended 1 Click on the REF button in IPEdit and wait a few seconds This will detect the network settings and setup the device automatically...

Page 14: ...and on the right side of IPEdit all network information on the device will be displayed If the device is not on the same network a Red Exclamation mark will appear in the IP Network information secti...

Page 15: ...P Service How to use IP Service on IPEdit IP service allows the user to directly connect to his her device through the internet without having to remember long confusing IP Address Instead with this I...

Page 16: ...ctly to your device Remember It is crucial to have the IP Address of the device port forwarded from the router that you are using so you can connect to your device from anywhere Please refer to your r...

Page 17: ...irst Option 1 Go to IPEdit find the device that is being used 2 Double click on the device link and a IE window will appear with the loading screen Second Option 1 Open Internet Explorer type in the I...

Page 18: ...d in details below Power Control Settings Power Controls Scheduler Settings Ping Settings PC Control Setting Ethernet to RS232 System Configuration User Management Change Password Network Settings PPP...

Page 19: ...utlet of the output that you would like to control Name If the output has been named the name that you have chosen will show up here Control The control section will allow you to turn on or turn off t...

Page 20: ...and off of each output in turns For demo purpose only Device Startup Default Value The system Power Default Value allows you to set each power port as on or off when the device power reboot You can a...

Page 21: ...e or basis Please set up the time gap of each schedule action at 15 seconds at least To avoid the action of schedule be delay by the action of Email as keep waiting server response we suggest to turn...

Page 22: ...e allows the device to repeat the cycle on a weekly basis a Select the From Date and then select the To Date b Enter the time that you would like the action to be activated 4 Once the scheduler has be...

Page 23: ...t click on event that you would like to remove 2 It the remove button 3 Reconfirm the remove Editing a Scheduled Event 1 To edit a scheduled event click on the even that you would like to edit 2 Edit...

Page 24: ...use the Ping function in Schedule Setting Ping Settings The ping function on 9258 HP allows the device to automatically Ping an IP Address to act as a watchdog to make sure the device getting Pinged...

Page 25: ...of the device If a name has been selected in the power control section they will appear here instead of the default names Action Enable Disable In this section you can turn enable or disable the ping...

Page 26: ...es to the next port When it reaches the designated Ping failures then the action will happen Port 3 Pings with no failure the device will move to Port 4 Port 4 Pings with no failure the device will mo...

Page 27: ...n to ping and click Save bottom Second Go to Wake up Settings under Ping Settings of Power Control settings and setup enable IP address and the times of ping failures As above picture the pink value 0...

Page 28: ...of this PC need to support and enable Wake On Lan function in it s BIOS Please fill the MAC address and click save bottom Shutdown settings Premise To safely shutdown your PC shutdown Windows system f...

Page 29: ...webpage of 9258HP you can enable disable this function and delay the time to turn off the Windows OS system by our own software and then wake up the PC in LAN The main board of this PC need to suppor...

Page 30: ...30 Ethernet to RS232 This section allows the RS232 port on 9258HP to receive pass out command from other 9258HP 9258WiFi...

Page 31: ...s and control the device Guest The guest only has the ability to view operate the device Any other function will be disabled Adding an User 1 Click on the add button and a add user screen will appear...

Page 32: ...s anyone to enter the device and change the settings By default this setting is set to Disable Change Password The change password page allows you to change your password for the 9258 HP You must logi...

Page 33: ...address via DHCP This allows the 9258 HP to automatically obtain a IP Address from the server Recommended for non advance users Use the following IP address You can also enter the IP Address informat...

Page 34: ...in this section Note You will need to port forward your device to this port on your router in order for the device to be able to be accessed from outside of the network DHCP Clone MAC The clone Mac se...

Page 35: ...e are four sections Current Server Time This displays the current time of the 9258 HP Time Zone Displays the time zone of the country that you reside in Time Mode The NTP Server allows the 9258 HP to...

Page 36: ...start Restarts the 9258 HP devices Restore Resets all parameters except the IP parameters to the original factory settings Default Resets all parameters to the original factory settings Upgrade Server...

Page 37: ...asily accessed on the internet With this feature anyone can find there device with no problems IP Server Allows you can find your 9258 HP on the internet without having to remember long IP Addresses I...

Page 38: ...s you to setup up to 2 separate E mails just in case one is down Both E mails will be sending notification E mails Mail Server The mail server is the field where you will enter the outgoing From E Mai...

Page 39: ...g this these blocked IP Addresses will not be able to access your device at all Blocking an IP Address 1 First hit the Add button to start the process 2 Then type the blacklisted IP Address 3 Then hit...

Page 40: ...Information section contains the System The System section will provide basic information on the devices network status LOG The log is a log of all the movements that have occurred in the device Http...

Page 41: ...dress This will show the subnet Mask of the 9258 HP LAN Gateway Address This information will provide the gateway information DHCP State The DHCP state will notify the state of the 9258 HP Log The Log...

Page 42: ...2 save the log in the directory of the computer A new screen will appear please save the log carefully E mail Email will E mail the current log page to the selected receiver mail in the E mail setting...

Page 43: ...mands directly from here Command The command is the command name Parameter Is the parameters that you would like to be used or ran in the command Auth Req If a password is required Allowed User Which...

Page 44: ...yntax to submit commands to the device View Run Commands Create Command Lines 1 To Create command Lines select the appropriate settings to achieve the desired commands 2 Hit the Cmd Syntax link to cre...

Page 45: ...ate settings to achieve the desired commands 2 Hit the Run CMD link Run the command desired 3 Another window will appear and confirm the settings have been activated Please review the section on the C...

Page 46: ...46 XML Information The XML function allows you to use XML for programming purposes To enable the XML make sure the Enable button has been selected and press submit...

Page 47: ...92 168 1 100 90 GetStartup cgi Name SetDeviceName Set the Device Name http 192 168 1 100 90 SetDeviceName cgi Name GetDeviceName Get Device Name http 192 168 1 100 90 GetDeviceName cgi SetPowerName Se...

Page 48: ...48 3 Enter a name and choose an Icon 4 Select the correct Com port for your RS 232 5 Use these settings provided below Bits per second 57600 Data Bits 8 Parity None Stop Bits 1 Flow Control None...

Page 49: ...Power 9258 HP can be controlled by using Telnet To use Telnet 1 Open Command Prompt in windows 2 Type telnet and the IP address of your device 3 Type in the login and password to the 9258 HP then hit...

Page 50: ...e back to manufacturer default settings Take a pen or small pin then press and hold for about 10 15 seconds Once you hear a single beep sound the device will be reset back to manufacturer default Q2 H...

Reviews: