background image


2.2


Operation 

2.2.1


Unsuitable original types 


Do not use the following types of originals for scanning, otherwise the scanner may 

malfunction: 


Originals with lots of black or dark colors 


Originals with dark colors surrounding the edges 


Soft and thin materials (thin paper, cloth, etc.) 


Curl or wrinkle originals 


Originals with staples or paper clips. 


Originals that exceed acceptable size - 8” (width) x 14”(length) (216 mm x 356 mm) 


2.2.2


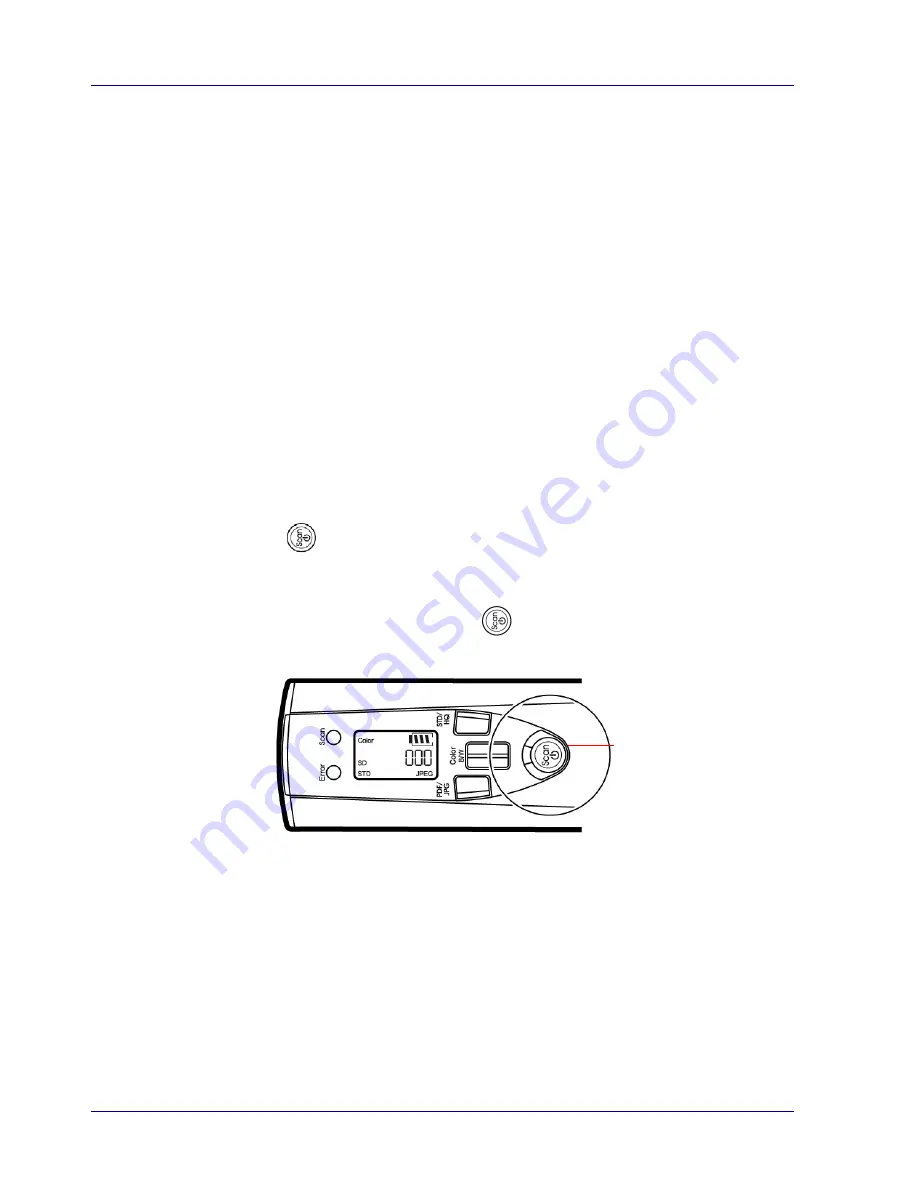
Turn on the scanner 


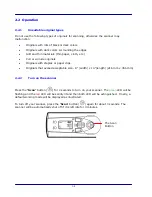
Press the Scan” button (

) for 2 seconds to turn on your scanner. The


green

 LED will be 

flashing and the 

red

 LED will be solidly lit and then both LED will be extinguished.  Finally, a 

default working mode will be displayed as illustrated. 

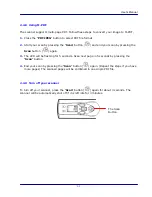
To turn off your scanner, press the “Scan” button (

) again for about 3 seconds. The 

scanner will be automatically shut off if it is left idle for 3 minutes.  

The Scan 

Button


2-4

Summary of Contents for FS-0913B

Page 1: ...Handy Scanner User s Manual Regulatory model FS 0913B Avision Inc ...

Page 2: ...omplying with all such laws and regulations Warranty The information contained in this document is subject to change without notice Avision makes no warranty of any kind with regard to this material including but not limited to the implied warranties of fitness for a particular purpose Avision shall not be liable for errors contained herein or for incidental or consequential damages in connection ...

Page 3: ...munications However there is no guarantee that interference will not occur in a particular installation If this equipment does cause harmful interference to radio or television reception which can be determined by turning the equipment off and on the user is encouraged to try to correct the interference by one or more of the following measures Reorient or relocate the receiving antenna Increase th...

Page 4: ...ce will be degenerate and its service life will be decreased Do not use it in a location where is electrostatic and magnetic greatly otherwise the safety devices may be damaged causing hidden trouble of safety If the battery leaks and the electrolyte get into the eyes Do not wipe eyes instead rinse the eyes with clean running water and immediately seek medical attention Otherwise eyes injury can r...

Page 5: ...your documents 2 5 2 2 5 View or download the scanned images 2 6 2 2 6 View or download images iPad 2 8 2 2 7 Using auto rotation 2 8 2 2 8 Using M PDF 2 9 2 2 9 Turn off your scanner 2 9 3 Presto PageManager 7 3 1 3 1 Feature 3 1 3 2 Minimum System Requirements 3 1 3 3 Installing Presto PageManager 3 2 3 4 Starting Software 3 3 3 5 Using Optical Character Recognition OCR 3 4 3 6 Using image enhan...

Page 6: ...ct it to a card reader or connect the scanner to your computer via a USB cable Before you install and operate the product please take a few minutes to read through this manual It provides proper instructions for you to install operate and maintain the product The following figure indicates the package contents Please check all the items against your checklist If you do not receive all the items pl...

Page 7: ...high quality 600 dpi resolution 4 Error LED A red flashing LED indicates error conditions such as scanning too fast 5 JPG PDF button Press to select desired file format PDF or JPEG 6 Color BW button Press to select the color of an image color or black and white 7 Scan Power button Hold 2 seconds to power on press to start scan and end scan Hold 3 seconds to power off 8 Battery compartment Slide to...

Page 8: ...ng 3 Edge of document line up mark Line up the edge of your document with this mark and the mark on the left side 1 5 Bottom View 1 2 Item Name Description 1 Sensor rollers The rollers are sensors and should only be rolled in one direction Do NOT roll back and forth while scanning except during calibration 2 Glass While rolling scanner over a document the optical sensor in the glass reads and scan...

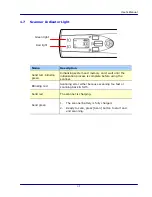
Page 9: ...se PHOTO Color or Black and white 2 SD card indicator Pictures are stored in micro SD card 3 Resolution indicator STD 300dpi or HQ 600 dpi 4 Battery indicator Battery is full Empty battery 5 Counting indicator Show scan count 6 File format indicator JPEG or PDF 1 2 3 4 5 6 COLOR ...

Page 10: ...ystem and memory card wait until the initialization process is complete before using the scanner Blinking red Scanning error either because scanning too fast or scanning back forth Solid red The scanner is charging Solid green 1 The scanner battery is fully charged 2 Ready to scan press Scan button to start and end scanning ...

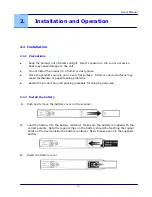
Page 11: ...d or uneven surfaces may cause mechanical or paper feeding problems z Retain the product box and packing materials for shipping purposes 2 1 2 Install the battery 1 Push and remove the battery cover on the scanner 2 Load the battery into the battery container Make sure the battery is loaded with the correct polarity Note the copper strips on the battery should be touching the copper strips on the ...

Page 12: ...e charged at least 2 hours for first time use Important z Allow the battery to charge for at least 2 hours The battery must be fully charged before using the scanner for the first time z Do not turn on the scanner power when charging the battery Note z One end of the supplied USB Y cable includes two USB connectors one labeled Power Cable the other labeled Data Cable To charge the battery be sure ...

Page 13: ... at the back of the scanner to store your images Gently press in until the SD card is latched micro SD card Note z The scanner only accepts micro SD card in FAT16 or FAT32 format NTFS and other file formats are not supported z Always insert a micro SD card before calibrating and scanning 2 3 ...

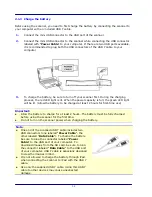
Page 14: ...staples or paper clips Originals that exceed acceptable size 8 width x 14 length 216 mm x 356 mm 2 2 2 Turn on the scanner Press the Scan button for 2 seconds to turn on your scanner The green LED will be flashing and the red LED will be solidly lit and then both LED will be extinguished Finally a default working mode will be displayed as illustrated To turn off your scanner press the Scan button ...

Page 15: ...on a flat surface If you are scanning a book hold the book firmly with one hand 2 Place the scanner horizontally on the start scanning position marked by white lines on four sides of the scanner 3 Press the Scan button on the scanner SP0 will be displayed on the screen 4 Hold the scanner and glide the scanner gently over the surface of the page as illustrated 5 During scanning the scan speed SP0 S...

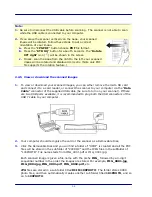
Page 16: ... or connect the scanner to your computer via the Data Cable connector of the supplied USB cable be sure to turn on your scanner If there are two USB ports available it is recommended to plug both the USB connectors of the USB Y cable to your computer 2 Your computer should recognize the card or the scanner as a Removable Disk 3 Click the Removable Disk and you will find a folder of DCIM is created...

Page 17: ...10 5 or above Mac is used only for data transferring USB port USB 2 0 USB 1 1 2 2 5 2 After successful connection When the scanner connects with the PC an additional drive is listed in the Explorer window titled Removable Disk drive letter or the personalized title you may have previously assigned to your microSD card 2 2 5 3 Safely disconnect scanner micro SD card from PC 1 On the Windows System ...

Page 18: ...d the scanned images to the album of your iPad 2 2 7 Using auto rotation The scanner allows you to rotate your images 90 degrees left or 90 degrees right Yet the rotation supports PDF file format only To rotate your image follow these steps 1 Press the PDF JPEG button to select PDF file format 2 Press the STD HQ button for about 5 seconds the 90 right icon will be displayed 3 To rotate your image ...

Page 19: ... Scan button again 3 The LED will be flashing for 5 seconds Scan next page in 5 seconds by pressing the Scan button 4 End your scan by pressing the Scan button again Repeat the steps if you have more pages The scanned pages will be combined in one single PDF file 2 2 9 Turn off your scanner To turn off your scanner press the Scan button again for about 3 seconds The scanner will be automatically s...

Page 20: ...ger document and image viewers z PageManager document and image viewers let you view files without opening other applications z Preview audio or video files in Thumbnail view z Easily stack related image and document files even with different file formats z Get text out of an image with reliable and accurate OCR Optical Character Recognition z Full text search with adjustable Fuzzy logic z Easy to...

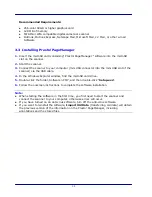
Page 21: ...scanner via the USB cable 4 In the Windows Explorer window find the microSD card drive 5 Double click the folder Software PM7 and then double click Setup exe 6 Follow the onscreen instructions to complete the software installation Note z When starting the software in the first time you first need to start the scanner and connect the scanner to your computer otherwise errors will occur z If you hav...

Page 22: ...Start All Programs Presto PageManager 2 Presto PageManager window will open 3 In the left pane locate the scanner drive Please find the removable drive drive letter 4 Click DCIM 100PHOTO or DCIM 200DOC to view the scanned image 5 Double click on an image to open it from the Presto PageManager 3 3 ...

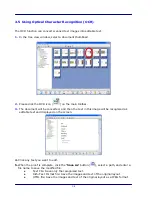
Page 23: ...ted and then the text in this image will be recognized as editable text and displayed on the screen 4 Click any text you want to edit 5 When the proof is complete click the Save As button select a path and enter a file name to save the modified file z Text File Save only the recognized text z Rich Text Format file Save the images and text of the original layout z HTML file Save the images and text...

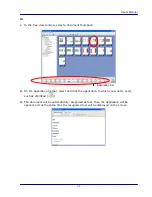
Page 24: ... the application toolbar select and click the application to which you want to send such as WordPad 3 The document will be automatically recognized as text then the application will be opened and at the same time the recognized text will be displayed on the screen Application List ...

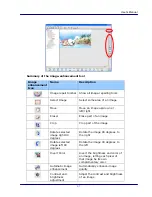
Page 25: ... image and remove noise to improve your image quality 1 In the tree view window double click an image thumbnail to open it from the view window 2 The image annotation toolbar appears on the right hand side of the screen 3 Click the small image repairing icon at the top and the Image repair toolbar appears on the screen 3 6 ...

Page 26: ... Crop Crop part of the image Rotate selected image right 90 degrees Rotate the image 90 degrees to the right Rotate selected image left 90 degrees Rotate the image 90 degrees to the left Invert Color Invert the brightness and color of an image letting each pixel of that image be its own complementary color Automatic image enhancement Automatically enhance image quality Contrast and brightness adju...

Page 27: ...e function of the tool 5 When repairing is done click the Save As button to select a path and enter a file name to save the modified file 3 7 Using the annotation tool Annotation by entering text lines or adding the seal and using the fluorescent pen makes it possible for the document or picture to be more visible and clearer The annotation function applies for text and image files 1 In the tree v...

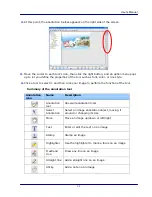
Page 28: ...ge to perform the function of the tool Summary of the annotation tool Annotation icon Name Description Annotation tool Show all annotation tools Select Annotation Select an image annotation object moving it around or changing its size Move Move an image up down or left right Text Enter or edit the text on an image Stamp Stamp an image Highlighter Use the highlighter to mark a focus on an image Fre...

Page 29: ...displayed z If you want to know various tool descriptions of the image or text annotation toolbar please click the Help function key 3 8 Removing Presto PageManager 1 Click Start All Programs Presto PageManager Remove Presto PageManager Or 1 Click Start Control Panel Add or Remove Programs Presto PageManager 2 Follow the onscreen instructions to remove the application Note For more details on usin...

Page 30: ...area of the calibration sheet 4 Press and hold the PDF JPG button for 5 seconds and press the Scan button for one second The scanner initiates the calibration mode Red LED flashing C01 is shown on screen 5 Move the scanner down on the white area When the first calibration is complete CO2 is displayed on the LCD screen 6 Move the scanner on the white area to perform 2nd calibration When the calibra...

Page 31: ...alibrate the scanner z 4 2 Clean the rollers and glass if vertical lines or stripes appear on the scanned image it is possible that there is dust or debris on the rollers or the glass Clean the rollers and glass with included cleaning cloth Use only the included cleaning cloth to clean the scanner glass Cleaning steps 1 Turn the scanner over to reveal the rollers and glass 2 Wipe the rollers and t...

Page 32: ...omputer recognize my scanner when it s connected via USB cable A Make sure the cable connection is correct and secure Restart the computer if necessary Q Why are my scanned images distorted A You may be scanning too fast scan again at the lowest speed SP0 Q Why there are strange lines on the scanned document A Please check the following 1 Are there scratches on the original or is the original clea...

Page 33: ...n in a lower speed E02 No micro SD card is inserted Insert a micro SD card and then press the Scan button to restore E03 Micro SDTM card full or card error Free more space or insert a new micro SDTM card E04 Scanner time out No scan in 30 seconds Press the Scan button to restore and try again E06 Calibration error Recalibrate the scanner E05 No scan data detected Users press the Scan button again ...

Page 34: ...ing SP0 Speed level 0 Best moving speed SP1 Speed level 1 Good moving speed SP2 Speed level 2 Warning that you are moving the scanner too fast The scanner may stop scanning due to the speed being too fast Slow down your scan and if necessary rescan the original ...

Page 35: ...27 3 mm Battery Life 700 pages A4 size color 300 dpi nonstop scanning Auto power off 3 minutes Battery Rechargeable Li ion battery compatible with CNP 50 3 75V 800mA Interface USB 2 0 Output File Format JPEG PDF Resolution 300 dpi 600 dpi Input 48 bit Color Color Depth Output 24 bit Color Net Weight 195 g excluding battery Dimensions WxLxH 263 x 39 x 36 mm Operating Environment 5ºC 35ºC 20 85 RH ...

Reviews: