A-Series Dobby Loom Assembly Manual
Finish Setting Up Your Loom
Mechanical Dobby Setup
Page | 123
Compu-Dobby, then waiting 60 seconds before trying to reconnect. The rule
of thumb is to do this whenever you have a USB communications failure or
error message.
M
ECHANICAL
D
OBBY
S
ETUP
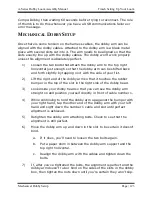
Once there is some tension on the harness cables, the dobby arm can be
aligned with the dobby cables. Attached to the dobby arm is a black metal
piece with several slots cut into it. The arm needs to be aligned so that the
slots exactly line up with the dobby cables. The dobby won’t work properly
unless this alignment is absolutely perfect.
1)
Loosen the two bolts that attach the dobby arm to the top right
horizontal just enough so that the dobby arm can be shifted back
and forth slightly by tapping on it with the side of your fist.
2)
Lift the right end of the dobby arm so that it touches the rubber
bumper in the top of the slot in the right side of the dobby head.
3)
Look inside your dobby head so that you can see the dobby arm
straight on and position yourself directly in front of cable number 1.
4)
While continuing to hold the dobby arm up against the bumper with
your right hand, tap the other end of the dobby arm with your left
hand and sight down the number 1 cable and slot until perfect
alignment is achieved.
5)
Retighten the dobby arm attaching bolts. Check to see that the
alignment is still perfect.
6)
Move the dobby arm up and down in the slot to be certain it doesn’t
bind.
a.
If it does, you’ll need to loosen the two bolts again.
b.
Put a paper shim in between the dobby arm support and the
top right horizontal.
c.
Realign the dobby arm with the cables and tighten down the
bolts.
7)
If, after you’ve tightened the bolts, the alignment is perfect and the
dobby arm doesn’t rub or bind on the sides of the slots in the dobby
box, then tighten the nuts down until you’re certain they won’t slip.


