background image


TECHNICAL EDUCATION LOOM 

Technical Manual 


A V L   L O O M S 

AVL Looms, Incorporated 

2360 Park Avenue, Chico, California 95928-8305 

Phone:  530-893-4915    Fax:  530-893-1372    

www.avlusa.com


sales@avlusa.com


support@avlusa.com


Summary of Contents for TECHNICAL EDUCATION LOOM

Page 1: ...ICAL EDUCATION LOOM Technical Manual A V L L O O M S AVL Looms Incorporated 2360 Park Avenue Chico California 95928 8305 Phone 530 893 4915 Fax 530 893 1372 www avlusa com sales avlusa com support avlusa com ...

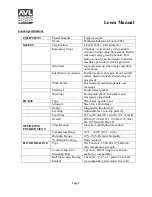
Page 2: ...s Electrical Secured steel panels Warnings Pinch point shock hot surface and emergency stop decals FRAME Type TEL black powder coat Structure Steel 1in x 2in tubular Gantry Integrated with structure Leveling Adjustable feet non slip pads 6 Foot Print 38 1in 96 8cm W x 68 0in 172 7cm D Overall 60 0in 152 4cm W x 109 0in 276 9cm D x 105 5in 268 0cm H OPERATING ENVIRONMENT Classification Class B Ligh...

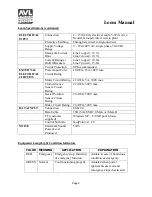
Page 3: ...25A 300V max Motor Circuit Rating 22 AWG 5A 300V max Cloth Advance Sensor Circuit Rating 22 AWG 300V max Beater Position Sensor Circuit Rating 26 AWG 500V max Brake Circuit Rating 20 AWG 300V max DATA INPUT Connection USB 2 0 Data Cable 10ft 3m USB 2 0 Male A Male B PC customer supplied Windows XP 8 USB port Mouse Control Software JacqPoint ver 2 0 NOISE Maximum Sound Power Level Produced 69db Equ...

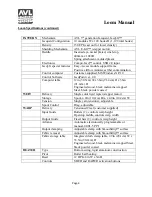
Page 4: ...melamine wrapped Steel black powder coated WEFT Delivery Single color rigid rapier stepper motor Storage Spool 4 0in 10 2cm Dia x 4 0in 10 2cm W Tension Single yarn tensioner adjustable Spool Control Drag adjustable WARP Delivery Tensioned Creel customer supplied Input Guide Rollers 2 controls warp height Open top raddle controls warp width Output Guide Fixed bars 2 controls warp height Advance Au...

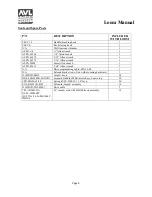
Page 5: ...ch 1 ALEN 2MM 2mm Allen wrench 1 ALEN 82615 9 64 Allen wrench 1 N A Drive programming cable STAC6 SI 1 N A Seismic bracket set of two with mounting hardware 1 J3G MOD M019 Jacq3G hook 20 HDL 400x1080R LANCIA Jacquard Heddle 1080R inserted eye Lancia top 20 SPR SPAM 65 90 Spring 65 90 D0 025 11 0 Jacq 20 SOL RG 03UA B01 Solenoid Jacq3G assembly 10 J3G MOD CBL D001 Drive cable 5 TEL COMB 25A Q2 09 M...

Page 6: ... and directly experiencing the effects of pattern interlacement beat up and fabric advancement Being a manual loom all processes are slowed sufficiently for easy observation and thus optimal understanding The primary technologies incorporated into the loom are Electronic Jacquard pattern selection Electronic shed lift Electronic rapier weft placement Electronic fabric advancement The TEL is design...

Page 7: ...ED IN A MANNER NOT SPECIFIED BY THE MANUFACTURER THE PROTECTION PROVIDED BY THE EQUIPMENT MAY BE IMPAIRED WARNING ELECTRICAL SHOCK HAZARD DO NOT TAMPER WITH ELECTRICAL WIRES OR OPERATE THE LOOM WITH SAFETY PANELS OPENED OR REMOVED WARNING PINCH CRUSH AND FINGER CUT OFF HAZARDS DO NOT OPERATE THE LOOM WITH SAFETY PANELS OPENED OR REMOVED DO NOT PLACE HANDS IN MOVING MECHANISMS OR SCISSORS ...

Page 8: ...Loom Manual Page 8 WARNING HOT SURFACE DO NOT TOUCH ATTENTION EMERGENCY STOP PRESS TO STOP RAPIER MOVEMENT PULL TO RETURN TO NORMAL OPERATION ...

Page 9: ... DO NOT POSITION EQUIPMENT IN A WAY TO BLOCK OR IMPEDE ACCESS TO DISCONNECTING DEVICES EMERGENCY STOPS OR ON OFF BREAKER SWITCHES WARNING USE OF CONDUCTIVE FIBER OR YARN ON OR AROUND THIS EQUIPMENT WILL VOID WARRANTY AND MAY DAMAGE EQUIPMENT WARNING THIS EQUIPMENT IS CLASSIFIED FOR LIGHT INDUSTRIAL ENVIRONMENT ONLY OPERATION OF HIGH CURRENT DRAW EQUIPMENT EX MIG WELDER ON THE SAME ELECTRICAL CIRCU...

Page 10: ...ere pinch hazards exist Do not reach under a covers and shielding while the loom is operating 7 Emergency stop button cuts power to the rapier motor Activation stops the rapier from moving avoiding potential personal and equipment damage The depressed emergency stop button lights red to notify user that the loom requires attention The Green Power On Lamp is deactivate when red light is on Pull out...

Page 11: ...ant electricity or wired to a suitably rated plug for a corresponding outlet Seismic Concerns Where seismic concerns exist equipment should be installed with supplied brackets and hardware Use HILTI drop in expansion anchors inserted into the concrete floor Use HILTI instructions for concrete preparation and anchor installation Use Grade 5 13x1 Fastener Bolts or equivalent metric hardware Loom Squ...

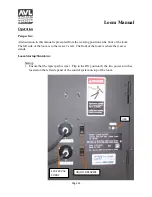
Page 12: ... loom The left side of the loom is to the weaver s left The front of the loom is where the weaver stands Loom Startup Shutdown Startup 1 Ensure that the rapier path is clear Flip to the ON position I the two power switches located on the left side panel of the control system on top of the loom 220 240 VAC CORDS USB ON OFF BREAKERS ...

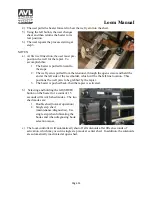
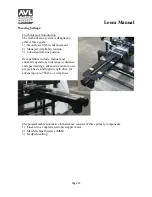
Page 13: ... activate the null pick 2 Exit the Loom Control windows 3 Flip to the OFF position O the two power switches located on the left side panel of the control system on top of the loom Weaving Weaving is designed to be simple and easy to observe using the following steps 1 The user stands at the front of the loom on either side of the output table with one hand on the beater 2 To open a shed the user s...

Page 14: ...side of the reed holder which will be the fell line location This positions the weft yarn to be grabbed by the rapier 3 The beater is pushed back then the rapier is activated b Selecting and holding the left SHED button on the beater for a count of 15 seconds will switch shed modes The two shed modes are 1 Double shed normal operation 2 Single step shed maintenance diagnostics Use single step when...

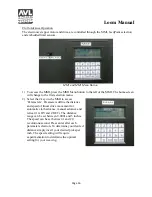
Page 15: ...nt fell line position Its capabilities include manual and automatic operation wide range of distance and speed settings advance no advance on a per pick basis and high strength drive for advancing up to 750 lbs of warp force The programmable automatic cloth advance consists of three primary components 1 Linear drive coupled electronic stepper motor 2 Man Machine Interface MMI 3 JacqPoint setting ...

Page 16: ...lect the 4 key on the MMI to access Parameters Parameters define the distance and speed of linear drive movement for automatic cloth advance manual advance and retreat 1 ADV and 2 RET The distance range can be set between 0 0001 and 5 inches The speed can be set between 1 and 20 revolutions second Press enter after each parameter selection To determine your desired distance simply invert your desi...

Page 17: ...stop movement or allow the linear drive to reach its end limit sensor b Press the key to retreat the cloth clamp move towards the beater Press the key again to stop movement or allow the linear drive to reach its home limit sensor 6 Select 5 Exit to exit the MMI menu and weave in automatic cloth advance mode 7 JacqPoint selection of pick by pick advance activation is done by selecting de selecting...

Page 18: ... back to the home position for tie on Rapier Extended Position A stationary rubbing block and spring loaded dog are located near the extended position to squeeze open the rapier head gripper in order to capture the weft yarn In setting rubbing block dog positions first adjust the block such that the head very lightly rest on it Then adjust the dog to open the gripper sufficiently to allow the weft...

Page 19: ...ad sits when in home position are positioned to squeeze open the gripper for releasing the weft yarn In setting rubbing block positions first adjust the lower block such that the head very lightly rest on it Then adjust the upper rubbing block to open the gripper just enough to release the weft yarn just before the rapier reaches home Rapier Gripper Tension Gripper tension is set by loosening the ...

Page 20: ...owered manual move the rapier for measuring these settings Adjust position with the system hardware Scissor Position The scissor is activated when the rapier head moves onto the scissor head rubbing block Scissor positioning is set at the factory Adjusting the scissor position requires moving the bearing in line with the rapier head The height of the bearing defines the amount of arc in the scisso...

Page 21: ...er tightening the spool tension may cause issues with rapier operation Weft Tensioner The weft tensioner provides adjustable tension by the nut on top of the spring Tighten the nut to increase tension Tension should be set with the minimal amount of tension required to achieve the two divergent goals of avoiding Yarn slack between the tensioner and scissor and Yarn pulling out of the gripper ...

Page 22: ...or 3 0 The loom comes with 1 JacqPoint MS Windows based loom control software 2 USB 2 0 cable 10 foot A male B male Loom Control Steps 1 Start JacqPoint 2 Power up the loom 3 Open a weaving file 4 From the Weave menu select Jacquard Options 5 Select USB Direct then select Test Boards from the dialog box A new dialog box will appear displaying the status of the connection and once cleared another d...

Page 23: ... open the new shed then select Close from the AVL Jacquard control window The loom and Macbook are now ready for powering down NOTES a JacqPoint uses a native JCP file as the standard format It also allows the use of BMP PNG or J1P formats all of which can be output by ArahWeave and most other design software ...

Page 24: ...s with the hook operation 2 Straight through threading without angles between the raddle rollers and heddles This error will cause mechanical issues with the hook operation 3 Thread sizing appropriate to the density With twelve hundred 1 200 hooks in eight 8 inches the weaving density is very tight Overly thick yarn will exacerbate all other problems 4 No yarn abrasion applies mostly to technical ...

Page 25: ...tification Additionally the heddle rows may be disconnected from the fixture to provide for more space during threading 4 Twelve 12 Dents per Inch DPI Reed Sley reed alternating between twelve and thirteen ends per dent to achieve the maximum one hundred fifty 150 ends per inch density 5 Move the Cloth Advance to home position closest to the beater Unclamp the handles on each side and slide the cl...

Page 26: ...mp and then open the fixed clamp Cloth Advance Clamps The cloth advance system utilizes two clamps cloth clamp and fixed clamp The cloth clamp is attached to the linear motor and moves with the advance The warp is attached to the cloth clamp during loom setup and before weaving The fixed clamp is left open during weaving When the woven cloth is complete and ready to be removed from the loom the fi...

Page 27: ...Loom Manual Page 27 Cloth Clamp Closed Cloth Clamp Open Fixed Clamp Open Fixed Clamp Hanging ...

Page 28: ... Lubricate clear lubricant gel Four months Hooks other bare metal Lubricate dry lubricant spray Four months Hardware Inspect and tighten Four months Fan filters Vacuum or rinse in water Yearly Scissors Replace When dull External sheet metal and frame Clean with damp cloth Yearly Failure of Safety equipment should be immediately remedied Contact AVL for replacement parts See Appendix A Wiring Diagr...

Page 29: ...Loom Manual Page 29 Module Hooks Exposed Front Cover Removed Hooks Close Up ...

Page 30: ...paired renewed or comparable part whichever is deemed necessary or proper by AVL if it becomes defective or inoperative or fails to perform according to AVL s specifications Any repair during the Original Warranty Period will be carried out without charge to you for parts except applicable taxes if any You will be responsible for all labor in connection with installation of the parts and service u...

Page 31: ...ly acceptable manner in accordance with the regulations specified by the local authorities Notice to Users in the European Union Products bearing the CE mark are in conformity with the protection requirements of EC Council directives 2004 108 EC 2006 95 EC 1999 5 EC and 2009 125 EC on the approximation and harmonization of the laws of the Member States relating to electromagnetic compatibility saf...

Page 32: ... 13 PS1 2 3 4 and 3 Drives are all connected to terminals 11 13 and Chassis ground is terminated to the frame The module boards are connected to the power supplies as well as the brake to PS4 Terminals 1 8 are connected on the left side to the drive output input header from either the Main Drive Advance Drive or Rapier Drive Sensor inputs and misc jumpers are plugged into left side of AC terminals...

Page 33: ...Appendices Page 33 APPENDIX A WIRING DIAGRAMS continued ...

Page 34: ...Appendices Page 34 APPENDIX A WIRING DIAGRAMS continued ...

Page 35: ...Appendices Page 35 APPENDIX A WIRING DIAGRAMS continued ...

Page 36: ...Appendices Page 36 APPENDIX A WIRING DIAGRAMS continued ...

Page 37: ...Appendices Page 37 APPENDIX A WIRING DIAGRAMS continued ...

Page 38: ...Appendices Page 38 APPENDIX A WIRING DIAGRAMS continued ...

Page 39: ...Appendices Page 39 APPENDIX A WIRING DIAGRAMS continued ...

Page 40: ...Appendices Page 40 APPENDIX A WIRING DIAGRAMS continued ...

Page 41: ...Appendices Page 41 APPENDIX A WIRING DIAGRAMS continued ...

Page 42: ...Appendices Page 42 APPENDIX A WIRING DIAGRAMS continued ...

Page 43: ...Appendices Page 43 APPENDIX A WIRING DIAGRAMS continued ...

Page 44: ...Appendices Page 44 APPENDIX A WIRING DIAGRAMS continued ...

Page 45: ...Appendices Page 45 APPENDIX A WIRING DIAGRAMS continued ...

Page 46: ...Appendices Page 46 APPENDIX A WIRING DIAGRAMS continued ...

Page 47: ...Appendices Page 47 APPENDIX A WIRING DIAGRAMS continued ...

Page 48: ...Appendices Page 48 APPENDIX A WIRING DIAGRAMS continued ...

Page 49: ...Appendices Page 49 APPENDIX A WIRING DIAGRAMS continued ...

Page 50: ...Appendices Page 50 APPENDIX A WIRING DIAGRAMS continued ...

Page 51: ...Appendices Page 51 APPENDIX A WIRING DIAGRAMS continued ...

Page 52: ...Appendices Page 52 APPENDIX A WIRING DIAGRAMS continued ...

Page 53: ...Appendices Page 53 APPENDIX A WIRING DIAGRAMS continued ...

Page 54: ...Appendices Page 54 APPENDIX A WIRING DIAGRAMS continued ...

Page 55: ...ons that each loom encounters For example a loom in constant usage should be lubricated more often perhaps even once per quarter The loom owner is responsible for monitoring the need for lubrication and adjusting the schedule as required Lubricant You will need two types of lubricant for your Jacq3G loom Clear Dry Spray Lubricant we recommend RZ 50 brand Clear Grease we recommend Tri Flow brand Tr...

Page 56: ...q3G Lubrication Schedule continued Lubrication Points Gel Lubricant Note the red arrows and circles in the following pictures for lubrication points Dry Lubricant Note the blue circle Drive Chain Module pulley bearings eight per module ...

Page 57: ...IX B Jacq3G Lubrication Schedule continued Slide bearings and channels apply lightly in grooves and directly on ball bearings Q Tips work great for this work Hooks and knives for rust protection DO NOT SPRAY ONTO CIRCUIT BOARD ...

Page 58: ...e are two primary causes for hook inaccuracy or weaving errors threading errors and equipment issues You might be surprised how often people have an issue with their warp even with very experienced weavers From our experience it is by far the most common cause of weaving errors We think this is partially due to the fact that Jacquard machines whether it be an AVL or some other brand are much more ...

Page 59: ...onger or weaker than those around it If so you have a bad plunger spring Test 3 Observe the solenoid plunger in action Does the solenoid remain activated when treadling a null pick or never activate when it should In either case you have a bad solenoid Test 4 Observe the misbehaving hook at rest in center shed position Does the hook sit significantly closer to the upper knife than the others If so...

Page 60: ...e If you pass these tests but still have a problem you have a solenoid bar placement issue Equipment Fixes Solenoid bar placement Incrementally adjust test the solenoid mount bar until issue goes away Incremental adjustment is typically 1 turn of the nut test with tabby with alternately activates the upper and lower solenoid bars Adjustment can be made independently at front and back hardware howe...

Page 61: ... until the hooks are vertical Loosen the outer hex nuts then cycle hooks up down with null picks Looking down from above while at open shed and hooks down null pick observe the hook alignments in relation to each other and the upper guide If the hooks appear paired the solenoid mount bars are misaligned from front to back Determine which solenoid mount bar is incorrect by observing hook leaning fo...

Page 62: ...out damaging the cable sheathing Slide the knife until the front and rear inner bearing carriers are in contact with the hardware at the bottom of it bearing travel If the outer bearing carrier touches the hardware first apply additional force to overcome the inner to outer carrier force until the inner bearing carrier is in the correct position Retighten the button head cap screws b Lower knife a...

Reviews: