Workshop Dobby Loom User’s Manual
WDL Assembly
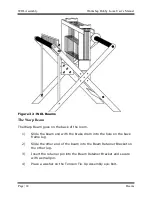
Beams
Page | 25
5)
From the inside of the X-Frame, insert the eye-bolt of the Tension
Tie-Up Assembly into the hole near the IDU on the lower left leg of
the X-Frame and secure with another washer and nut.
6)
Wrap the Tension Tie-Up cord over and down the rear side of Warp
Beam Brake Drum.
7)
Wrap the cord around the drum twice working towards the center of
the loom. The cord wraps counter-clockwise if you are looking at
the drum from the left side of the loom.
8)
Extend the cord back down to the eye-bolt and clip it on.
NOTE:
The cord should not overlap itself on the drum.
The Separation Beam
The Separation Beam is located at the upper rear of the X-Frame and is
secured with Phillips-head screws.
IMPORTANT:
The Separation Beam is solid wood and should not be confused with the
plywood Cross Brace.
1)
Insert the Separation Beam between the upper rear members of
the X-Frame
2)
Secure with Phillips-head screws from the outside of the leg.
The Cloth Storage Beam (24” WDL Only)
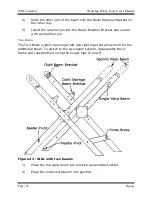
The Cloth Storage Beam is inserted in the front, lower position on the X-
Frame, just in front of the IDU. The Cloth Storage Beam is included with the
24” WDL only. It is available as an option for the 16” WDL.
1)
Place the Ratchet handle on the ratchet end of the beam.
2)
Hold the Ratchet handle so it is horizontal while placing the beam
on the loom. The long straight side of the handle should go to the
back of the loom.
3)
Slide the beam end with the ratchet into the hole on the left front
frame leg.


