8
1.4.1
Phase LED
Especially with high end audio components, which are by nature very sensitive to mains hum,
it is important to connect the mains phase correctly. The device is equipped with a Phase LED
(35) on the rear panel for this purpose.
To check the phase, switch on the unit with the power button (1) and have a look at the Phase
LED (35). This LED only lights up if the mains plug is connected with the correct polarity and
remains dark if the polarity is correct. The display has been deliberately designed in this way,
as the control electronics of the Phase LED (35) produces slight interference when the LED is
lit. This is not the case with correct mains polarity (and a dark LED).
1.5
Connecting digital sources
Connect the outputs of your digital sources to the corresponding digital inputs of the SD 6.3 /
8.3 (20 - 25). You con choose from two optical inputs (21, 22), two coaxial inputs (23, 24), the
USB B input (20), or the AES/EBU input (25).
1.6
Connecting analogue signal sources
Connect the outputs of your signal sources to the analogue inputs (14-17). The upper row is
for the left channel, the lower row is for the right channel.
1.7
Connecting a recorder
The input of a digital recorder must be connected to the digital outputs (18, 19). The signal on
the digital outputs depends on the selected source such as
DIG COAX
,
DIG OPT
.
1.8
RC 9 remote control
The optionally available RC 9 remote control allows for easy and comprehensive control of your
devices. Before you can use the RC 9 together with your device, both components need to be
connected. This process is also referred to as
Pairing
. In order to start the pairing process,
please follow the instructions as described in section 1.8.1. A detailed description of the entire
functionality of the optionally available RC 9 remote control can be found in a separate manual
on our AVM website at
www.avm.audio
.
1.8.1
Pairing
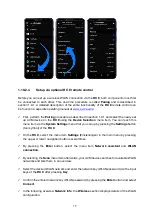
In order to control your device with a RC 9 remote control, both components need to be linked
first. This process is also referred to as
Pairing
. To start the pairing process, please switch off
your device by using the mains switch on the rear side of the unit. Now please navigate to the
Summary of Contents for OVATION CS 6.3
Page 1: ...Operating instructions OVATION SD 6 3 OVATION SD 8 3 ...
Page 2: ......


