5
www.avonic.eu
1.
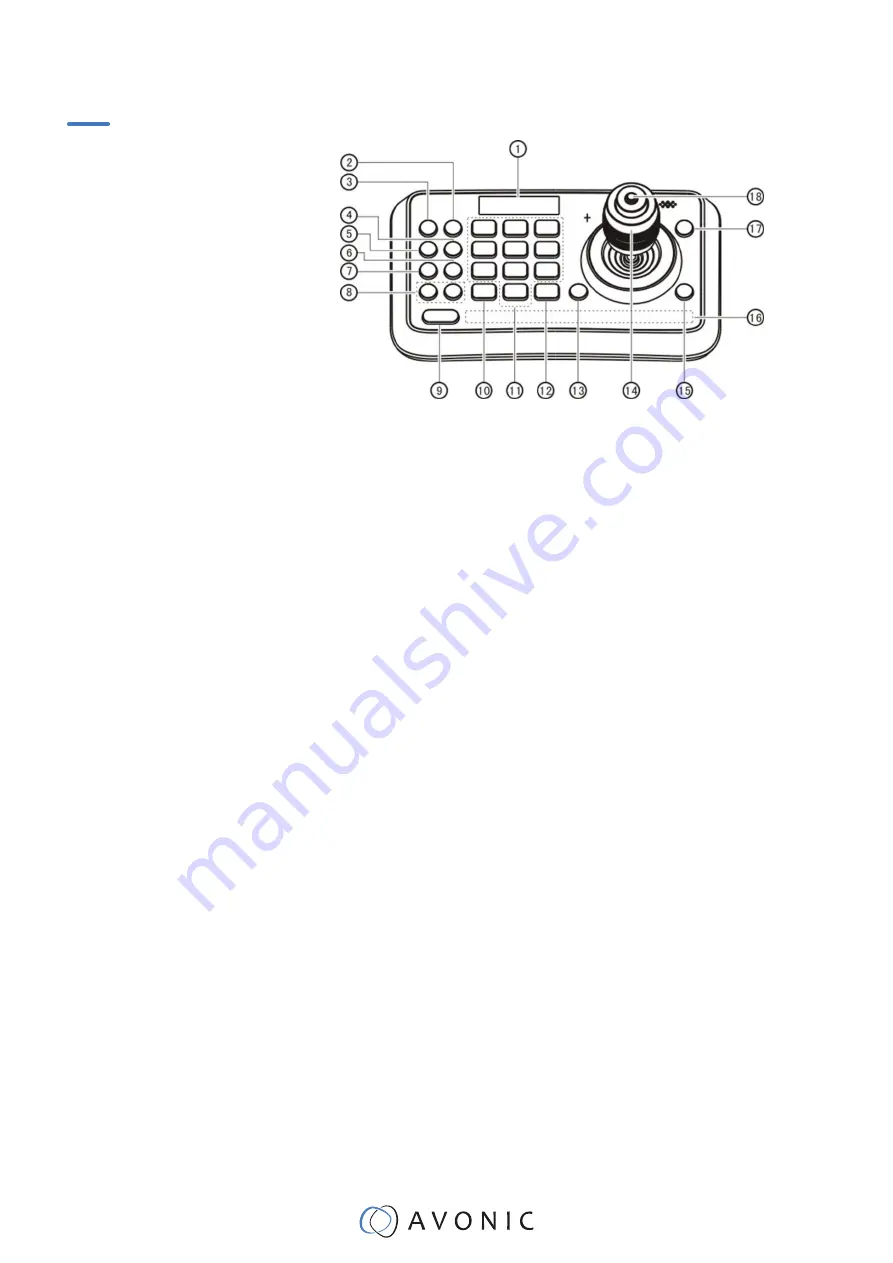
OLED screen. The OLED screen displays status of current operation.
2.
CALL (Call preset) Input preset number, then press CALL key to call a preset
3.
CAMERA (Switch cameras) Input camera number, then press CAMERA key to switch to another camera.
4.
SET (Set / Clear preset) Input preset number, then press SET key to set or delete a preset
(Short press to “set”; long press to “clear”).
5.
SETUP (Enter setup menu) Press SETUP key to enter menu and program the keyboard
6.
CRUISE (Auto Cruise) Press CRUISE key to do auto cruise.
7.
PATTERN (Pattern Scan) Press PATTERN key to do pattern scan
8.
F1, F2 Toggle between Auto Focus and Manual Focus (also see 18.)
9.
SHIFT (Extension key) It is an extension key to be used with other keys for special functions.
10.
ESC (Exit / Delete) It is a key to EXIT in a menu or DELETE in other operations.
11.
0~9 (Numbers) Those are keys used to input numbers. Combine with SHIFT key to activate various
functions shown on number keys. For example, press SHIFT + 1 will turn on DIS function of the camera.
12.
ENT (Confirm) It is used to confirm menu setting.
13.
OPEN ( IRIS Open) This key is used to activate IRIS open of the camera. It is also a “confirm” key in
a menu.
14.
Joystick This joystick is used to Pan, Tilt, Zoom and Focus
Non-Menu State:
Left/Right/Up/Down: Pan/Tilt the camera correspondingly
Twist clockwise: Zoom In,
Twist anti-clockwise: Zoom Out;
Press Zoom/ Focus Switch Key and Twist: Focus Near/Far
Menu State:
Right: Enter a submenu or Confirm;
Left: Return to previous menu or exit (expect some not returnable menus);
Up: Move to last option;
Down: Move to next option.
15.
CLOSE ( IRIS Close) This key is used to activate IRIS close of the camera; it is “return” key in a menu.
16.
Status Display area This area is used to display status of functions that are turned on, relative icons will
be back lighted.
17.
MENU (Enter Camera Menu) This key is used to enter camera menu.
18.
Zoom / Focus Switch Key. (See also 8.) This key is used to switch between zoom and focus function.
Operation: Press this key, the red cross indicatorlight near the joystick will go out, twist the joystick to
zoom in / out; press this key again, the red cross indicatorlight will be lightened, twist the joystick adjust
focus value.
Connections
INSTALLATION


