background image


www.avonic.eu 


Avonic CM55-VCT Videoconferencing Endpoint Quick 

Installation Guide 


Copyright Notice   


All contents of this manual, whose copyright belongs to Avonic. Cannot be cloned, copied or 

translated without the permission of the company. Product specifications and information which 

were referred to in this document are for reference only, and the content will be updated at any time 

without prior notice Avonic. 


Summary of Contents for CM55-VCT

Page 1: ...ntents of this manual whose copyright belongs to Avonic Cannot be cloned copied or translated without the permission of the company Product specifications and information which were referred to in thi...

Page 2: ...Key Features All in one design Camera Video Conferencing System buit in one device simple to use Support Wi Fi support external microphone small size easy to install Use 72 5 wide angle high quality...

Page 3: ...www avonic eu Getting Started The Front of C9 The back of C9...

Page 4: ...to a USB flash drive upgrade connect mouse keyboard control and so on 6 HDMI OUT1 Using an HDMI cable Connect the high definition TV to the HDMI OUT1 output interface of endpoint With audio output 7 H...

Page 5: ...re 0 40 Humidity 10 80 Peripheral noise 46dBA SPL Lowest luminance 0 5lux Recommended luminance 300lux Non Operating condition Temperature 40 70 Humidity 0 95 Physical Characteristics Size 239 4mm 148...

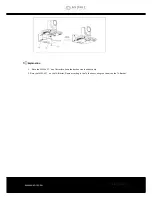
Page 6: ...nic eu Explanation 1 Place the CM55 VCT on a flat surface keep the desk on stable and note slip 2 Place the CM55 VCT on the TV Bracket Please according to the TV thickness using the screws on the TV B...

Page 7: ...www avonic eu Connecting Cables The following figure shows a cable connection example in which the HDMI port is used for video output...

Page 8: ...an HDMI cable to connect the HDMI OUT1 interfaces of CM55 VCT to HDMI input display device Output sound using an HDMI cable to connect the HDMI OUT1 interfaces of CM55 VCT to HDMI input display device...

Page 9: ...r definition of FireWire L neutral N and protective earth PE and the corresponding voltage difference must conform to international standards and the protective earth PE can get ground The HDMI OUT1 a...

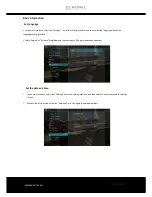
Page 10: ...r the language setting interface 2 Select English or Chinese Simplified and then come back The picture has been updated Set the date and time 1 In the main interface select the Settings enter the sett...

Page 11: ...cally Select 24 Hour Format Set up 24 hours format Select Date Format Display date format Year Month Day Return button Save the configuration information back to internet interface Set the network 1 S...

Page 12: ...utton Save the Internet Setting Back to Internet Setting interface Release button Do not save the network settings Back to Internet Setting interface Set the Videoconferenceing camera name 1 Select Se...

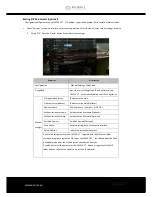
Page 13: ...lt value empty If you select this parameter the TE30 registers with the GK after being started After successfully registering with the GK the TE30 can call endpoints defined in the address book by the...

Page 14: ...r address IP address or domain SIP proxy server address IP address or domain Optional End user name End user name number or SIP URI Authentication username Authentication username Optional Authenticat...

Page 15: ...p the camera 1 Find the local IP address on the front diplay of the camera 2 Open a browser on a computer or tablet and browse to the IP address of the camera 3 Default login details are User admin Pa...

Reviews: