background image

293Z 

N204_212_V1.0 

H.264 DAY & NIGHT 

NETWORK CAMERA 

INSTALLATION GUIDE 

Please read instructions thoroughly before operation and retain it for future reference.


Summary of Contents for avn212

Page 1: ...293Z N204_212_V1 0 H 264 DAY NIGHT NETWORK CAMERA INSTALLATION GUIDE Please read instructions thoroughly before operation and retain it for future reference ...

Page 2: ...nal 5 2 4 Connect to Power 5 3 ETHERNET CONNECTION 6 3 1 Network Connection via LAN 6 3 2 Ethernet Configurations 9 3 2 1 Setting in Wizard 9 3 2 2 DDNS Setting 11 4 WIRELESS CONNECTION 13 4 1 Wireless Network Configurations 13 APPENDIX 1 CREATING ACCOUNT FOR DDNS SERVICE 16 APPENDIX 2 ADDING WIRELESS PROFILE 18 A2 1 Via Scan 18 A2 2 Manually 19 A2 3 Activate Connect 20 APPENDIX 3 COMPATIBLE USB F...

Page 3: ...1 1 OVERVIEW 1 1 Package Content Network camera RJ45 network cable Installation Guide Alarm cable Bracket Adapter CD ROM disc including user manuals CMS software Video Viewer 1 2 Hardware Overview ...

Page 4: ...nput Support the connection to an audio device such as a microphone for voice transmission of the local side Video Output Connect to the video input connector of your monitor with a video cable i e a RCA cable with the BNC connector or a coaxial cable for video output The video cable is optional LAN Connect the camera to the network with the supplied RJ45 cable Power Connector Connect the DC 12V a...

Page 5: ...able connection please refer to 1 3 Rear Panel on Page 2 Tool needed Power drill x 1 not supplied within the sales package Prepare all the parts needed for camera installation Find the network camera bracket package a bag of screws wall plugs and a cap supplied with the sales package as shown in Figure 1 Unpack the bracket package to find the bracket disassembled into three parts the base stem and...

Page 6: ...re as shown in Figure 4 Desktop With the upper side of the camera facing up align the mounting screw hole on the underside with the screw thread of the joint lock and rotate the camera to secure Figure 4 Connect the camera to the bracket Figure 5 Insert the cap to the camera 4 Insert the cap to the other mounting screw hole of the camera Ceiling mounted Insert the cap to the mounting screw hole on...

Page 7: ...for video recording For wireless settings please refer to 4 WIRELESS CONNECTION at page 13 For the compatible USB flash drive list please refer to APPENDIX 3 COMPATIBLE USB FLASH DRIVE LIST at page 21 For details about the video recording function please refer to 5 3 Video recording directly to USB flash drive in the user manual Note Please note that this device doesn t support USB hot swapping or...

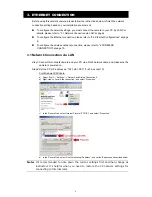
Page 8: ...13 3 1 Network Connection via LAN Step1 Connect this network camera and your PC via a RJ45 network cable and make sure the camera is powered on Step2 Set the PC s IP address as 192 168 1 XXX 1 255 except 10 For Windows 2000 users a Select Start Settings Network and Dial up Connections b Right click on Local Area Connection and select Properties c In the General tab select Internet Protocol TCP IP ...

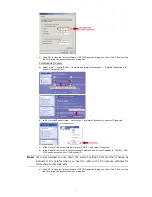
Page 9: ... Properties c In the General tab select Internet Protocol TCP IP and select Properties d In the General tab select Use the following IP address and set the IP address to 192 168 1 XXX XXX can be any value from 1 255 except 10 Note It s recommended to note down the current settings first and then change as instructed It s helpful when you need to restore the PC network settings for connecting to In...

Page 10: ...ocol Version 4 TCP IPv4 and select Properties d In the General tab select Use the following IP address and set the IP address as described below Note It s recommended to note down the current settings first and then change as instructed It s helpful when you need to restore the PC network settings for connecting to Internet later e Click OK to close the Internet Protocol Version 4 TCP IPv4 Propert...

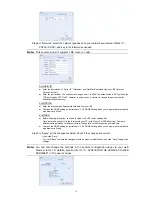
Page 11: ...ESSING THE CAMERA VIA WEB BROWSER in the user manual 3 2 1 Setting in Wizard Step1 Open your web browser for example Microsoft Internet Explorer and enter http 192 168 1 10 in the URL address box Step2 In the login page key in the default user name admin and password admin and enter the security code from the image below Then click LOGIN Step3 The wizard is then starting analyzing your network env...

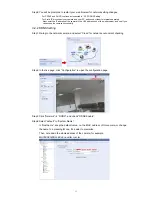
Page 12: ...S Setting when you re prompted to restart the web browser in Step8 For DHCP a Before selecting this option you need to finish the DHCP router settings first Get a router and connect it to the Internet via your PC with Static IP or PPPoE setting There are different setting methods for different routers Please refer to their respective user manuals b Continue the DDNS setting as instructed in 3 2 2 ...

Page 13: ... if you can access the camera successfully 3 2 2 DDNS Setting Step1 Re log in the network camera and select Close for network environment checking Step2 In the live page click Configuration to open the configuration page Step3 Click Network DDNS and check DDNS Enable Step4 Select default in System Name In Hostname keep the default value i e the MAC address of this camera or change the name to a me...

Page 14: ... refer to APPENDIX 1 CREATING ACCOUNT FOR DDNS SERVICE at page 16 Step5 Click Save and log out Then disconnect your camera and your PC and connect them to Internet separately Step6 Enter the host name you just note down in the URL address box of the web browser and see if you can access the camera successfully ...

Page 15: ...ble Step2 Set the PC s IP address as 192 168 1 XXX 1 255 except 10 For details please refer to 3 1 Network Connection via LAN at page 6 Step3 Open your web browser for example Microsoft Internet Explorer and key in http 192 168 1 10 in the URL address box In the login page key in the default user name admin and password admin and enter the security code from the image below Step4 The wizard is the...

Page 16: ...era is intended to configure for is not too weak and it s set to open for searching If this method is not working please close the wizard and manually add the wireless profile as described in A2 2 Manually at page 19 Step8 In Apply all the changes are listed Check if the changes are correct If yes click Save If no click Back to where the changes should be made for modification and click Save to ap...

Page 17: ...hen select Network Wireless to enter the wireless setting page and note down the assigned IP address similar as follows Step10 Log out the camera Then remove the network cable between your camera and your PC and connect your PC to the wireless network the same as the one your camera is configured Step11 Enter the IP address you just note down in the URL address box of the web browser and see if yo...

Page 18: ...2 Enter all the information necessary for signing up an account according to the website instructions Key in a user name for login for example headoffice523 Set the password and input it again to confirm Key in your E mail address and input it again to confirm Then click Create Account Step3 The system will automatically send a confirmation email to your email account Please read this email within...

Page 19: ...Note This service is free Just finish the billing process and NO paying information is required Step6 Click Activate Services after checkout and you re ready to use DDNS services now Step7 Return to Video Viewer and go to Network DDNS Select On for DDNS Select the system name you set when subscribing the DDNS service from the drop down list for example dyndns Enter the user name password you used ...

Page 20: ...s set to open for searching If this method is not working please manually add the wireless profile as described in A 2 Manually Step1 Click Scan to search all available wireless access points routers and double click the one your camera is intended to configure for Step2 The setting for the selected wireless access point router will be shown except for the Key column Enter the password to access t...

Page 21: ...tication method is used for the wireless access point router and select the correct one Open Shared WPAPSK or WPA2PSK Encryption Type Check which encryption type is used for the wireless access point router and select the correct one WEP TKIP or AES Select NONE to disable key authentication for wireless network access Default Key In 64 bit WEP 4 keys are available in 128 bit WEP only 1 key is avai...

Page 22: ... or keep the default value 192 168 2 10 When DHCP is selected click Reload and check the IP address assigned in Server IP When the network type is Ad hoc Select Static IP only and change the server IP in Server IP when necessary or keep the default value 192 168 2 10 Then click Save to save the setting Step2 Double click the profile to activate it and make sure the signal strength is fine Step3 Re...

Page 23: ...refer to 5 3 Video recording directly to USB flash drive in the user manual MANUFACTURER MODEL CAPACITY Transcend JFV35 4G JFV30 8G Kingston DataTraveler 1G PQI U172P 4G Apacer AH320 2GB AH320A 8GB AH220 1GB AH320 4GB A data RB 18 1GB Sandisk Cruzer Micro 2G Cruzer Micro 4G Cruzer4 pk 2G Netac U208 1G MSI F200 4G SONY Micro Vault Tiny 2G 2G Micro Vault Tiny 4G 4G Micro Vault Tiny 1G ...

Reviews: