*
Specifications are subjected to change without notice.
DC 12V/AC24V(
10%)
±
3-group additional IR LEDs
DC12V/650mA,AC24V/3.4W
LENS
EXPOSURE
BACKLIGHT
WHITE BAL
DAY&NIGHT
NR
SPECIAL
ADJUST
SAVE&EXT
MANUAL
SHUTTER
SENS-UP
D-WDR
OFF
HSBLC
ATW
INDOOR
MANUAL
EXT
COLOR
2DNR
CAM TITLE
MOTION
LANGUAGE
485
DC
AGC
BRIGHTNESS
DEFOG
BLC
AWC
SET
→
OUTDOOR
AWB
AUTO
B/W
3DNR
D-EFFECT
DEFECT
SHARPNESS
VIDEO.OUT
SAVE$END
LSC
NOT SAVE
PRIVACY
RESET
RS
About 760g
-20
~55
℃
℃
O.S.D
White balance
Image adjustment
Motion detection
Privacy zones
Day & night
Electronic shutter
Min. Illumination
Power supply
Operation temperature
Dimension
Weight
SHARPNESS/MONITOR/LSC/VIDEO.OUT
Built-in/Support UTC OSD
Off/on(4 areas)
AUTO /COLOR / B/W / EXT
1.0Vp-p composite video output, 75
Ω
0 Lux(IR on)
Off/on(4 areas)
IR LED
1280(H)
2.8-12mm
CVBS Output format
Sensor
1/2.9" CMOS
NR(noise reduction)
D-WDR
AGC
Backlight
Mirror function
Languages
Power comsumption
Auto,1/25(1/30)~1/50000,X2~X30
2DNR/3DNR
OFF/ON/AUTO
1~15
OFF/BLC/HSBLC
OFF/MIRROR/V-FLIP/ROTATE
12 languages(
)
ENG/CHN1/CHN2/GER/FRA/
ITA/SPA/POL/RUS/POR/NED/TUR
Lens type
ATW/AWC
SET/INDOOR/
OUTDOOR/MANUAL/AWB
→
Defog
OFF/AUTO
Video output
AHD2.0(1080p@25/30fps)
AHD Output format
THD (1080p@25/30fps)
THD Output format
CHD (1080p@25/30fps)
CHD Output format
MONITOR
100 feet
IR distance
93(W)*95.5(H)*263(L)mm
Under the mode of OSD logout, press left button
5 seconds to output CVBS signal, and press right
button 5 seconds to output AHD signal, press up
button 5 senconds to output CHD signal, and
press down button 5 senconds to output THD
signal
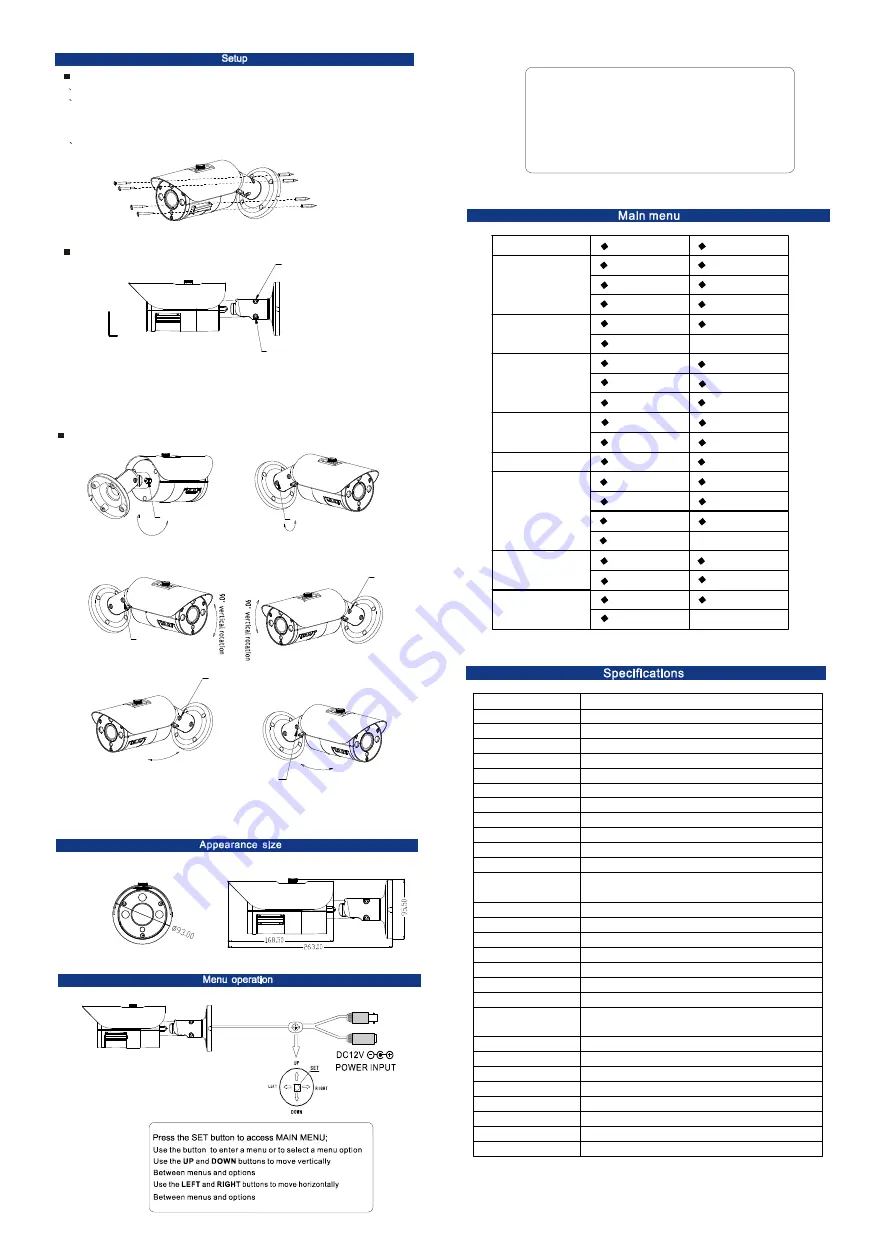
1 Using the foam pat
to locate holes in the wall
2
3
Drill 4 holes in the position needed in accordance with the installation
subpanel of the bracket
,
hole on the
push the expansion bolt inside
the installation hole
then tighten the screws make
,
aim at the four
Camera installation
Get the wire out from the bottle of the bracket.
Assembly instruction of 3D cable bracket
Figure 1
Figure1:Take the screws out of the accessories pouch and use L-shape
to assemble.
spanner
Adjustment instruction of 3D bracket
Figure 2: Loosen screw 3 to rotate 360
°
Figure 3: Loosen screw 1 to rotate 360
°
Figures 4,5,6 and 7: Loosen screw 2 to rotate 90
°
.
up,down,left,right
Screw 1
L-shape spanner
Screw 3
Figure 2
360 rotation
°
Screw 1
Figure 3
360 rotation
°
Screw 2
Figure 4
Screw 2
Figure 5
90 horizontal rotation
°
Figure 6
Figure 7
90 horizontal rotation
°
Screw 2
Screw 2
Screw 2
screws and fix it.
AHD/THD/CHD/CVBS OUTPUT
All manuals and user guides at all-guides.com


