background image

EN - 21

6. CLEANING AND CARE


IMPORTANT: 

Do not use industrial 

chemicals to clean your dryer. Do not use a 

dryer that has been cleaned with industrial 

chemicals.

6.1. Cleaning the Lint Filters


IMPORTANT: 

DO NOT FORGET TO 

CLEAN THE LINT FILTERS AFTER EACH 

USE.

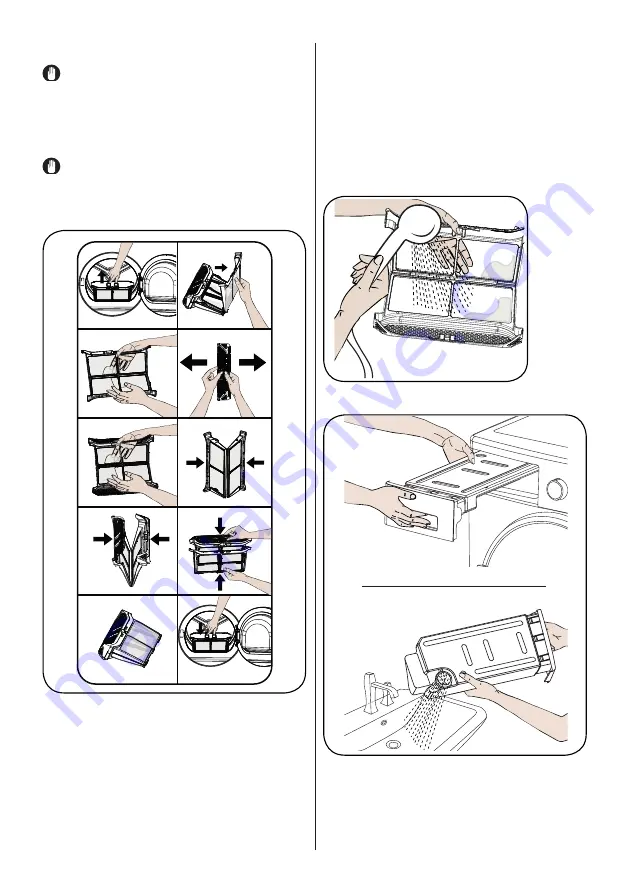
To clean the lint filters:

1. Open the loading door.
2. 

Pull up the lint filters to remove it.

3. 

Open the outer filter

4. 

Clean the outer filter by your hands or 

using a soft cloth.
5. 

Open the inner filter

6. 

Clean the inner filter by your hands or 

using a soft cloth

7. 

Close the filters and fit the hooks

8. 

Place inner filter inside of outer filter

9. 

Refit the Lint filter

After the dryer has been used for a certain 

period of time, if you encounter a layer that 

will cause obstruction on the filter surface, 

wash the filter with warm water to clean the 

layer. Dry the filter thoroughly before 

reinstalling it again.

6.2. 

Emptying the Water Tank

1. Pull the drawer cover and carefully take 

out the tank.
2. Empty the water in the tank.

1

2

Summary of Contents for TDHP8

Page 1: ...TDHP8 Dryer User Manual EN ...

Page 2: ...ke the time to read this User Manual before using your dryer and keep this book for future reference Icon Caption Description WARNING Risk of serious injury or death RISK OF ELECTRIC SHOCK Dangerous voltage FIRE Risk of fire ATTENTION Risk of injury or material damage IMPORTANT NOTE Information on correct operation of the system Read the instructions Hot surface ...

Page 3: ...14 5 USING THE DRYER 15 5 1 Control Panel 15 5 1 1 Programme Selection Knob 15 5 1 2 Electronic Indicator and Additional Functions 15 5 2 Programme Selection and Consumption Table 16 5 2 1 Auxiliary Functions 17 5 2 2 Starting the Programme 18 5 2 3 Programme Progress 19 5 3 Drum Light Information 19 6 CLEANING AND CARE 21 6 1 Cleaning the Lint Filters 21 6 2 Emptying the Water Tank 21 6 3 Cleanin...

Page 4: ...rer will not accept responsibility for damages resulting from incorrect use or transport Do not allow floor coverings to obstruct the ventilation openings Installation and repair of the dryer should only be made by an authorised repair agent The manufacturer cannot be held responsible for damages resulting from un authorised repairs WARNING Never spray or pour water onto the dryer to wash it There...

Page 5: ...nd water outlet is suitable If they are not call a qualified electrician and a plumber to have the necessary adjustments made It is the customer s responsibility to prepare the dryer s installation place as well as the electricity and waste water installation Before installation check the dryer for damage If damaged do not have it installed Damaged dryer may endanger your health Install the dryer ...

Page 6: ...of this temperature range the performance of the dryer will be affected negatively and the dryer will be damaged Be careful when carrying the dryer since it is heavy Always wear safety gloves Always install the dryer against a wall The rear surface of the dryer should be placed against the wall When the dryer is placed on a stable surface use a level to check if it is fully level stable If not adj...

Page 7: ...household waste at the end of its service life To prevent the potential harms of uncontrolled waste disposal on the environment and human health please keep this dryer separate from other types of waste and to prevent sustainable reuse of material resources make sure that it is recycled responsibly Contact your dealer or local authorities to get information on how and where you can take the dryer ...

Page 8: ...e installed by a qualified electrician Our company cannot be held responsible for damages losses resulting from using the dryer without an earth connection as required by local regulations The voltage and the allowable fuse protection are indicated on the type plate For the type plate please see Overview Voltage and frequency values indicated on the type plate must be equal to the mains voltage an...

Page 9: ...rning use of the dryer in a safe way and understand the hazards involved Children must not play with the dryer Cleaning and user maintenance must not be made by children without supervision Do not leave children unattended near the dryer Children might lock themselves in the dryer resulting in risk of death Do not allow children to touch the glass door during operation The surface becomes extremel...

Page 10: ...r turpentine candle wax wax remover or chemicals Laundry that has residues of hair sprays nail polish remover and similar substances Laundry on which industrial chemicals have been used for cleaning such as chemical cleaning Laundry that has any kind of foam sponge rubber or rubber like parts or accessories These include latex foam sponge shower caps waterproof fabrics fitted clothes and foam pill...

Page 11: ...amme or in the event of a power failure whilst the dryer is running This concentration of heat can cause self combustion so always activate the Refresh programme to cool down or quickly remove all laundry from the dryer in order to hang them up and dissipate the heat Use the dryer only for household drying and to dry fabrics with a label that indicates they are suitable for drying All other uses a...

Page 12: ...idable that fabrics that contain vegetable or cooking oil or have been contaminated by hair care products be placed in a dryer they should first be washed in hot water with extradetergent this will reduce but not eliminate the hazard ATTENTION Never use the dryer without a lint filter or with a damaged lint filter Lint filters must be cleaned after each use as indicated in Cleaning the Lint Filter...

Page 13: ...ed Service Provider When the dryer is placed on the washing machine the total weight of these dryer may reach almost 150 kilograms when loaded Place the dryer on a solid floor that has a load bearing capacity Appropriate Installation Table for Washing Machine and Dryer Dryer Depth Washing Machine 37 cm 42 cm 53 cm 56 cm 59 cm 85 cm 56 cm X X 61 cm X X X For the depth information please see 7 Techn...

Page 14: ...olded or stepped over 2 1 3 2 2 Adjusting the Feet For the dryer to work with less noise and vibration it must be stable and balanced on its feet Adjust the feed to ensure that the dryer is balanced Rotate the feet to the right and to the left until the dryer is even and stable IMPORTANT Never remove the adjustable feet 2 3 Electrical Connection ATTENTION There is risk of fire and electric shock Y...

Page 15: ...3 OVERVIEW 1 2 3 4 5 6 7 8 9 10 11 1 Upper tray 2 Control panel 3 Loading door 4 Plinth 5 Plinth opening slot 6 Ventilation grills 7 Adjustable feet 8 Plinth cover 9 Type plate 10 Lint filter 11 Drawer Cover ...

Page 16: ...ryer No drying Do not dry clean At any temperature At high temperatures At medium temperatures At low temperatures Heatless Hang to dry Spread to dry Hang wet to dry Spread in shadow to dry Suitable for dry cleaning Do not dry thin multi layer or thick layer fabrics together as they dry at different levels For this reason dry clothes together that have the same structure and fabric type This way y...

Page 17: ...e type and drying programme Remove clips and similar metal parts from the clothes Woven goods such as t shirts and knit clothes generally shrink in the first drying Use a protective programme Do not over dry synthetics This will cause creases When washing the laundry to be dried adjust the amount of softener according to the data from the manufacturer of the washing machine 4 3 Load Capacity Follo...

Page 18: ...tional functions 5 1 1 Programme Selection Knob Use the programme selection knob to select the desired drying programme 1 2 5 1 2 Electronic Indicator and Additional Functions Display symbols Water tank warning indicator Lint filter cleaning warning indicator Heat exchanger cleaning warning indicator ...

Page 19: ...Iron Dry 4 800 40 64 Delicate 2 600 50 55 Time drying Baby Care 3 1000 60 78 Duvet 2 5 800 60 140 Sport 4 800 40 103 Mix 4 1000 60 112 Wool Refresh 5 Refresh 10 Express 34 1 1200 50 34 Shirts 20 0 5 1200 50 20 Energy consumption values Programme Load kg Energy Consumption Value kWh year Energy Rating Star Cotton Cupboard Dry Drying Level 3 8 149 7 Energy labelling standard programme AS NZS 2442 Al...

Page 20: ...ing when programme selection knob is turned buttons are pressed and at the end of programme To cancel the warnings press and hold the Anti Crease Option button for 3 seconds When you press the button you will hear an audible warning that the option has been cancelled Time Drying When knob is positioned to Time Drying programme option can be selected by pressing Time Drying option button and progra...

Page 21: ...ved from the machine will be damp Delicate This programme dries thin clothes like shirts blouses and silk garments at a low temperature to make them ready to wear Time Drying To reach the required drying level at a low temperature you can use the time programmes of 20 min to 200 min Regardless of the drying level the programme stops at the desired time Baby Care This programme dries delicate infan...

Page 22: ...on Additionally an audible warning will be given at the end of the programme You can remove the laundry to make the machine ready for a new load IMPORTANT Clean the lint filter after every programme Empty the water tank after every programme IMPORTANT If you do not remove the laundry after the programme has ended the 1 hour Anti Crease phase will automatically be activated This programme rotates t...

Page 23: ...rying Level Anticrease Cotton Extra Dry X Cotton Cupboard Dry X Cotton Iron Dry X Synthetics Cupboard Dry X Synthetics Iron Dry X Delicate X X Time drying X Baby Care X Duvet X X Sport X Mix X Wool Refres X X Refresh X X Express 34 X X Shirts 20 X X X Not selectable Selectable ...

Page 24: ...er by your hands or using a soft cloth 5 Open the inner filter 6 Clean the inner filter by your hands or using a soft cloth 7 Close the filters and fit the hooks 8 Place inner filter inside of outer filter 9 Refit the Lint filter After the dryer has been used for a certain period of time if you encounter a layer that will cause obstruction on the filter surface wash the filter with warm water to c...

Page 25: ... 2 Unlock the exchanger cover by turning in the direction shown with arrows 3 Take out the exchanger cover as shown 4 Clean the front surface of the exchanger as shown 5 Fit the exchanger cover as shown 6 Lock the exchanger cover by turning in the direction shown with arrows 7 Close the kick plate cover as shown WARNING DO NOT CLEAN WITH BARE HANDS SINCE THE EXCHANGER FINS ARE SHARP THEY MAY HURT ...

Page 26: ...r similar dryer when cleaning the sensors 6 5 Cleaning the Inner Surface of the Loading Door IMPORTANT DO NOT FORGET TO CLEAN THE INNER SURFACE OF THE LOADING DOOR AFTER EACH DRYING PROCESS Open the loading door of the dryer and clean all of the inner surfaces and the gasket with a soft damp cloth ...

Page 27: ...ange depending on the environmental conditions and use of the dryer ATTENTION 1 Due to safety reasons legislation forces a room of at least 1 m per 8 g refrigerant for such equipment For 150 g propane the minimum allowed room size would be 18 75 m 2 Coolant Risk of fire risk of poisoning risk of material damage and damage to the dryer The dryer contains refrigerant which although it is environment...

Page 28: ...erally feels more humid The programme used might not be suitable for the type of laundry Check the care labels on the laundry items select a suitable programme for the type of laundry and additionally use the time programmes The surface of the lint filter might be clogged Wash the filter with lukewarm water The heat exchanger might be clogged Clean the heat exchanger The dryer might be overloaded ...

Page 29: ...ns on its own The loading door might not be closed properly Push the loading door until you hear the closing sound The water tank warning symbol is on flashing The water tank might be full Empty the water tank The water discharge hose might be bent If the dryer is connected directly to the water outlet check the water discharge hose The filter cleaning warning symbol is on The lint filter might be...

Page 30: ... Contact the nearest authorised service agent E03 Empty the water tank if problem does not solved contact the nearest authorised service agent E04 Contact the nearest authorised service agent E05 Contact the nearest authorised service agent E06 Contact the nearest authorised service agent E07 Contact the nearest authorised service agent E08 There may be voltage fluctuation in mains Wait until volt...

Page 31: ...ndry are dried together Please follow the recommendations in the user manual for programme selection For air circulation leave an appropriate clearance on the front and back sides of the dryer Do not cover the grills on the front side of the dryer Unless necessary do not open the door of the dryer when drying If you have to open it do not keep it open for a long time Do not add new wet laundry dur...

Page 32: ...52313389 200428 00 ...

Reviews: