background image


I

I

I

N

N

N

S

S

S

T

T

T

A

A

A

L

L

L

L

L

L

I

I

I

N

N

N

G

G

G


T

T

T

H

H

H

E

E

E


A

A

A

W

W

W

N

N

N

I

I

I

N

N

N

G

G

G


O

O

O

N

N

N

T

T

T

O

O

O


T

T

T

H

H

H

E

E

E


B

B

B

R

R

R

A

A

A

C

C

C

K

K

K

E

E

E

T

T

T

S

S

S


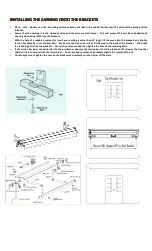
Place    safe    ladders on a flat, dry, stable surface at both ends (and in the middle if wider than 12’) of where the awning will be 
installed 


Assure  that  the  awning  is  in  the  closed  position  and  the  arms  are  tied  closed.    This  will  prevent  the  unit  from  inadvertently 
opening while being lifted into the brackets. 


With the help of a capable assistant (or two-if your awning is more than 12’ long), lift the awning to the brackets and slip the 
torsion bar (back bar) into the brackets.    Make sure the torsion bar slides all the way to the back of the bracket.    Then slide 
the retaining bolts into the brackets.    Center the unit as needed then tighten the nuts on the retaining bolts.       


If the torsion bar does not easily slip into the brackets, make sure the torsion bar is held in place and lift or lower the front bar 
slightly till it is horizontal with the torsion bar.    You may need to loosen the brackets slightly to accomplish this fit. 


Once fully secure, retighten the nuts on the brackets and carefully cut the zip ties off the arms.


Summary of Contents for California

Page 1: ...ers Do not try to repair or adjust the arms 7 This awning should be installed at the height 8 off the deck ground 8 The awning has 1 year limited warranty for any manufacturing defects 9 The installation should be carried out by at least two adults 10 Make sure there is enough space for awning extension before installation CARE AND MAINTENANCE FRAME Cleaning use a mild detergent and warm water on ...

Page 2: ...ws and doors are structural and may be used to secure bracket as well as full length studs Cultured stone surfaces may require a grinder to flatten off the area where the brackets are to be installed Using the bracket as a template the top of the bracket has a ridge on it mark the holes Place the bottom of the bracket on the chalk line BRACKETS WILL BE THE LOWEST POINT OF THE AWNING For stucco or ...

Page 3: ... are structural and may be used to secure bracket as well as full length studs Using the bracket as a template mark the holes Place the bottom of the bracket on the chalk line For aluminum or vinyl Mark a 5 1 2 x5 1 2 square centered on the stud left to right and on the bracket vertically where the bracket will be placed Cut the siding with a sharp utility knife For all other siding Mark a 5 1 2 x...

Page 4: ...p of a capable assistant or two if your awning is more than 12 long lift the awning to the brackets and slip the torsion bar back bar into the brackets Make sure the torsion bar slides all the way to the back of the bracket Then slide the retaining bolts into the brackets Center the unit as needed then tighten the nuts on the retaining bolts If the torsion bar does not easily slip into the bracket...

Page 5: ...r parts found by Awntech Corporation to be defective in design manufacture or assembly under each specific component or product warranty as set forth below D WHAT ARE THE RESPONSIBILITIES OF THE ORIGINAL PURCHASER UNDER THE WARRANTY 1 Before any claims may be made under this Warranty the original purchaser must have paid in full for the product covered under the Warranty according to the terms and...

Page 6: ...owner s manual AWNING ACCESSORIES defined as accessories attached to the awning are warranted for one 1 year not to fail under normal conditions if maintained operated used and stored in accordance with the instructions contained in the owner s manual R R RE E ET T TU U UR R RN N NS S S D D DA A AM M MA A AG G GE E ES S S RETURN QUALIFICATION You can only return a product if it is defective upon a...

Reviews: