background image


15 

 
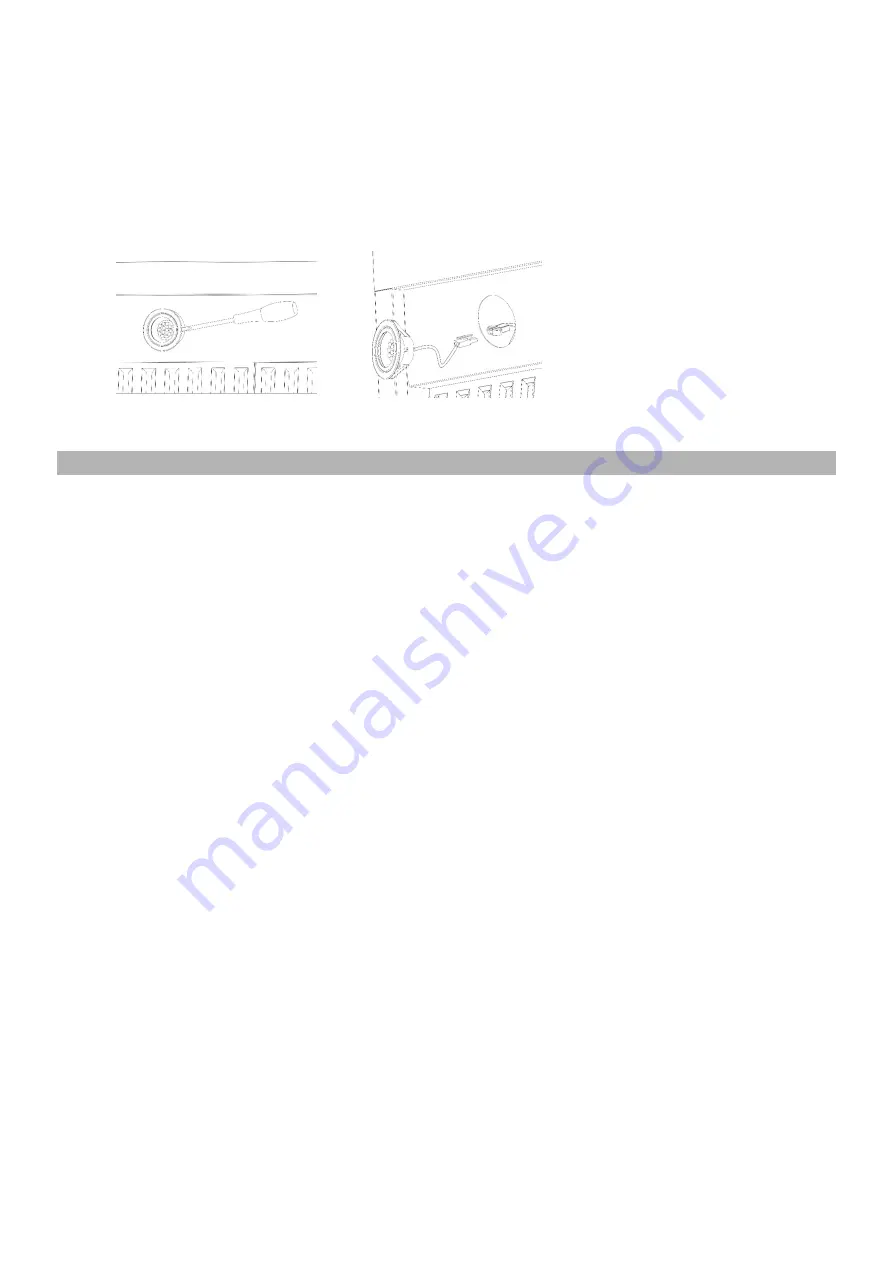
Replacing the Light Bulbs: 


This range hood uses LED bulbs: 3W 12V. 


Make sure the range hood is unplugged or turn OFF breaker. 


1.


Gently pull the defective bulb assembly straight out from the edge, and then disconnect the wires. 

2.


Connect the new LED bulb’s wires and snap the new LED assembly into the housing hole. 

3.


Turn ON breaker/power and to test the range hood for operation. 


12. WARRANTY 


Please provide an original dated proof of purchase (sales receipt / invoice) in order to obtain warranty. 


One Year Parts Warranty


For one year from the date of original purchase, we will provide free of charge, non-consumable replacement parts 
or components that failed due to manufacturing defects. Subject to the conditions and limitations set forth below, 
we will, at its option, either repair or replace any part of its products that prove defective by reason of improper 
workmanship or materials.   


Repaired parts or replacement products will be provided by us on an exchange basis, and will be either new or 
refurbished to be functionally equivalent to new.   


The consumer is responsible for all shipping costs.   


Consumable parts not covered by this warranty include but not limited to: light bulbs, stainless steel baffle filters. 


Who is Covered? 


This warranty is extended to the original purchaser for products purchased for ordinary home use in the continental 
USA. 


This Warranty Will Be Voided When: 


Product damaged through negligence, improper installation, accident, abuse, misuse, natural disaster, insufficient 
or excessive electrical supply, abnormal mechanical or environmental conditions, or any unauthorized disassembly, 
repair, modification, or failure to follow installation instructions.   


When product is used commercially or other than its intended purpose.   


Damaged because of improper connection with equipment of other manufacturers. Repaired or modified by 
anyone other than our authorized agents.   


This limited warranty also does not apply to any product on which the original identification information has been 
altered, obliterated or removed, has not been handled or packaged correctly, has been sold as second-hand. 


What is Not Covered? 


Consumable parts such as light bulbs, stainless steel baffle filters. The natural wear of finish, and wear due to 
improper maintenance, use of corrosive and abrasive cleaning products, pads, and oven cleaner products.   


Chips, dents or cracks due to abuse, misuse, freight damage, or improper installation.   


Damage of product caused by accident, fire, floods or act of God. It is not liable for, and does not cover under 
warranty, any loss of properties or any costs associated with removing, servicing, installing, or determining the 
source of problems with our products. 


Summary of Contents for RH-SP06

Page 1: ...rom the range hood to the split blower unit s connector inside the top connection box 5 Plug in 120V AC power source Press the power button and the speed buttons to turn on 6 Check if any unusual metal touching noise check the speed variation and press the Light button to check the lights 7 Verify all functions per Section 9 RANGE HOOD OPERATIONS 8 Refer to Section 10 TROUBLESHOOTING if any malfun...

Page 2: ...by qualified person s in accordance with all applicable codes and standards including fire rated construction C When cutting or drilling into wall or ceiling do not damage electrical wiring and other hidden utilities D Verify and ensure the rated voltage and frequency please refer to the rating label of the range hood is in compliance with the mains supply CONTENTS 1 KNOW BEFORE INSTALLATION 2 2 I...

Page 3: ...ling Two of 6 aluminum round ducts are included Refer to Section 5 VENTING METHODS for detail Check the existing exhaust duct size If not 6 round metal duct try to get the converter reducer adapter elbow as shown in the pictures The damper is included on the top vent of the split blower unit Also prepare the cutting tools jig saw or reciprocating saw screw drivers or power drill level measuring ta...

Page 4: ...f 6 Aluminum Ducts Top Connection Box 2 INCLUDED PARTS ACCESSORIES Note The split blower unit must be kept inside the home attic or crawl space etc Never try to install the split blower outside of the home The supplied are subjected to change without notice due to product development ...

Page 5: ...ities Before servicing or cleaning unit unplug the power cord or switch power OFF at service panel and lock service panel to pre vent power from being switched ON accidentally Clean grease laden surfaces frequently To reduce the risk of fire and to disperse air properly make sure to vent air outdoors DO NOT vent exhaust into spaces between walls crawl spaces ceiling attics or garages Use only meta...

Page 6: ...he lights or any type of appliance Open all doors and windows to disperse the gas If you still smell gas call the gas company and fire department or 911 immediately Your safety and the safety of others are very important We have provided many important safety messages in this manual and on your appliance Always read and obey all safety messages All safety messages will tell you what the potential ...

Page 7: ... duct For the most efficient quiet operation A distance of 27 to 30 is recommended between stove top and the bottom of range hood The vent duct isn t included It is recommended that the range hood be vented vertically through the roof through 6 15 24 cm or bigger round metal aluminum vent work such as 6 in x 8 ft semi rigid aluminum flexible duct The size of the vent should be uniform Use no more ...

Page 8: ...hoods mounted too high will be hard to reach and will reduce its performance and efficiency If available also refer to stove top manufacturer s height clearance requirements and recommended hood mounting height above range Minimum Duct Size Round 6 minimum Included 2 of 6 aluminum round ducts Recommend to purchase higher quality 6 semi rigid aluminum ducts if you are not satisfied with these provi...

Page 9: ...r semi rigid type metal aluminum ducts if available to maximize airflow Decide the location of the venting pipe from the hood to the outside Astraight short vent run will allow the hood to perform more efficiently Try to avoid as many transitions elbows and long run as possible This may reduce the performance of the hood IMPORTANT NEVER exhaust air or terminate duct work into spaces between walls ...

Page 10: ...ected directly to the fused disconnect or circuit breaker box through flexible armored or non metallic sheathed copper cable ETL listed strain relief must be provided at each end of the power supply cable Specifications Specifications Body Design Seamless Stainless Steel Satin Finish Power Rating 120V 60Hz USA Canada standard General Input Power 236W 230W 2x3W Motor Input Power 230W Ampere 2 5 A L...

Page 11: ...nstall the hood unplug the power on an electric range SHUT OFF THE GAS VALVE BEFORE MOVING A GAS RANGE 8 INSTALLATION INSTRUCTIONS 1 Installation planning Measure the distance between stove top and the bottom of range hood A distance of 27 to 30 is recommended Minimum 25 5 is required for safety concern Decide the venting method and the location of the venting pipe from the hood to the outside Pur...

Page 12: ... to connect the top exhaust on the Split Blower Unit to the roof wall cap Use the hose clamps and foil tape or duct tape to make all joints secure and air tight 8 Connect the Speed Control Cord from the hood to the top connection box of the Blower Unit make sure the wires are securely connected using the provided electrical nuts according to the colors Note the Black wire is Neutral in this Speed ...

Page 13: ...peed Control button can be activated Blower Speed Selection With the range hood is OFF press the Power Control On Off button once The LED on the Power Control button will be illuminated While the Power Control LED is illuminated press one of the four speed control button Quiet Low Medium and High to activate the desired speed the LED on the speed control button will turn on To change the fan speed...

Page 14: ... The range hood might not have been secured properly on to the cabinet or wall The blower or fan seems weak Check that the duct sized used is at least 6 or 3 1 4 x 10 Range hood WILL NOT function efficiently with insufficient duct size For example 7 duct over 6 top vent and loosely secured Check if duct is clogged or if damper unit half circular flapper is not installed correctly or opening proper...

Page 15: ... onto or into the control panel Follow directions of the stainless steel cleaner CAUTION DO NOT leave on too long as this may cause damage to hood finish Use soft towel to wipe off the cleaning solution gently rub off any stubborn spots Use dry soft towel to dry the hood After cleaning you may use nonabrasive stainless steel polish to polish and buff out the stainless luster and grain Always scrub...

Page 16: ...anty is extended to the original purchaser for products purchased for ordinary home use in the continental USA This Warranty Will Be Voided When Product damaged through negligence improper installation accident abuse misuse natural disaster insufficient or excessive electrical supply abnormal mechanical or environmental conditions or any unauthorized disassembly repair modification or failure to f...

Page 17: ...rranty service you may contact us its dealer or distributor from which you purchased the product Please confirm the terms of your dealer s or distributor s policies prior to contacting Typically you must include product identification information including model number and lot number with a detailed description of the problem you are experiencing You must also include proof of the date of original...

Reviews: