Chapter 2 |
13
Surface Operation
G - Talk to Studio Button
The button below the Studio knob is used to talk into the Monitor Feed for cueing purposes. Pressing TALK TO STUDIO will
take the audio of the Operator profile and feed it directly to the Studio Monitor feed. By Default the source defined as the
Operator will be used for this talkback and this source would need to be loaded to a fader. The Show Profile provides the option
to define an “External Source,” which avoids the requirement to load the Operator microphone to a channel.
H- Talk to Backfeeds Button
Similar to TALK TO STUDIO button, TALK TO BACKFEEDS is a global talkback button that will feed the operator microphone
audio to all backfeeds that are generated by the console.
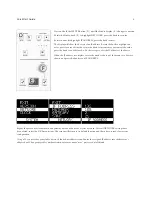
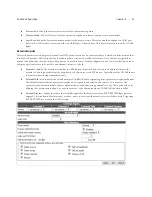
I - Control Room Display
The Control Room display indicates conditions on three different audio feeds related to the Control Room. These three feeds
are the Control Room Monitor Feed, the Preview Feed, and the Operator Headphone Feed. By default the display shows the
source selected to the monitors. By pressing the Preview knob (M) or the Headphone knob (L), the display will temporarily
indicate which source is feeding those destinations. By rotating any of the knobs, (K)(L)(M), the display will show a
horizontal bar indicating the volume. The display will indicate [MUTED] or [DIMMED] states.
J - Control Room Monitor Select Buttons
These six buttons are used to select what is monitored in the control room. The first four buttons are designated to the four
Program mixes. The last two buttons are labeled “EXT n”—external—and are assigned to any source. A typical use case is to
monitor the tuner set to your frequency and thus monitor what is broadcast on the air via the ON AIR Monitor. The operator
can assign a source to a button by pressing the button for a few seconds until display (F) changes to show a list of sources.
In this condition, use knob (E) to highlight the desired new source followed by pressing the knob to select. To exit the
mode, press the EXT button again. Pressing the EXT button will route that audio to the control room monitors and operator
headphones as well as list the name on display (I).
K - Control Room Knob
The control room knob is the volume for the control room monitor speakers. First-time operators should be instructed to use
this knob to adjust the volume and not the channel faders. The channel faders are for adjusting the audio level in relation to
what is shown on the meter bridge.
L - Operator Headphone Knob
The headphone knob is for adjusting the volume feeding the operator headphone. The knob is not intended to adjust the
volume of any other headphone. The headphone feed would come from an xNode or other AoIP I/O device. The iQx console
provides no analog audio interfaces.
M - Preview Knob
The preview knob will adjust the volume of the Preview mix. As items are selected for preview, the operator may need to adjust
the volume to better hear the audio. By default the main monitors will dim when any channel is engaged into Preview in order
to assist the operator.
N - Preview in Headphone Button
This button will route the Preview mix into the operator headphone feed. The result will be a mix of Preview and the selected
(J) source. The selected source will be dimmed.

