background image

2: S

et

up •

 3

Chapter Two: 

Setup


When the xSwitch boots for first time, it will have no 

IP address. An IP address can be assigned to the xSwitch 

in any of three ways:

1.  Assign the xSwitch a NODE-ID value, which in 

turn assigns an IP address.

2.  Enter an IP address from the front panel.

3.  Use the 

bootp

 server within iProbe to push an 

IP address to the xSwitch. 

These three methods are given more detail below.

Assigning an ID to the xSwitch

The Axia xNode family uses an ID schema for iden-

tifying  each  device,  in  which  assigning  a  unique  ID 

number also assigns a unique IP address. The xSwitch 

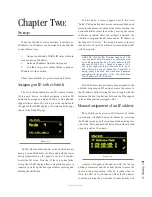
supports this schema. To do this, press the top button to 

the right of the OLED display a few times until the page 

shown is the Node ID page.

No ID value should be shown, as the xSwitch has not 

been given an ID number yet. Press and hold the lower 

button (represented by the pencil icon) for 10 seconds 

to edit the ID value. Note that if the screen has fallen 

asleep (the OLED display dims), a single button press is 

required to wake up the front panel before pressing and 

holding the edit button. 

In  Edit  mode,  a  cursor  appears  next  to  the  word 

“Node”. The top button becomes an increment button and 

increases the numerical value at the cursor position; the 

bottom button becomes the next key, moving the cursor 

to the next position. After the last digit is entered, the 

xSwitch is assigned the ID value and an IP address in 

the subnet of 10.216.x.y . If, during this process, there is 

inactivity for 30 seconds, edit mode times out and no ID 

will be assigned.

MORE  ON  ID  VALUES:  Number  ranges  of  1-99 

(nn)  supports  small-to-medium  networks  with 

up to 99 network devices. The ID defines the IP 

address 10.216.0.1nn . Number ranges of 100-

319  (abc)  supports  large  networks  with  up  to 

2299  network  devices.  When  the  3  digit  ID  is 

being  used,  a  second  level  identifier  becomes 

available with range of d=<0-9>. The ID defines 

the IP address 10.216.ab.1cd .

If an IP address has previously been assigned to the 

xSwitch, assigning an ID number moves the cursor to 

the IP Address field, allowing the user to toggle with the 

increment button (top button) between the ID-assigned 

value and the previous assigned value.

Manual assignment of an IP address

The xSwitch can be given an IP address to fit within 

a previously established network schema by accessing 

the IP address page on the front panel and entering into 

edit mode. Press and hold the lower button (shown with 

a pencil icon) for 10 seconds.

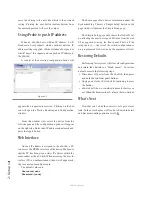
A cursor will appear in the address field. Use the top 

button to increment and the bottom button to move the 

cursor to the next position. After 30 seconds of no ac-

tivity, the Edit view will time out. Once the IP address 

is edited, pressing the next button (bottom button) will 

Figure 2-1

Figure 2-2

©2013 Axia Audio

Summary of Contents for xSwitch

Page 1: ...xSwitch Installation User s Guide Manual Rev 1 2 0 June 2013 p n 1490 00094 001...

Page 2: ...ompatibility Conformity is declared to those standards EN50081 1 EN50082 1 Important Safety Information ELECTRICAL WARNING If the equipment is used in a manner not specified by the manufacturer the pr...

Page 3: ...re Keep moisture away from the ventilation openings in the top and front of the unit To avoid the possibility of electrical shock do not use this equipment when you are wet If you accidentally drop th...

Page 4: ...Switch are determined largely by software Periodic updates may become available to deter mine if this is the case visit our web site periodically or contact us for advice concerning whether a newer re...

Page 5: ...el Credit Where Credit s Due It s a pleasure to be a part of this organization Thanks to all of the engineers architects and design ers that made this product a reality you know who you are cn Feedbac...

Page 6: ...apter One Intoducing the xNode 1 Front Panel 1 Rear Panel 1 HTML Interface 1 Chapter Two Setup 3 Fast setup 3 Assigning an ID 3 Assigning an IP address manually 3 iProbe configuration 4 Web interface...

Page 7: ...s Needless to say we re hum bled by the trust broadcasters place in us and by your enthusiasm Being first with new technology is nice but we ve never been content to rest on our laurels So the Telos R...

Page 8: ...Introduction viii 2013 Axia Audio Complexity gone Just plug it in and go that s what we re talkin bout...

Page 9: ...er over Ethernet ports Four 100BASE T ports There is also a single IEC connector to power the xSwitch HTML Interface Along with the front panel OLED display the xSwitch has an HTML interface that can...

Page 10: ...1 Introducing the xSwitch 2 SFP so small Copper fiber coexist Duality rocks 2013 Axia Audio...

Page 11: ...cursor to the next position After the last digit is entered the xSwitch is assigned the ID value and an IP address in the subnet of 10 216 x y If during this process there is inactivity for 30 second...

Page 12: ...hen accessing the user in terface UI an authentication window will appear ask ing for a username and password The default values are Username user Password none The home page shows device information...

Page 13: ...hich are used for securing metal work to the xSwitch Secure the bracket to the xSwitch with included screws in the desired configuration Optional Rack Mount kit A rack mount kit is provided with each...

Page 14: ...is used by the xSwitch Temperature The temperature reading of the inter nal sensor Alarm status will appear if the temperature is above acceptable limits System Uptime The amount of time since the la...

Page 15: ...k Sequence with an integral number of octets FCS Error or a bad FCS with a non integral number of octets Alignment Error RxErr Error in received packets FCSErr Frame Check Sequence errors indicate cor...

Page 16: ...erver IP address of the computer which is running a syslog server application Syslog severity level filter The 8 standard syslog levels are available for selection User password The authentication pas...

Page 17: ...panel Switch details The xSwitch supports 4 QoS queues Highest priority given to CoS 6 and 7 DCSP priority also recognized IGMP version 2 supported IGMP snooping query function is enabled with 10 seco...

Page 18: ...3 Console Operation 10 2013 Axia Audio...

Page 19: ...over Ethernet 15 4 W per port maximum 61 6 W switch maximum Connector Specifications 10 100 1000 Ports The 10 100 1000 Ethernet ports use standard RJ 45 connectors Connecting to 100BASE T Compatible D...

Page 20: ...3 The xSwitch in depth 12 Five Guys In N Out Anyway you slice it it s a darn fine burger 2013 Axia Audio...

Page 21: ...orized dealers be liable for incidental or consequential damages or for loss damage or expense directly or indirectly arising from the use of any Product or the inability to use any Product either sep...

Page 22: ...Axia Audio a Telos Alliance Company 1241 Superior Ave Cleveland Ohio 44114 USA 1 216 241 7225 www AxiaAudio com...

Reviews: