


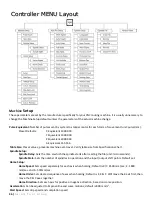


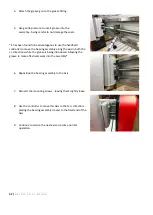


31 |
A x i o m T o o l G r o u p
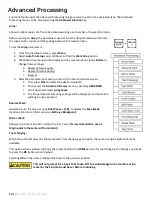
Stop State (Back Position):
In addition to the above option
(Advanced Processing Tool Changing)
, there is another option which can be more
effective specifically when using fixtures.
The
Stop State
shares some similarities with the
Origin
point since it will allow a defined location that can be
programmed anywhere within the machine limitations.
This point must be activated in the controller software before being programmed. Once complete, the machine will
go to the programmed location at the end of each process. (
Location can be changed as needed
).
To program a Stop State:
1-
From the coordinate screen, press
Menu
.
2-
Select
Auto Pro Setup
, then scroll down to find the
Stop State
.
3-
The Work Stop State menu will be displayed which has several options.
a.
FinAct
(Finish Action)- press
Delete
to change the settings.
i.
Pickup Z- Will leave the X & Y axis wherever they are at the end of the file operation, raising
the Z-axis to the set safe height. (
Default
)
ii.
Back to Work Origin- Will move the X & Y axes back to the
Origin
, while raising Z-axis to the
safe height.
iii.
Back Home- Will move all axes back to the
HOME
position.
iv.
Back Position- Will move all axes to a programmed location after the file operation is
complete.
b.
Programming the
Back Position
can be done similarly to the
Origin
point. Move all axes to the
desired location and height.
i.
Press
Menu + Z-0
to set the location.
Highly recommended that the Z-axis is raised to the highest elevation to help prevent
damage as the machine travels.
c.
A specific set of coordinates can also be programmed by entering the desired location for each axis
manually.
Part Work:
Using this processing option allows a specific line in the gcode from a file operation to be selected as the start and
stop locations.
To setup a
Part Work
operation:
1-
First, select the toolpath file. Then enter the
Advanced Process
menu and select
Part Work
a.
The gcode will be displayed.
i.
Use the
Y+/-
buttons to scroll through the list and highlight the desired start line.
ii.
Press
OK
to select
iii.
Use the
Y+/-
buttons to scroll through the list and highlight the desired stop line.
iv.
Press
OK
to select
2-
The normal file parameters will be displayed, and operation will begin once approved.
Calculate Boundaries:
This application will calculate the boundaries of the file. Allowing a user to verify that an operation will fit within the
machine limitations.
Will show the operation boundaries for each axis in metric units.
Summary of Contents for AR16 ELITE
Page 1: ...AR8 16 ELITE MANUAL Axiom Tool Group Inc All rights reserved Rev 1 2 2020 ...
Page 46: ...46 A x i o m T o o l G r o u p AR8 Elite Part List ...
Page 47: ...47 A x i o m T o o l G r o u p ...
Page 48: ...48 A x i o m T o o l G r o u p ...
Page 49: ...49 A x i o m T o o l G r o u p ...
Page 50: ...50 A x i o m T o o l G r o u p ...
Page 51: ...51 A x i o m T o o l G r o u p ...
Page 52: ...52 A x i o m T o o l G r o u p ...
Page 53: ...53 A x i o m T o o l G r o u p ...
Page 54: ...54 A x i o m T o o l G r o u p ...
Page 55: ...55 A x i o m T o o l G r o u p AR16 Elite Part List ...
Page 56: ...56 A x i o m T o o l G r o u p ...
Page 57: ...57 A x i o m T o o l G r o u p ...
Page 58: ...58 A x i o m T o o l G r o u p ...
Page 59: ...59 A x i o m T o o l G r o u p ...
Page 60: ...60 A x i o m T o o l G r o u p ...
Page 61: ...61 A x i o m T o o l G r o u p ...
Page 62: ...62 A x i o m T o o l G r o u p ...
Page 63: ...63 A x i o m T o o l G r o u p ...
Page 64: ...64 A x i o m T o o l G r o u p ...