to the stereo line output jack.
The system is powered by the display modules.
WARNING!
Use a
regulated
12 VDC power supply. If you use an unregulated power supply, it may
damage the display modules.
Bootloader
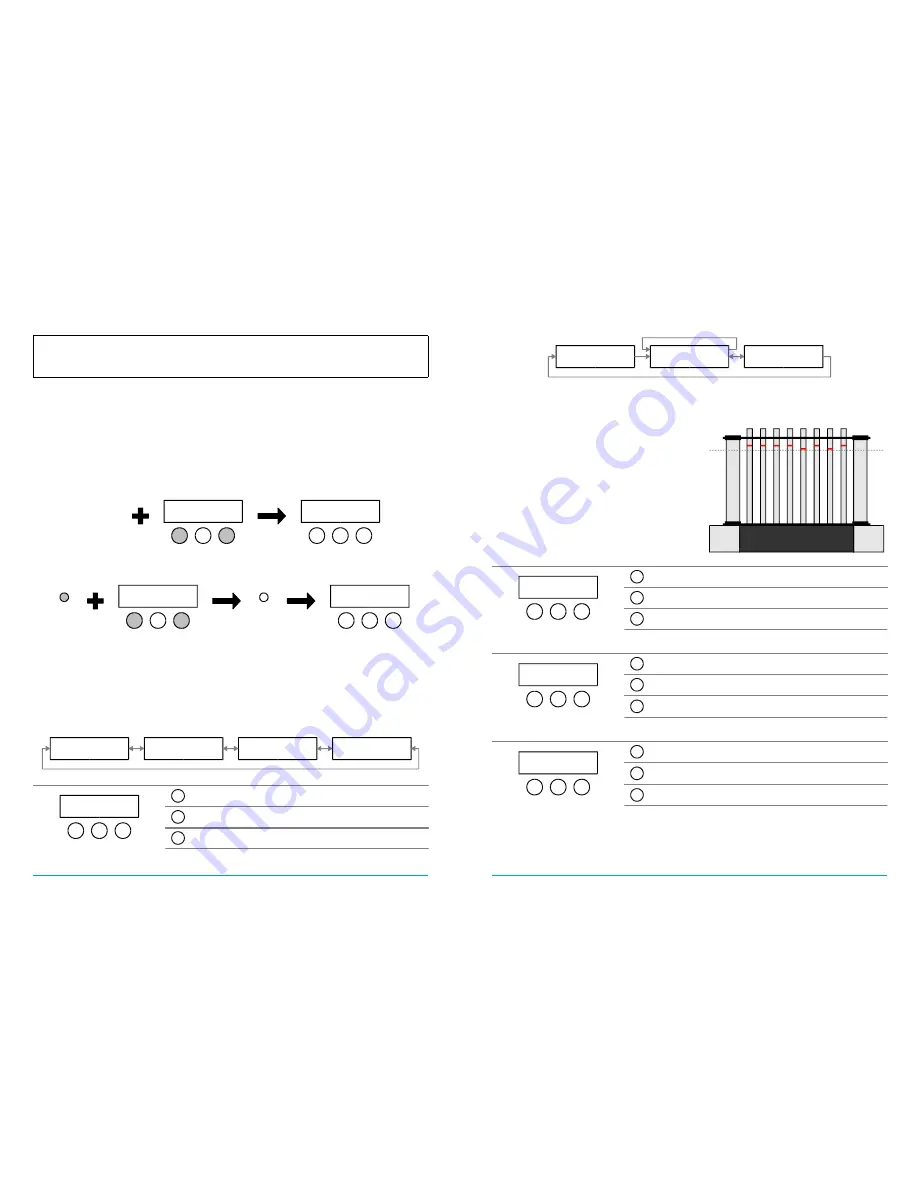
There are two methods for invoking the bootloader.
1.
Hold down buttons 1 and 3 while powering up the system. The system will start up in
bootloader mode.
2.
When the system is powered up, hold down the RESET button along with buttons 1
and 3. When you release the RESET button, the system will go to bootloader mode.
With the bootloader active, you can update the firmware in the control module. Connect
the USB port to a PC for this purpose.
Main Menu
Select the previous menu.
Select the next menu.
Enter the selected menu.
4
User Manual
Main Menu
◄► Audio
1
2
3
1
2
3
Main Menu
◄► Audio
Main Menu
◄► Animation
Main Menu
◄► Demo Mode
Main Menu
◄► Configuration
POWER UP
1
2
3
Bootloader
1
2
3
1
2
3
RESET
Bootloader
1
2
3
RESET
Calibration Menu
Each IN-13 tube shoots out differently. The calibration menu offers a method for fine-
tuning the height at which the tubes glow for a specific reference level. The red markers
near to top of the IN-13 tubes may serve as the reference level.
The red markers may not be aligned perfectly
horizontal. If this is the case, you're advised
to use something different as a means of
reference level, like a ruler, a piece of paper,
or a rubber band that's not too tightly
wrapped around the display's outer columns.
It's preferably to align this means with the
lowest red marker of all tubes in the vertical
direction.
During the calibration procedure, you must
adjust each tube's glowing height to the
reference level.
Start calibrating the tubes on the left display. IN-13 only.
Start calibrating the tubes on the right display. IN-13 only.
Exit to the configuration menu.
In the entry screen you can select the display module you want to calibrate.
Decrement the value.
Increment the value.
Select the next tube. When the last tube has been
calibrated, go to the next screen.
The tubes on the display are calibrated from left (tube 1) to right (tube 8).
Save the calibration values in the display's EEPROM.
Discard the calibration values and go back to the first
screen.
Resume calibrating the tubes. All values are retained.
You can choose BACK to check the calibration values and to further fine-tune the
calibration of each tube.
When you choose YES, the calibration data is saved in the EEPROM of the IN-13 display.
User Manual
9
1
2
3
1
2
3
1
2
3
Right tube 5
◄► 840
1
2
3
Save?
YES NO BACK
1
2
3
Calibration
IV-26 IN-13
1
2
3
Calibration
IV-26 IN-13
Right tube 5
◄► 840
Save?
YES NO BACK


