background image

Instalación de la AXIS 231D/232D


35 

ESPAÑOL

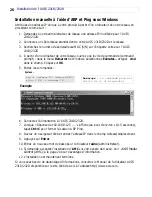
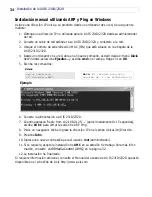
Instalación manual utilizando ARP y Ping en UNIX/Linux

Asigne una dirección IP única a su producto desde un ordenador de su red, de la siguiente 

manera:

1. Obtenga una dirección IP no utilizada para la AXIS 231D/232D desde su administrador 

de red.

2. Conecte un cable de red estándar a su AXIS 231D/232D y conéctelo a la red.
3. Ubique el número de serie/dirección MAC (S/N) que está situado en la etiqueta de la 

AXIS 231D/232D.

4. Conecte la alimentación a AXIS 231D/232D.
5. Cuando aparezca ‘Reply from 192.168.0.125: ...’ (o similar) (aproximadamente 10-15 

segundos), escriba CTRL+C para cerrar la sesión de ARP Ping.

6. Inicie un navegador Web e ingrese la dirección IP en el campo Ubicación/Dirección.
7. Presione 

Intro

.

8. Ingrese una nueva contraseña para el usuario 

root

 (administrador).

9. La instalación ha finalizado.

Si requiere información adicional, consulte el Manual del usuario de AXIS 231D/232D que está 

disponible en el sitio Web de Axis http://www.axis.com

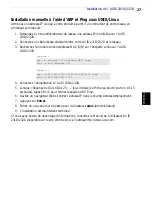
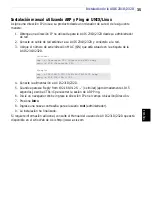
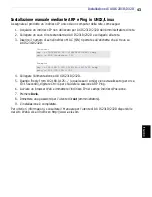
Sintaxis:

arp -s <Dirección IP> <Dirección MAC> temp

ping -s 408 <Dirección IP>

Ejemplo:

arp -s 192.168.0.125 00:40:8c:18:10:00 temp

ping -s 408 192.168.0.125

Summary of Contents for 231D

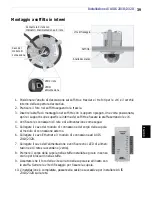
Page 1: ...AXIS 231D 232D Network Dome Camera Installation Guide Installation instructions are also available in German French Spanish and Italian in this manual ENGLISH DEUTSCH FRANCAIS ESPAÑOL ITALIANO ...

Page 2: ...ect the interference Europe This digital equipment fulfills the requirements for radiated emission according to limit A of EN55022 1998 and the requirements for immunity according to EN55024 1998 residential commercial and light industry Japan This is a class B product based on the standard of the Voluntary Control Council for Interference from Information Technology Equipment VCCI If this is used...

Page 3: ...Utility 17 Manuelle Installation mit ARP und Ping unter Windows 18 Manuelle Installation mit ARP und Ping unter UNIX Linux 19 AXIS Internet Dynamic DNS Service 20 Installation de l AXIS 231D 232D 21 Montage de l AXIS 231D 232D 21 Montage à l extérieur du plafond 22 Montage encastré dans un plafond 23 Installation dans un réseau 24 AXIS Media Control AMC 24 Installation manuelle à l aide de l utili...

Page 4: ...ynamic DNS Service 36 Installazione di AXIS 231D 232D 37 Montaggio di AXIS 231D 232D 37 Montaggio a soffitto in esterni 38 Montaggio a soffitto in interni 39 Installazione su una rete 40 AXIS Media Control AMC 40 Installazione manuale mediante AXIS IP Utility 41 Installazione manuale mediante ARP e Ping in Windows 42 Installazione manuale mediante ARP e Ping in UNIX Linux 43 AXIS Internet Dynamic ...

Page 5: ...y Never position the camera directly towards the sun or other bright objects Whether the camera is in use or not never aim it at the sun or other extremely bright objects Hardware Inventory Check the items supplied with your AXIS 231D 232D against the following list Optional accessories are available for mounting on ceiling wall corner and pole for both indoor and outdoor use For more information ...

Page 6: ...AXIS 231D 232D 4 Connect the power cable and check that the power and network LEDs light up green 5 Mount the dome body to the bracket and rotate it clockwise Make sure the screw hole on the side of dome is aligned with the bracket Tighten the fixing screw to secure the dome 6 Attach and secure the Decoration ring to the bracket 7 The hardware installation is now complete proceed to Installing on ...

Page 7: ...s 4 Connect the Ethernet cable and connection module to the AXIS 231D 232D 5 Connect the power cable and check that the power and network LEDs light up green 6 Push the dome body up into the installed bracket and twist it clockwise to lock it into the bracket 7 Make sure the screw hole on the side of dome is aligned with the bracket Tighten the fixing screw to secure the dome 8 The hardware instal...

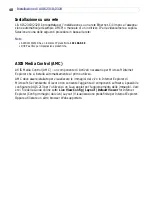
Page 8: ...his open the Control Panel from the Start Menu and select Add Remove Programs Select Add Remove Windows Components and open the Networking Services section Click Details and then select UPnP as the service to add Refer to the Windows help files for more information AXIS Media Control AMC AXIS Media Control AMC an ActiveX component required for Microsoft Internet Explorer installed automatically on...

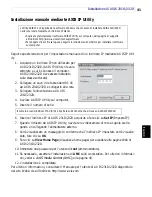
Page 9: ...sage confirming that the IP address has been set will be displayed click OK 9 Click View Home Page to access the AXIS 231D 232D Web pages 10 Enter a new password for the root user administrator 11 If required accept the installation of AMC onto your workstation See AXIS Media Control AMC on page 8 for more information 12 The installation is now complete If you need additional information refer to ...

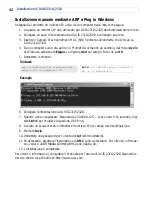
Page 10: ...Click OK 5 Enter the commands Syntax Example 6 Connect the power to the AXIS 231D 232D 7 When Reply from 192 168 0 125 is displayed approximately 10 15 seconds type Ctrl C to close the ARP Ping session 8 Start a Web browser and enter the IP address in the Address Location field 9 Press Enter 10 Enter a new password for the root user administrator 11 If required accept the installation of AMC onto ...

Page 11: ...D 232D 4 Connect the power to the AXIS 231D 232D 5 Once Reply from 192 168 0 125 or similar is displayed approximately 10 15 seconds type CTRL C to close the ARP Ping session 6 Start a Web browser and enter the IP address in the Address Location field 7 Press Enter 8 Enter a new password for the root user administrator 9 The installation is now complete If you need additional information refer to ...

Page 12: ...amic IP address from a DHCP server on your network 4 Wait 60 seconds and push the control button on the dome camera once The Power indicator will blink amber while it connects to the AXIS Internet Dynamic DNS service When the registration process is complete the indicator will return to steady green 5 Visit www axiscam net where you will be guided through the remainder of the installation Please h...

Page 13: ...werden wenn es vor Regen und Feuchtigkeit geschützt wird Verwenden Sie bei einer Nutzung der Kamera in Außenbereichen das entsprechende Zubehör Setzen Sie beim Reinigen des Gehäuses keine intensiven oder scheuernden Reinigungsmittel ein Wischen Sie das Gehäuse vorsichtig mit einem sanften Reinigungsmittel ab Setzen Sie die Kamera niemals direkter Sonneneinstrahlung oder anderen hellen Lichtquellen...

Page 14: ...g und Netzwerk grün aufleuchten 5 Setzen Sie die Kuppel in die Halterung ein und drehen Sie sie im Uhrzeigersinn Stellen Sie sicher dass das Schraubenloch an der einen Kuppelseite an der Halterung ausgerichtet ist Ziehen Sie die Befestigungsschraube an um die Kuppel zu sichern 6 Bringen Sie die Ringblende an der Halterung an und befestigen Sie sie mit drei Schrauben 7 Die Hardwareinstallation ist ...

Page 15: ...hließen Sie Ethernet Kabel und Verbindungsmodul an AXIS 231D 232D an 7 Schließen Sie das Netzkabel an und vergewissern Sie sich dass die LEDs für Stromzufuhr und Netzwerk grün aufleuchten 8 Drücken Sie die Kuppel in die montierte Halterung und drehen Sie sie im Uhrzeigersinn um sie in der Halterung zu befestigen 9 Stellen Sie sicher dass das Schraubenloch an der einen Kuppelseite an der Halterung ...

Page 16: ...trol AMC AXIS Media Control AMC AXIS Mediensteuerung ist eine ActiveX Komponente die für Microsoft Internet Explorer benötigt und bei der ersten Verwendung automatisch installiert wird AMC muss installiert sein damit direkt übertragene Bilder in Microsoft Internet Explorer gese hen werden können Falls Ihr Arbeitsumfeld weitere Softwarekomponenten nicht zulässt kön nen Sie Ihren AXIS 231D zum Aktua...

Page 17: ...eine Meldung zur Bestätigung dass die IP Adresse festgelegt wurde Klicken Sie auf OK 9 Klicken Sie auf View Home Page um die AXIS 231D 232D Webseiten aufzurufen 10 Geben Sie ein neues Passwort für den Benutzer root Administrator ein 11 Bestätigen Sie ggf die AMC Installation auf Ihrem Arbeitsplatz Einzelheiten finden Sie unter AXIS Media Control AMC auf Seite 16 12 Die Installation ist damit abges...

Page 18: ...d ein Klicken Sie auf OK 5 Geben Sie die Befehle ein Syntax Beispiel 6 Schließen Sie AXIS 231D 232D an das Stromnetz an 7 Bei Reply from 192 168 0 125 ca 10 15 s drücken Sie Strg C zum Beenden der ARP Ping Sitzung 8 Öffnen Sie einen Webbrowser und geben Sie die IP Adresse im Adressfeld ein 9 Drücken Sie die Eingabetaste 10 Geben Sie ein neues Passwort für den Benutzer root Administrator ein 11 Bes...

Page 19: ...D 4 Schließen Sie AXIS 231D 232D an das Stromnetz an 5 Bei Reply from 192 168 0 125 oder so ähnlich ca 10 15 s drücken Sie Strg C zum Beenden der ARP Ping Sitzung 6 Öffnen Sie einen Webbrowser und geben Sie die IP Adresse im Adressfeld ein 7 Drücken Sie die Eingabetaste 8 Geben Sie ein neues Passwort für den Benutzer root Administrator ein 9 Die Installation ist damit abgeschlossen Zusätzliche Inf...

Page 20: ...von einem DHCP Server im Netzwerk erhalten 4 Warten Sie 60 s Drücken Sie daraufhin einmal die Steuertaste an der Kuppelkamera Die Stromversorgungsanzeige blinkt gelb während eine Verbindung mit dem AXIS Internet Dynamic DNS Service hergestellt wird Nach Abschluss der Registrierung wechselt die Anzeige wieder auf Dauergrün 5 Auf der Website www axiscam net werden Sie durch den restlichen Installati...

Page 21: ...e et de l humidité Pour une utilisation en extérieur utilisez les accessoires de protection pour montage extérieur N utilisez pas de détergents abrasifs ou agressifs pour nettoyer le corps Utilisez un détergent doux et essuyez avec précaution N orientez jamais la caméra directement vers le soleil ou d autres objets brillants Que la caméra soit en fonc tionnement ou non ne la dirigez jamais vers le...

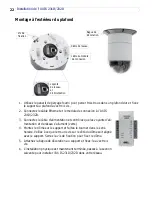
Page 22: ...tion et de réseau s allument verts 4 Montez le dôme sur le support et faites le tourner dans le sens horaire Veillez à ce que le trou de vis sur le côté du dôme soit aligné avec le support Serrez la vis de fixation pour fixer le dôme 5 Attachez la bague de décoration au support et fixez la avec trois vis 6 L installation physique est maintenant terminée passez à la section suivante pour installer ...

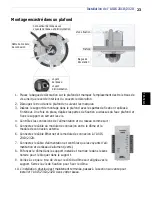
Page 23: ...dule de connexion entre le dôme et le module de connexion externe 6 Connectez le câble Ethernet et le module de connexion à l AXIS 231D 232D 7 Connectez le câble d alimentation et contrôlez que les voyants d ali mentation et de réseau s allument verts 8 Enfoncez le dôme dans le support installé et tournez le dans le sens horaire pour le bloquer dans le support 9 Veillez à ce que le trou de vis sur...

Page 24: ...défaut AXIS Media Control AMC AXIS Media Control AMC un composant ActiveX exigé par Microsoft Internet Explorer et automatiquement installé dès la première utilisation AMC doit être installé pour visualiser les images en direct dans Microsoft Internet Explorer Si votre environnement de travail limite les composants logiciels supplémentaires vous pouvez configurer votre AXIS 213 pour utiliser un ap...

Page 25: ...IP a été définie s affiche sur l écran cliquez surOK 9 Cliquez sur Afficher page d accueil pour accéder aux pages Web de l AXIS 231D 232D 10 Entrez un nouveau mot de passe pour l utilisateur racine administrateur 11 Si demandé acceptez l installation d AMC sur votre poste de travail Voir AXIS Media Control AMC à la page 24 pour davantage d information 12 L installation est maintenant terminée Si v...

Page 26: ...ur OK 5 Entrez les commandes Syntaxe Exemple 6 Connectez l alimentation à l AXIS 231D 232D 7 Lorsque Réponse de 192 168 0 125 s affiche au bout d environ 10 15 secondes tapez Ctrl C pour fermer la session ARP Ping 8 Ouvrez un navigateur Web et entrez l adresse IP dans le champ Adresse emplacement 9 Appuyez sur Entrer 10 Entrez un nouveau mot de passe pour l utilisateur racine administrateur 11 Si ...

Page 27: ...l alimentation à l AXIS 231D 232D 5 Lorsque Réponse de 192 168 0 125 ou similaire s affiche au bout d environ 10 15 secondes tapez Ctrl C pour fermer la session ARP Ping 6 Ouvrez un navigateur Web et entrez l adresse IP dans le champ Adresse emplacement 7 Appuyez sur Entrer 8 Entrez un nouveau mot de passe pour l utilisateur racine administrateur 9 L installation est maintenant terminée Si vous av...

Page 28: ... dynamique d un serveur DHCP dans votre réseau 4 Attendez 60 secondes et appuyez une fois sur le bouton de commande de la caméra dôme Le voyant d alimentation est jaune clignotant au cours de la connexion à AXIS Internet Dynamic DNS service Une fois le processus d enregistrement terminé le voyant redevient vert fixe 5 Visitez le site www axiscam net où vous serez guidé pour le reste de l installat...

Page 29: ...egido de la lluvia y la humedad Para hacer funcionar la cámara en tales condiciones utilice los accesorios para alojamiento en exteriores No utilice detergentes fuertes o abrasivos al limpiar la carcasa Utilice un detergente suave y seque con cuidado Nunca coloque la cámara directamente dirigida hacia el sol u otros objetos brillantes Ya sea si utiliza o no la cámara nunca la apunte hacia el sol u...

Page 30: ...en de color verde 4 Monte el cuerpo de la cúpula en el soporte y gírelo en el sentido de las agujas del reloj Asegúrese de que el orificio del tornillo en el interior de la cúpula esté alineado con el soporte Apriete el tornillo de sujeción para fijar la cúpula 5 Coloque el anillo de decoración en el soporte y fíjelo con tres tornil los 6 La instalación del hardware está lista pase a la sección si...

Page 31: ... de la cúp ula hasta el módulo de conexión externo 6 Conecte el cable Ethernet y el módulo de conexión a la AXIS 231D 232D 7 Conecte el cable de alimentación y compruebe que los LEDs de ali mentación y de red se iluminen de color verde 8 Presione el cuerpo de la cúpula en el soporte instalado y gírelo en el sentido de las agujas del reloj para bloquearlo en el soporte 9 Asegúrese de que el orifici...

Page 32: ...68 0 90 El DHCP está habilitado por defecto AXIS Media Control AMC AXIS Media Control AMC un componente ActiveX requerido para Microsoft Internet Explorer que es instalado automáticamente en el primer uso AMC debe instalarse para ver imágenes en vivo en Microsoft Internet Explorer Si su entorno de trabajo limita componentes de software adicionales Ud puede configurar su AXIS 213 para que utilice J...

Page 33: ...irmando que la dirección IP ha sido configurada haga clic en OK 9 Haga clic en View Home Page para acceder a las páginas Web de AXIS 231D 232D 10 Ingrese una nueva contraseña para el usuario root administrador 11 Si se requiere acepte la instalación de AMC en su estación de trabajo Para más infor mación consulte AXIS Media Control AMC en la página 32 12 La instalación ha finalizado Si requiere inf...

Page 34: ...Haga clic en OK 5 Escriba los comandos Sintaxis Ejemplo 6 Conecte la alimentación a AXIS 231D 232D 7 Cuando aparezca Reply from 192 168 0 125 aproximadamente 10 15 segundos escriba Ctrl C para cerrar la sesión de ARP Ping 8 Inicie un navegador Web e ingrese la dirección IP en el campo Ubicación Dirección 9 Presione Intro 10 Ingrese una nueva contraseña para el usuario root administrador 11 Si se r...

Page 35: ...4 Conecte la alimentación a AXIS 231D 232D 5 Cuando aparezca Reply from 192 168 0 125 o similar aproximadamente 10 15 segundos escriba CTRL C para cerrar la sesión de ARP Ping 6 Inicie un navegador Web e ingrese la dirección IP en el campo Ubicación Dirección 7 Presione Intro 8 Ingrese una nueva contraseña para el usuario root administrador 9 La instalación ha finalizado Si requiere información ad...

Page 36: ...n servidor DHCP en su red 4 Aguarde 60 segundos y pulse el botón de control en la cámara de cúpula una vez El indicador de alimentación va a parpadear con luz ámbar mientras se conecta con el ser vicio AXIS Internet Dynamic DNS Una vez finalizado el proceso de inscripción el indicador vuelve a brillar con luz verde fija 5 Visite www axiscam net dónde le guiarán a través del resto de la instalación...

Page 37: ...è protetto da pioggia e umidità Per utilizzare la videocamera in queste condizioni utilizzare gli accessori per l alloggiamento esterno Non utilizzare detergenti forti o abrasivi per pulire l involucro Utilizzare un detergente delicato e pulire delicata mente Non esporre mai la videocamera direttamente al sole o ad altri corpi luminosi Che la videocamera sia utilizzata o meno non puntarla mai al s...

Page 38: ...e i LED di alimen tazione e di rete si accendano verde 4 Montare il corpo a cupola alla staffa e girarlo in senso orario Accertarsi che il foro della vite sul lato della cupola sia allineato con la staffa Serrare la vite di fissaggio per fissare la cupola 5 Fissare l anello decorativo alla staffa con tre viti 6 L installazione è completata passare alla sezione successiva per installare AXIS 231D 2...

Page 39: ...ne del corpo della cupola al modulo di connessione esterno 6 Collegare il cavo Ethernet e il modulo di connessione ad AXIS 231D 232D 7 Collegare il cavo dell alimentazione e verificare che i LED di alimen tazione e di rete si accendano verde 8 Premere il corpo della cupola nella staffa installata e giralo in senso orario per bloccarlo nella staffa 9 Accertarsi che il foro della vite sul lato della...

Page 40: ...Media Control AMC un componente di ActiveX necessario per Microsoft Internet Explorer che si installa automaticamente al primo utilizzo AMC deve essere istallato per visualizzare le immagini dal vivo in Internet Explorer di Microsoft Se l ambiente di lavoro non consente l aggiunta di componenti software è possibile configurare AXIS 213 per l utilizzo di un Java applet per l aggiornamento delle imm...

Page 41: ...rma che l indirizzo IP impostato verrà visualiz zato fare clic su OK 9 Fare clic su View Home Page Visualizza home page per accedere alle pagine Web di AXIS 231D 232D 10 Immettere una password per l utente di root amministratore 11 Se necessario accettare l installazione di AMC sulla workstation Per ulteriori informazi oni vedere AXIS Media Control AMC alla pagina 40 12 L installazione è completat...

Page 42: ... 5 Immettere i comandi Sintassi Esempio 6 Collegare l alimentazione ad AXIS 231D 232D 7 Quando viene visualizzato Risposta da 192 168 0 125 per circa 10 15 secondi digi tare Ctrl C per chiudere la sessione ARP Ping 8 Avviare un browser Web e immettere l indirizzo IP nel campo Indirizzo Posizione 9 Premere Invio 10 Immettere una password per l utente di root amministratore 11 Se necessario accettar...

Page 43: ...re l alimentazione ad AXIS 231D 232D 5 Quando Reply from 192 168 0 125 o qualcosa di simile viene visualizzato per circa 10 15 secondi digitare Ctrl C per chiudere la sessione ARP Ping 6 Avviare un browser Web e immettere l indirizzo IP nel campo Indirizzo Posizione 7 Premere Invio 8 Immettere una password per l utente di root amministratore 9 L installazione è completata Per ulteriori informazion...

Page 44: ...zo IP dinamico da un server DHCP sulla rete 4 Attendere 60 secondi quindi premere il pulsante di controllo della videocamera a cupola una volta La luce color ambra dell indicatore di alimentazione lampeggia mentre si con nette ad AXIS Internet Dynamic DNS service Completato il processo di registrazione la luce dell indicatore diventa verde e fissa 5 Visitare il sito Web www axiscam net per essere ...

Page 45: ...Installazione di AXIS 231D 232D 45 ITALIANO ...

Page 46: ......

Page 47: ...AXIS COMMUNICATIONS Product Name Quick User s Guide AXIS 231D 232D Installation Guide Rev 1 0 Part No 23141 ...

Reviews: