background image

28


USER MANUAL


__________________________________________________________________________________________________________________


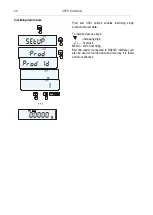
17.  Scale setup (SEtUP) 


SEtUP

  contains  all  options  used  for  setting  scale 

work mode:  


MEnu 

 creating personalized user menu, 


CALIb


 scale sensitivity calibration, 


AutoZEro(ing)


  self-maintaining  zero  indication 

(unloaded scale), 


 UnIt 

 weight unit selection, 


SErIAL 

 setting serial ports,  


Print 

 transmission (printout) data selection,  


dAtE 

 inscribing actual date and time, 


FirMW(are) 

  uploading  new  firmware  (only  for 

service) 


dEFAULt 

  reset to factory settings, 


SErVICE 

 service menu (only for service). 


g

Summary of Contents for AKA120

Page 1: ...USER MANUAL AKA SERIES File 2015 05 25 ALN Aln 01 GB ...

Page 2: ...he balance 15 12 Connecting the balance to computer or printer 15 13 Start up 19 14 Weighing with tare 20 15 Scale menu 21 16 Menu navigation rules 22 17 Scale setup SEtUP 28 17 1 Scale calibration CALIb 29 17 2 Autozeroing function AutotAr 33 17 3 Weight unit selection UnIt 34 17 4 Serial port parameters setting SErIAL 35 17 5 Printout configuration PrInt 36 18 Special functions description 38 18...

Page 3: ...45 18 7 Maximum value indication function UP 47 18 8 Total weight function totAL 48 18 9 Checkweighing function thr 50 18 10 Setting date and time function dAtE 53 18 11 Statistical calculations function StAt 54 18 12 Function for summing recipe ingredients rECIPE 57 18 13 Density determination dEnSItY 58 19 Troubleshooting and maintenance 61 Declaration of Conformity 62 ...

Page 4: ...he following legal and securing items green metrological mark placed on the balance name plate notified body stamp number of notified body on the balance name plate protective seals placed on an edge of balance name plate the casing mounting screw and in the place of access to adjustment switch In order to renew legal verification please contact authorized service of AXIS Balance classification ac...

Page 5: ... type supplied with the balance and supply voltage have to be compatible with specified technical data Do not use the balance when its cover is opened Do not use the balance in explosive conditions Do not use the balance in high humidity environment If the balance seems not to operate properly switch it off and do not use until checked by authorised service According to current acts of low about p...

Page 6: ... of mass F2 100g F2 200g F2 200g F1 500g Type AKA1200 AKZ1200 AKA2200 AKZ2200 AKA3200 AKZ3200 AKA4200 AKZ4200 AKZ10 Load Max 1200g 2200g 3000g 4200g 10kg Load Min 0 5g 0 5g 0 5g 0 5g 5g Readout unit d 0 01g 0 01g 0 01g 0 01g 0 1g Verification unit e 0 1g 0 1g 0 1g 0 1g 1g Tare range 1200g 2200g 3000g 4200g 10kg Accuracy II Repeatibility 0 01g 0 1g Non linearity 0 02g 0 2g Work temp 18 33 C Weighin...

Page 7: ..._____________ 5 General balance description AKA100 AKA520 AKZ100 AKZ520 balances 1 pan 2 pan support 3 pan ring 4 display LCD 5 keys 6 rotating legs 7 water level 8 draft shield AKA1200 AKA4200 AKZ1200 AKZ10 balances 1 pan 2 nuts under pan 4 LCD display 5 keys 6 rotating legs 7 water level 7 6 1 2 4 5 7 6 1 2 4 3 5 8 ...

Page 8: ...____________________________________________________________________________________________ Connectors view Feeder 230V 50Hz Printer or computer ON OFF Adjustment switch RxD receiver TxD transmitter GND Case RS232C Feeder 1 2 3 4 5 6 7 8 9 ...

Page 9: ...unction weighing MENU enter to special function menu I switch on switch off standby indicator shows stabilization of weighing result linear indicator indicator of balance load 0 100 OFF indicator appears after the balance is switched off with I key distinction of last digit informs that reading unit value is lower than acceptable indication error balances with legal verification d e Max Min d e I ...

Page 10: ... can interrupt working balance This location has to maintain proper temperature for working balance and necessary space for its operating The balance should stay on stable table made of material that does not influence magnetically on the balance Rapid air blasts vibrations dust rapid temperature changes or air humidity over 75 are not allowed in balance surrounding The balance should be far from ...

Page 11: ...er level 7 at the back of the balance is in the middle 4 for AGC100 AGC600 Gently insert the mandrel of pan support 2 into balance mechanism socket through the pan ring 3 and the pan 1 on AGC600 balances have not pan ring 5 for AGC1000 AGC4000 AGZ10C Place nuts 2 on mandrels that are visible in balance cover holes put the pan 1 on nuts If the balance was taken from a lower temperature surrounding ...

Page 12: ...ey and wait until the balance is zeroed and zero indicator appears In other balances the key does not operate 5 When the balance is not used but should be ready to work immediately it can be switched off by pressing I key The backlight of balance reading system is then switched off and the balance enters into standby mode in which the balance maintains internal temperature and ability to start wor...

Page 13: ...fferences between values of gravitational acceleration in the place where the balance was manufactured and in the place where it is operated as well as due to changes of balance level and temperature Internal calibration is performed in the following situations when key is pressed after defined time interval for legally verified balances 2 hours after temperature change for legally verified balanc...

Page 14: ... results are compared Discrepancy of results is signalled with a message and causes the balance being blocked Until calibration process is finished do not perform any operation on the balance Any vibrations and shocks interfere calibration process and may delay it or deteriorate accuracy of its result When internal calibration is performed successfully the balance indicates zero on the display at ...

Page 15: ...r additional charge is given in technical data table In order to calibrate the balance with external weight in legally verified balances verification seals should be removed and another legal verification should be performed In this case it is recommended to contact authorized service centre Calibration with external weight is described in details in chapter 17 1 12 Connecting the balance to compu...

Page 16: ...w 16 bytes Byte 1 sign or space Byte 2 space Byte 3 4 digit or space Byte 5 9 digit decimal point or space Byte 10 digit Byte 11 space Byte 12 k l c p or space Byte 13 g b t c or Byte 14 space Byte 15 CR Byte 16 LF Attention Network number different than zero SErIAL nr function changes scale working mode communication with a computer is possible after logging the scale in with 02h scale number com...

Page 17: ...igits after dot should be the same as on scale display Scale Computer without response Example in order to set low threshold 1000g in scale B1 5 d 0 5g the following order should be sent S L 1 0 0 0 0 CR LF 53h 4Ch 31h 30h 30h 30h 2Eh 30h 0Dh 0Ah in order to set low threshold 100kg in scale B150 d 50g the following order should be sent S L 1 0 0 0 0 CR LF 53h 4Ch 31h 30h 30h 2Eh 30h 30h 0Dh 0Ah Se...

Page 18: ...able signs mm gg 5 signs minutes hour rrrr mm dd 10 signs year month day masa 10 signs scale indication mass unit P1 Steering instruction Attention 1 Except variable signs constant signs can also be inscribed e g factory name product name and so on 2 In standard only one label pattern is possible to printout number 0001 Using bigger amount of patterns other label numbers is possible thanks to LAbE...

Page 19: ...ts C1 8 displayed only when any test result is negative Displaying firmware version Test of internal calibration Internal calibration in not legally verified balances can be terminated using key CAL End communicate confirms After zeroing the balance is ready to weighing It is recommended before making measurements to wait until internal temperature of balance stabilize To accomplish that the balan...

Page 20: ...ey Zero indication and 0 indicator mean that the scale is ready to work After putting container package tare the scale using T key NET indicator will show up Put on weighted object and readout net weight NET indicator shows that scale indicates net weight In order to readout gross weight press key B G indicator shows that scale indicates gross weight Press again key in order to come back to net in...

Page 21: ...ut of the box scale after pressing MENU key only SEtuP option it contains all configuration options is available One of the configuration options is Menu that is used to create personalized menu To add a function to personalized menu press T key when the function is indicating Chosen function is indicated with o sign on the left side of display After adding all necessary functions press out in ord...

Page 22: ...10 seconds successive menu positions are displayed automatically Choosing menu position option is done by pressing T key when it is displayed on the screen After choosing position option usually several options show up on turning on selected option OFF turning off out out to menu Accelerated working with menu First menu position is displayed for about 10s User can change menu positions manually by...

Page 23: ... key working method During standard weighing key is used to switch between net and gross indication When special function e g PCS is turned on using key enables to go back to standard weighing mode Sign o on the left side signalizes that special function is turned on and user can go back to function mode by pressing key g g g g ...

Page 24: ...________________________________________ Inscribing numerical values Inscribing numerical values is needed in some special functions e g tArE function requires to inscribe tare values Keys decimal point T next digit position increasing digit inscribed value use also 0 MENU end of inscribing ...

Page 25: ...ime interval internal calibration temperature interval exit autozeroing autozeroing on autozeroing off lasts 10min exit settings creating menu added to menu choosing product choosing user pieces counting function actual unit selection percentage conversion function animals weighing function tare memory bank maximum value function summation series of measurements function threshold values comparing...

Page 26: ...arcode reader MJ4209 cooperation exit port 2 as above printout data configuration transmission port 1 header scale type Max d e serial nr scale operator id number data time succesive printout measurement number product identification number product barcode number product name pieces quantity PCS function product unit weight net weight package weight tare gross weight total weight totAL function me...

Page 27: ...______________________ bAttEry AUto OFF ZEro dEFAULt SErVICE out turn on off accumulator charging if the scale is equipped with accumulator automatic turning off saving accumulator power as above scale start zero inscribing factory zero restore default settings for all options options only for service exit ...

Page 28: ...work mode MEnu creating personalized user menu CALIb scale sensitivity calibration AutoZEro ing self maintaining zero indication unloaded scale UnIt weight unit selection SErIAL setting serial ports Print transmission printout data selection dAtE inscribing actual date and time FirMW are uploading new firmware only for service dEFAULt reset to factory settings SErVICE service menu only for service...

Page 29: ... the balance it is necessary to contact a service or notified body In balances comply with verification requirements performing calibration requires changing adjustment switch position which is placed behind protecting mark sticker of a notified body An access to the switch is possible only after removing the mark Before proceeding with calibration for balances comply with verification requirement...

Page 30: ...ps MENU key out leave without changes CAL Prn calibration report CAL tM set time interval for internal calibration CAL C set temperature difference for internal calibration out Press T key when CAL StP option appears calibration in two steps Press T key when weight value used for calibration is indicating or use othEr option and inscribe proper value keys 0 T Press MENU and wait for writing zero t...

Page 31: ...alibration Press MENU key to display function menu and choose CALIb function by pressing T key when it is displayed The following options will appear CAL on perform calibration with external weight CAL Prn printout of calibration report CAL tM set time interval for internal calibration 1h 6h CAL C set temperature difference for internal calibration 1 C 4 C out switch internal calibration off for i...

Page 32: ...bration report printout option CAL Prn CALIBRATION REPORT ALN220 MAX 220g e 0 001g d 0 0001g S N 1234 PROD DATE 2014 12 16 FIRM VER ALN_01 2015 01 12 ALN106 FACTORY EXT LOAD 200 00 g FACTORY INT LOAD 196 131 g CALIBRATION NO 1 CALIBRATION DATE 2015 01 22 CALIBRATION TEMP1 30 346 C CURRENT EXT LOAD 200 00 g CURRENT INT LOAD 196 131 g WEIGHT DIFFERENCE 0 00 g ...

Page 33: ...zero indication if the pan is empty or if zero indication was acquired by pressing T key To turn on the function use MENU key and using T key choose AutotAr and then Aut on To leave the function press MENU key then choose AutotAr and Aut OFF Note 1 AUt sign occurs only in scales with LCD display 2 In scales with active 0 key function function changes name into AutoZE autozeroing and works only whe...

Page 34: ...KGrAM 1kg 1000g kilogram Pound 1 lb 453 592374g English pound OunCE 1oz 28 349523g ounce OunCEt 1ozt 31 1034763g pharmaceutical ounce GrAIn 1gr 0 06479891g grain PennYW 1dwt 1 55517384g jewellery mass unit GrAM 1g gram The way of choosing carats as weighing unit is shown on the example Readout for different units Unit Readout g 0 0001 g ct 0 0005 ct kg 000 0001 kg mg 0 1 mg lb 000 0001 lb oz 0 000...

Page 35: ...ts in single char bitS 7 8 parity control PArItY nonE no control Odd nonparity Even parity control scale number in network nr if the scale doesn t work in network the number must be 0 transmission through serial interface SendInG StAb transmission after key is used and result is stable noStAb transmission after key is pressed without need of stabilisation Auto automatic transmission after load is ...

Page 36: ...o counter Prod Id product number Prod bA product barcode inscribed or scanned Prod nA product name Count counting result PCS function APW unitary mass PCS function nEt net mass tArE current tare value GroSS gross mass totAL total mass totAL function nr LCD printout number and indication in one line Attention If Prod Id or USEr Id is chosen it is possible to inscribe quickly their new values with o...

Page 37: ...g normal weighing with clock option all printout positions deactivated Sample printout during normal weighing some printout positions activated 20 07 kg 20 04 kg 20 04 kg 20 07 kg 2012 11 08 10 01 20 04 kg 2012 11 08 10 01 20 04 kg 2012 11 08 10 01 ALN220 MAX 220g e 0 001g d 0 0001g S N USER ID 000001 DATE 2012 11 08 TIME 12 26 NO 3 PROD ID 01 COUNT 0 PCS APW 0 0000 g NET 213 8 g TARE 0 0000 g GRO...

Page 38: ... change of mass unit UnIt percentage weighing function PErC selecting label number function LAbEL weighing large animals function LOC entering tare function tArE maximum value indication function UP summing series of measurements totAL statistical calculations StAt recipe making rECIPE density measurement dEnSItY and functions that require additional equipment to be completely functional options w...

Page 39: ... computer keyboard is inconvenient and using barcode reader is beneficial After selecting product and user it is possible to send to computer or printer actual scale indication with additional data selected by PrInt option SetuP HEAdEr header name model and scale number USEr Id scale user identification number USEr nA user name Prn no successive printout number choose this option to zero counter P...

Page 40: ..._______________ Inscribing data to base Prod and USEr options enables inscribing single product and user data To inscribe data use keys increasing digit T next dixit MENU end of inscribing Barcode reader connected to RS232C interface can also be used to inscribe data and this way it is faster and more effective 0 g ...

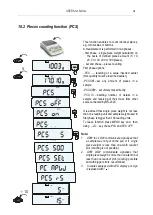
Page 41: ...PCS APW set unitary mass directly PCS rS inserting number of details in a sample and receiving of their mass from other scale connected by RS 232C It is advised that single piece weight is not less than one reading unit and sample weight used in first phase is bigger than 100 reading units To leave function press MENU key and then using T key chose PCS and PCS oFF Note 1 APW too LOW communicate si...

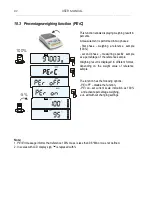
Page 42: ...00 second phase measuring specific sample as a percentage of the reference sample Weighing result is displayed in different format depending on the weight value of reference sample The function has the following options PEr oFF disable the function PEr on set current scale indication as 100 and activate percentage weighing out exit without changing settings Note 1 PEr Err message informs that refe...

Page 43: ...er should be saved in scale memory according to printer manual Label pattern choice is made by inscribing label number using LAbEL function Press MENU button When LAbEL is displayed press T key Actual label number will show To enter new label number press T key to exit function without number change press MENU To inscribe label number use keys digit increase T next digit MENU end After entering la...

Page 44: ...ading the scale LOC Prn the measurement initiated manually by pressing key When LOC on is displayed press T key Tare the scale using T key if necessary and place the animal on the pan Wait until the weighing result is averaged scale display blinks Then scale will show stable averaged result and will send it through serial port The result remains on display for about 30 second Important notes 1 The...

Page 45: ...e value to memory After pressing MENU key and choosing tArE function using T key the following options are available tAr 0FF leave the function tAr on activate the function with the previous tare value tAr sample tare value from the pan tAr SEt enter tare value with keys 0 T and MENU out printout a setting value of tare Press T key when tAr SEt is displayed By pressing T key choose proper memory c...

Page 46: ...ll show up tAr 01 02 10 Cells with inscribed value are marked with o sign on the left side active value marked with ATTENTION In scales with LED display cells with inscribed value are marked with Choose proper memory cell using T key tArE function is activated with chosen tare value Moreover the scale will indicate nett weight weight on the pan minus tare values Using T key or 0 while empty pan ca...

Page 47: ...s function allows holding maximum or minimum value that is indicating at the moment Before measurement scale should be tared Function has following options UP oFF function off HIGH holding maximum value LOW holding minimum value Pressing T key will cause result zeroing Note Autozeroing function and the stabilisation indicator are deactivated when UP function is running g 1g ...

Page 48: ...ot working with receipt printout after each measurement tot working without receipt printout tot CFG saving measurement mode using key Manual after taking off the load auto Press T key when tot is displayed Perform measurement series by pressing key for storing results into total register In order to print and display results enter the function by choosing totAL and tot Prn option from menu The re...

Page 49: ... Date and Time do not appear on printout Maximum number of measurements is 99 999 Maximum total load 99 999 000d The weighing unit of the total value from the register Total is the same as the weighing unit stated on the keypad or is 1000 times greater what is signalled by o indicator at the left of the display If the registered value is too big to be displayed E communicate appears on the display...

Page 50: ... greater than upper threshold the scale signals MAX red colour long sound signal The checkweighing results can be use to control optical indicator Indication mode batching devices Batching mode Standard scale is set for cooperation with optical indicator On outputs P1 P3 Relays socket short circuit states appear as result of comparison scale indication with threshold values On the chart below outp...

Page 51: ...thr on option using T key The following options for entering thresholds are displayed SEt LO set lower threshold value SEt HI set upper threshold value SEt ZEr set zero signalisation threshold Using T key select SEt LO option Set lower threshold value using the following keys digit increase decimal point T move to next digit MENU finish Then select SEt HI option and enter upper threshold value Cho...

Page 52: ... g 1N4148 It is advised to use MS3K P electronic board sold separately consisting of RM96P transmitters with DC24V input voltage and AC250V 3A output Important notes 1 After switching the scale on both thresholds are set to maximum values 2 When setting upper threshold value pay attention that its value is not below lower threshold value 3 Setting lower and upper threshold value is possible after ...

Page 53: ...SEt change current date and time dAt PIn data and time secure password to prevent from changing date and time by unauthorized personel dAt For data printout in USA or EU format tM For time printout in 24h or 12h format The example at the left presents how to set current date and time using dAt SEt option After setting proper date and time activate it with dAt on option UE rrrr mm dd gg mm USA mm d...

Page 54: ...fter the scale is loaded and its indications stabilize After each loading printout is made with number of measurements result date and time if clock is installed and the function is activated For the obtained measurements series the scale evaluates n number of samples sum x sum of all samples n x x sum _ x average value sum x n min minimal value from n samples max maximal value from n samples max ...

Page 55: ...ing tolerance in Sta tAr automatic tare on off StA CFG function configuration Auto Automatic work samples are confirmed after loading the scale and indication stabilization ManuAL manual work confirmation is made by pressing key out exit from function Remember first to inscribe nominal weight value and tolerance mentioned above After that push T key when StA o is displayed Put on successive object...

Page 56: ... average weight as Total n MIN minimum weight in n samples MAX maximum weight in n samples ST DEV standard deviation ST DEV standard deviation percentage To finish work with this function and zeroing result register press MENU key and then when StAt and Sta oFF is displayed press T button Statistics function cooperation with computer and Printer Scale can be equipped with two serial ports marked a...

Page 57: ...ng rEC Con continue previous recipe out exit without changes When proceeding with recipe successive ingredients A B C etc are weighed each time starting from zero indication which is obtained after scale taring If several ingredients are weighed their sum mass can be read despite several taring For this purpose use or rEC oFF option Using once again enables fast return to recipe In order to turn o...

Page 58: ...water L density of liquid If distilled water H2O or ethanol EthAnOL is used enter its exact temperature accurate to 0 5 C the balance will calculate its density automatically To enter the value use the following keys digit increase decimal point T next digit MENU end When using liquid other than distilled water or ethanol choose OTHER option and enter its density according to its temperature Phase...

Page 59: ...y measurements connect a printer to the balance and press key A sample for solid mass density determination is shown below DENSITY Mass in the air Mass in the liquid g Mass density g cm 3 Density with comp Water density Water temperature g cm 3 g cm 3 o C Operation sequence weighing in air and in liquid for below balance weighing Phase I measurement in air Phase II measurement in liquid ...

Page 60: ...ight in air and in examined liquid with known volume using the formula below where m1 plunger weight in air m2 plunger weigh in a liquid V plunger volume Plunger volume is stored on its hanger To enter the value use the following keys digit increase decimal point T next digit MENU end Phase I measurement in air Phase II measurement in liquid To print measurement result and begin next measurement p...

Page 61: ... in guarantee card 6 Balances can be sent for repair as messenger delivery only in original package if not there is a risk of damaging the balance and loosing guarantee Failure messages Message Possible cause Recommendation C 1 6 more than 1 min negative result in one of autotests if message still remains contact service centre L no pan on the balance put the pan on mechanical damage contact servi...

Page 62: ...the directive 2004 108 WE Electromagnetic compatibility Moreover scales with the following markings on the name plate 16 the number of the Notified Body responsible for EC verification 1443 two digit number of the year of EC verification a green metrology sticker with M mark a protective seal affixed by the Notified Body comply with the requirements on the Type Approval Certificate No TCM 128 07 4...

Reviews: