background image

About this document

This manual is intended for administrators and users of the AXIS
P3214–VE Fixed Dome Network Camera, and is applicable to firmware

5.55 and later. It includes instructions for using and managing the
product on your network. Previous experience of networking will be of
use when using this product. Some knowledge of UNIX or Linux-based
systems may also be beneficial, for developing shell scripts and
applications. Later versions of this document will be posted to the Axis
website, as required. See also the product’s online help, available via
the web-based interface.

Legal Considerations

Video surveillance can be regulated by laws that vary from country to
country. Check the laws in your local region before using this product
for surveillance purposes.
This product includes one (1) H.264 decoder license. To purchase
further licenses, contact your reseller.

Liability

Every care has been taken in the preparation of this document. Please
inform your local Axis office of any inaccuracies or omissions. Axis
Communications AB cannot be held responsible for any technical or
typographical errors and reserves the right to make changes to the

product and manuals without prior notice. Axis Communications AB
makes no warranty of any kind with regard to the material contained
within this document, including, but not limited to, the implied
warranties of merchantability and fitness for a particular purpose. Axis
Communications AB shall not be liable nor responsible for incidental or
consequential damages in connection with the furnishing, performance
or use of this material. This product is only to be used for its intended
purpose.

Intellectual Property Rights

Axis AB has intellectual property rights relating to technology embodied
in the product described in this document. In particular, and without
limitation, these intellectual property rights may include one or more
of the patents listed at

www.axis.com/patent.htm

and one or more

additional patents or pending patent applications in the US and other
countries.
This product contains licensed third-party software. See the menu item
“About” in the product’s user interface for more information.
This product contains source code copyright Apple Computer,
Inc., under the terms of Apple Public Source License 2.0 (see

www.opensource.apple.com/apsl

). The source code is available from

https://developer.apple.com/bonjour/

Equipment Modifications

This equipment must be installed and used in strict accordance with the
instructions given in the user documentation. This equipment contains
no user-serviceable components. Unauthorized equipment changes or
modifications will invalidate all applicable regulatory certifications
and approvals.

Trademark Acknowledgments

AXIS COMMUNICATIONS, AXIS, ETRAX, ARTPEC and VAPIX are
registered trademarks or trademark applications of Axis AB in various
jurisdictions. All other company names and products are trademarks or
registered trademarks of their respective companies.
Apple, Boa, Apache, Bonjour, Ethernet, Internet Explorer, Linux,
Microsoft, Mozilla, Real, SMPTE, QuickTime, UNIX, Windows, Windows
Vista and WWW are registered trademarks of the respective holders.
Java and all Java-based trademarks and logos are trademarks or
registered trademarks of Oracle and/or its affiliates. UPnP

TM

is a

certification mark of the UPnP

TM

Implementers Corporation.

SD, SDHC and SDXC are trademarks or registered trademarks of SD-3C,
LLC in the United States, other countries or both. Also, miniSD, microSD,
miniSDHC, microSDHC, microSDXC are all trademarks or registered
trademarks of SD-3C, LLC in the United States, other countries or both.

Regulatory Information

Europe

This product complies with the applicable CE marking directives

and harmonized standards:

Electromagnetic Compatibility (EMC) Directive 2004/108/EC. See

Electromagnetic Compatibility (EMC) on page 2

.

Low Voltage (LVD) Directive 2006/95/EC. See

Safety on page 3

.

Restrictions of Hazardous Substances (RoHS) Directive 2011/65/EU.
See

Disposal and Recycling on page 3

.

A copy of the original declaration of conformity may be obtained from
Axis Communications AB. See

Contact Information on page 3

.

Electromagnetic Compatibility (EMC)

This equipment has been designed and tested to fulfill applicable
standards for:

Radio frequency emission when installed according to the
instructions and used in its intended environment.

Immunity to electrical and electromagnetic phenomena when
installed according to the instructions and used in its intended
environment.

USA
Using an unshielded network cable (UTP) –

This equipment has

been tested using an unshielded network cable (UTP) and found to
comply with the limits for a Class A digital device, pursuant to part
15 of the FCC Rules. These limits are designed to provide reasonable
protection against harmful interference when the equipment is
operated in a commercial environment. This equipment generates,
uses, and can radiate radio frequency energy and, if not installed and
used in accordance with the instruction manual, may cause harmful
interference to radio communications. Operation of this equipment in a
residential area is likely to cause harmful interference in which case
the user will be required to correct the interference at his own expense.

Using a shielded network cable (STP) –

This equipment has also

been tested using a shielded network cable (STP) and found to comply
with the limits for a Class B digital device, pursuant to part 15 of the
FCC Rules. These limits are designed to provide reasonable protection
against harmful interference in a residential installation. This
equipment generates, uses and can radiate radio frequency energy and,
if not installed and used in accordance with the instructions, may cause
harmful interference to radio communications. However, there is no
guarantee that interference will not occur in a particular installation. If
this equipment does cause harmful interference to radio or television
reception, which can be determined by turning the equipment off and
on, the user is encouraged to try to correct the interference by one or
more of the following measures:

Reorient or relocate the receiving antenna.

Increase the separation between the equipment and receiver.

Connect the equipment into an outlet on a circuit different from
that to which the receiver is connected.

Consult the dealer or an experienced radio/TV technician for help.

To be used in a residential area or a demanding electrical environment,
the product shall be connected using a shielded network cable (STP)
that is properly grounded.

Canada

This Class B digital apparatus complies with Canadian ICES-003. The
product shall be connected using a shielded network cable (STP) that is
properly grounded.
Cet appareil numérique de la classe B est confome à la norme
NMB-003 du Canada. Le produit doit être connecté à l'aide d'un câble
réseau blindé (STP) qui est correctement mis à la terre.

Europe

This digital equipment fulfills the requirements for RF emission
according to the Class B limit of EN 55022. The product shall be
connected using a shielded network cable (STP) that is properly
grounded.
This product fulfills the requirements for emission and immunity
according to EN 50121-4 and IEC 62236-4 railway applications.
This product fulfills the requirements for immunity according
to EN 61000-6-1 residential, commercial and light-industrial
environments.
This product fulfills the requirements for immunity according to
EN 55024 office and commercial environments

Australia/New Zealand

This digital equipment fulfills the requirements for RF emission
according to the Class B limit of AS/NZS CISPR 22. The product shall
be connected using a shielded network cable (STP) that is properly
grounded.

Summary of Contents for P32 14-VE

Page 1: ...AXIS P3214 VE Network Camera User Manual ...

Page 2: ...ctromagnetic Compatibility EMC Directive 2004 108 EC See Electromagnetic Compatibility EMC on page 2 Low Voltage LVD Directive 2006 95 EC See Safety on page 3 Restrictions of Hazardous Substances RoHS Directive 2011 65 EU See Disposal and Recycling on page 3 A copy of the original declaration of conformity may be obtained from Axis Communications AB See Contact Information on page 3 Electromagneti...

Page 3: ...ith local legislation penalties may be applicable for incorrect disposal of this waste Europe This symbol means that the product shall not be disposed of together with household or commercial waste Directive 2012 19 EU on waste electrical and electronic equipment WEEE is applicable in the European Union member states To prevent potential harm to human health and the environment the product must be...

Page 4: ...Page 22 PTZ Pan Tilt Zoom 24 Preset Positions 24 Guard Tour 24 Advanced 25 Control Queue 25 Detectors 26 Camera Tampering 26 Motion Detection 26 Applications 29 Application Licenses 29 Install Application 29 Application Considerations 29 Events 31 Setting Up an Action Rule 31 Add Recipients 31 Create Schedules 32 Set Up Recurrences 32 Recordings 34 Recording List 34 Continuous Recording 34 Languag...

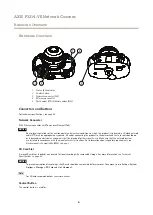
Page 5: ...ct to the network and that are routed outdoors or in demanding electrical environments shall be intended for their specific use Make sure that the network devices are installed in accordance with the manufacturer s instructions For information about regulatory requirements see Electromagnetic Compatibility EMC on page 2 SD Card Slot A microSD card not included can be used for local recording with ...

Page 6: ... hold the button for about 3 seconds LED Indicators LED Color Indication Unlit Connection and normal operation Amber Steady during startup Flashes during firmware upgrade Amber red Flashes amber red if network connection is unavailable or lost Red Flashes red for firmware upgrade failure Status Green Shows steady green for 10 seconds for normal operation after restart Note The Status LED can be co...

Page 7: ...xis com techsup 3 Enter your user name and password If this is the first time the product is accessed the root password must first be configured For instructions see Set the Root Password on page 7 4 The product s Live View page opens in your browser Note The controls and layout of the Live View page may have been customized to meet specific installation requirements and user preferences Consequen...

Page 8: ...ereas most other parts of the world use 50 Hz Local variations could apply Always check with the local authorities The Live View Page The controls and layout of the Live View page may have been customized to meet specific installation requirements and user preferences Consequently some of the examples and functions featured here may differ from those displayed in your own Live View page The follow...

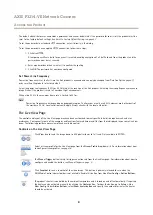
Page 9: ...wing buttons The Play button connects to the Axis product and starts playing a media stream The Stop button stops the media stream The Snapshot button takes a snapshot of the video image The location where the image is saved can be specified in the AMC Control Panel Click the View Full Screen button and the video image will fill the entire screen Press ESC Escape on the computer keyboard to cancel...

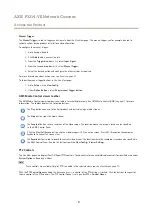
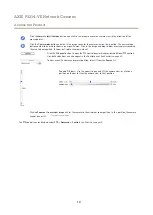
Page 10: ...tate the mouse wheel Click the Ctrl panel button to open the PTZ control panel which provides additional PTZ controls User defined buttons can also appear in the Control panel See Controls on page 25 To view a specific view area or preset position select it from the Source list Pan and Tilt bars Use the arrows to pan and tilt the camera view or click on a position on the bar to steer the camera vi...

Page 11: ...o traffic on the network until a client connects and requests the stream Note that there are a maximum of 20 simultaneous unicast connections Multicast RTP This method RTP over UDP should be used for live multicast video The video stream is always up to date even if some frames are dropped Multicasting provides the most efficient usage of bandwidth when there are large numbers of clients viewing s...

Page 12: ...the Axis product in the following ways Motion JPEG server push if supported by the client Firefox for example This option maintains an open HTTP connection to the browser and sends data as and when required for as long as required Still JPEG images in a browser Enter the path http ip axis cgi jpg image cgi Windows Media Player This requires AXIS Media Control and the H 264 decoder to be installed ...

Page 13: ... Note ip IP addess The Axis product supports QuickTime 6 5 1 and later QuickTime may add latency to the video stream It may be possible to use other players to view the H 264 stream using the paths above although Axis does not guarantee this 13 ...

Page 14: ... as described in the Installation Guide 2 Go to Video Focus Zoom 3 On the Basic tab set the zoom level using the slider The buttons and move the zoom position one step in either direction The buttons and move the zoom position in multiple steps in either direction 4 Click Perform auto focus to focus the camera automatically 5 If more adjustments are needed go to the Advanced tab Note Movements in ...

Page 15: ... image Use the mouse to move and resize the rectangle or enter the number of pixels in the Width and Height fields and click Apply Video Audio Focus Zoom Select the Show pixel counter option to enable the rectangle in the image Use the mouse to move and resize the rectangle or enter the number of pixels in the Width and Height fields and click Apply The Live View page in Internet Explorer with AXI...

Page 16: ...width is limited it is recommended to control the bit rate by selecting Constant bit rate CBR When the activity in the scene increases VBR adjusts the bit rate according to the complexity using up more bandwidth for increased activity in the scene and less for lower scene activity CBR allows you to set a target bit rate that limits the bandwidth consumption The CBR target bit rate works like the c...

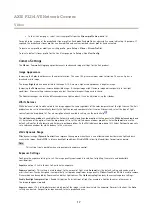
Page 17: ...h available setting see the online help The white balance window is enabled for the Automatic and Automatic outdoor options that appear in the White balance drop down list Select one of the options from the drop down list to set the white balance window properties Select Automatic to use the default settings for the Automatic and Automatic outdoor options in the White balance drop down list Select...

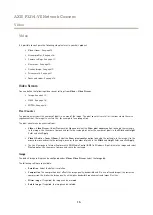
Page 18: ... At nighttime motion detection is more important than identification Motion blur is acceptable and since low light can cause a lot of noise move the low light priority slider toward low noise Example If storage space or bandwidth is limited try using a lower gain This will reduce image noise and produce smaller image files Iris adjustment Select Enable automatic iris adjustment to automatically co...

Page 19: ...The PTZ functionality is useful during installation of the Axis product Use a view area to crop out a specific part of the full view Overlay Overlays are used to provide extra information for example for forensic video analysis or during product installation and configuration Overlays are superimposed over the video stream An overlay text can display the current date and time or a text string When...

Page 20: ...ent enter FFFFFF To scale the image automatically select Scale with resolution The image will be scaled down to fit the resolution used by the Axis product 5 Click Save To select the image to use as overlay 1 Go to Video Overlay Image 2 Select the image to use from the Use overlay image list and click Save To display the overlay image 1 Go to Video Video Stream and select the Image tab 2 Under Ove...

Page 21: ... in the Text field when setting up the action rule Note To display text in multiple view areas overlay text must be enabled in each view area Privacy Mask A privacy mask is a user defined area that prevent users from viewing parts of the monitored area Privacy masks appear as blocks of solid color and are applied on the video stream Privacy masks cannot be bypassed using the VAPIX application prog...

Page 22: ...2 or higher JRE J2SE 5 0 or higher Windows Internet Explorer Still image Displays still images only Click the Refresh button in your browser to view a new image Server Push Recommended viewer for other browsers Motion JPEG QuickTime H 264 Java applet A slower imaging alternative to Server Push Motion JPEG only Other browsers Still image Displays still images only Click the Refresh button in your b...

Page 23: ...fined Links To display user defined links in the Live View page select the Show custom link option give the link a name and then enter the URL to link to When defining a web link do not remove the http from the URL address Custom links can be used to run scripts or activate external devices connected to the product or they can link to a web page Custom links defined as cgi links will run the scrip...

Page 24: ...Home button on the Live View page and in the Preset Positions setup window The product can be configured to return to the Home position when the PTZ functionality has been inactive for a specified length of time Enter the length of time in the Return to home after field and click Save Set the time to zero to prevent the product from automatically returning to the Home position To include the prese...

Page 25: ...ol Queue Once set up the PTZ Control Queue buttons appear in the Live View page offering one viewer exclusive control for a limited period of time Other users will be placed in queue A user who belongs to a group see Users on page 36 with a higher PTZ priority can go before other users in the queue and take control of the product The order of priority is as follows 1 Administrator An administrator...

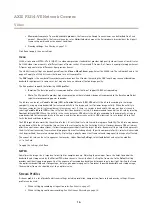
Page 26: ...ail select Send Notification and select a Recipient from the list of defined recipients Note The While the rule is active option under Duration cannot be used with camera tampering since camera tampering does not have a duration and once it has been triggered it will not automatically return to its untriggered state For more information on actions rules see Events on page 31 Motion Detection Motio...

Page 27: ...eaks in the Activity window 6 Click Save To exclude parts of the include window select the Configure Excluded Windows and position the exclude window within the include window To delete an include or exclude window select the window in the list of windows and click Del Motion Detection Parameters The parameters controlling motion detection are described in the table below Parameter Object Size His...

Page 28: ... a low object size To avoid triggering on small objects select a high object size While monitoring an area where moving objects are not expected select a high history level This will cause motion detection to trigger as long as the object is present in the window To only detect flashing light select a low sensitivity In other cases high sensitivity is recommended 28 ...

Page 29: ...ntation provided by the application vendor 4 Start the application Go to page Applications select the application in the list of installed applications and click Start 5 Configure the application For instructions see the documentation provided by the application vendor Note Applications can be uploaded by product administrators Applications and licenses can be installed on multiple products at the...

Page 30: ... VE Network Camera Applications If the Axis product is reset to factory default installed applications and their settings are removed For information about factory default see Reset to Factory Default Settings 30 ...

Page 31: ...detection window to use 5 Optionally select a Schedule and Additional conditions See below 6 Under Actions select Record Video from the Type drop down list 7 Select a Stream profile and configure the Duration settings as described below 8 Select Network Share from the Storage drop down list To use more than one trigger for the action rule select Additional conditions and click Add to add additiona...

Page 32: ...using for example a corporate email server follow the instructions above but select User defined as Provider Enter the email address to appear as sender in the From field Select Advanced settings and specify the SMTP server address port and authentication method Optionally select Use encryption to send emails over an encrypted connection The server certificate can be validated using the certificat...

Page 33: ...e in an action rule first select Time from the Trigger drop down list in the Action Rule Setup page and then select the recurrence from the second drop down list To modify or remove recurrences select the recurrence in the Recurrences List and click Modify or Remove 33 ...

Page 34: ...ed with the date and time they were downloaded that is not the date the recordings were made Note To play recordings in Windows Media Player AXIS Matroska File Splitter must be installed AXIS Matroska File Splitter can be downloaded from www axis com techsup software For detailed recording and video information select a recording and click Properties To remove a recording select the recording and ...

Page 35: ...ng the product to factory default settings will erase any uploaded language files and reset the product language to English Clicking the Restore button on the Maintenance page will not affect the language A firmware upgrade will not affect the language used However if you have uploaded a new language to the product and later upgrade the firmware it may happen that the translation no longer matches...

Page 36: ...terface Forum is a global interface standard that makes it easier for end users integrators consultants and manufacturers to take advantage of the possibilities offered by network video technology ONVIF enables interoperablity between different vendor products increased flexibility reduced cost and future proof systems By creating a user you automatically enable ONVIF communication Use the user na...

Page 37: ...tem Options Security Certificates See Certificates on page 37 Many CA certificates are preinstalled To allow the product to access a network protected by IEEE 802 1X 1 Go to System Options Security IEEE 802 1X 2 Select a CA Certificate and a Client Certificate from the lists of installed certificates 3 Under Settings select the EAPOL version and provide the EAP identity associated with the client ...

Page 38: ...splays the current date and time 24h clock The time can be displayed in 12h clock in the text overlay see below To change the date and time settings select the preferred Time mode under New Server Time Synchronize with computer time Sets date and time according to the computer s clock With this option date and time are set once and will not be updated automatically Synchronize with NTP Server Obta...

Page 39: ...g ARP and Ping For instructions see Assign IP Address Using ARP Ping on page 39 The ARP Ping service is enabled by default but is automatically disabled two minutes after the product is started or as soon as an IP address is assigned To re assign IP address using ARP Ping the product must be restarted to enable ARP Ping for an additional two minutes To disable the service go to System Options Netw...

Page 40: ... the AVHS service Always The Axis product will constantly attempt to connect to the AVHS service over the Internet Once registered the product will stay connected to the service This option can be used when the product is already installed and it is not convenient to use the one click installation AXIS Internet Dynamic DNS Service AXIS Internet Dynamic DNS Service assigns a host name for easy acce...

Page 41: ...etwork TCP IP Advanced In addition to the default setting which is 80 any port in the range 1024 65535 can be used HTTPS The HTTPS port used by the Axis product can be changed under System Options Network TCP IP Advanced In addition to the default setting which is 443 any port in the range 1024 65535 can be used To enable HTTPS go to System Options Security HTTPS For more information see HTTPS on ...

Page 42: ...ed The default port is 554 Note H 264 video streams will not be available if the RTSP server is disabled SOCKS SOCKS is a networking proxy protocol The Axis product can be configured to use a SOCKS server to reach networks on the other side of a firewall or proxy server This functionality is useful if the Axis product is located on a local network behind a firewall and notifications uploads alarms...

Page 43: ...d To use SNMP v3 HTTPS must be enabled see HTTPS on page 36 To enable SNMP v3 check the box and provide the initial user password Note The initial password can only be set once If the password is lost the Axis product must be reset to factory default see Reset to Factory Default Settings on page 47 UPnPTM The Axis product includes support for UPnPTM UPnPTM is enabled by default and the product is ...

Page 44: ...leshoot the card To avoid filling the card it is recommended to remove recordings continuously Under General Settings select Remove recordings older than and select the number of days or weeks To stop writing to the card and protect recordings from being removed select Lock under General Settings Mount and Unmount SD Card NO NO NOTICE TICE TICE To prevent corruption of recordings the SD card shoul...

Page 45: ...be used 5 If required select The share requires login and enter the user name and password 6 Click Connect To clear all recordings and data from the Axis product s folder on the designated share click Clear under Storage Tools To avoid filling the share it is recommended to remove recordings continuously Under Recording Settings select Remove recordings older than and select the number of days or ...

Page 46: ...ks to the proper Setup page Logs Reports The System Options Support Logs Reports page generates logs and reports useful for system analysis and troubleshooting If contacting Axis Support please provide a valid Server Report with your query System Log Provides information about system events Access Log Lists all failed attempts to access the product The Access Log can also be configured to list all...

Page 47: ...meters can be set and modified from this page To open Plain Config go to System Options Advanced Plain Config Axis Support does not provide assistance Reset to Factory Default Settings Important Reset to factory default should be used with caution A reset to factory default will reset all settings including the IP address to the factory default values Note The installation and management software ...

Page 48: ...e to your computer The latest version of the firmware is available free of charge from Axis website at www axis com techsup 2 Go to Setup System Options Maintenance in the product s webpages 3 Under Upgrade Server click Browse and locate the file on your computer Click Upgrade 4 Wait approximately 10 minutes while the product is being upgraded and restarted Then access the product AXIS Camera Mana...

Page 49: ...tatic IP address is also used by another device there may be problems accessing the product The product cannot be accessed from a browser Cannot log in When HTTPS is enabled ensure that the correct protocol HTTP or HTTPS is used when attempting to log in You may need to manually type http or https in the browser s address field If the password for the user root is lost the product must be reset to...

Page 50: ... use a Java applet for updating video images in your browser Go to Setup Live View Config and select Java applet under Default viewer Poor rendering of H 264 images Ensure that your graphics card is using the latest driver The latest drivers can usually be downloaded from the manufacturer s website Color saturation is different in H 264 and Motion JPEG Modify the settings for your graphics adapter...

Page 51: ...System Log under System Options Support Logs Reports Depending on the problem it might be necessary to re mount the storage device For information on how to set up a storage disruption alarm see Events on page 31 Video cannot be recorded Check that the SD card is not write protected that is read only SD card cannot be mounted Reformat the SD card and then click Mount NO NO NOTICE TICE TICE Formatt...

Page 52: ...vidually configurable streams in H 264 and Motion JPEG Controllable frame rate and bandwidth VBR CBR H 264 Video Image settings Compression Color Brightness Sharpness Contrast White balance Exposure control Exposure zones Backlight compensation Fine tuning of behavior at low light WDR dynamic contrast Text and image overlay Mirroring of images Privacy mask Rotation 0 90 180 270 including Corridor ...

Page 53: ...08 Windows 7 Windows 8 Windows Server 2012 and DirectX 9c or higher For other operating systems and browsers see www axis com techsup System Integration Installation management and maintenance AXIS Camera Management tool on CD and web based configuration Configuration of backup and restore Firmware upgrades over HTTP or FTP firmware available on www axis com Casing Aluminum inner camera module wit...

Page 54: ...lot Supports microSD cards with up to 64 GB of storage For best recording performance use a microSDHC or microSDXC card with speed class 10 Performance Considerations When setting up your system it is important to consider how various settings and situations will affect performance Some factors affect the amount of bandwidth the bit rate required others can affect the frame rate and some affect bo...

Page 55: ...User Manual Ver M1 18 AXIS P3214 VE Network Camera Date August 2014 Axis Communications AB 2014 Part No 56037 ...

Reviews: