background image

Page 6

Pendant Kit Installation Guide

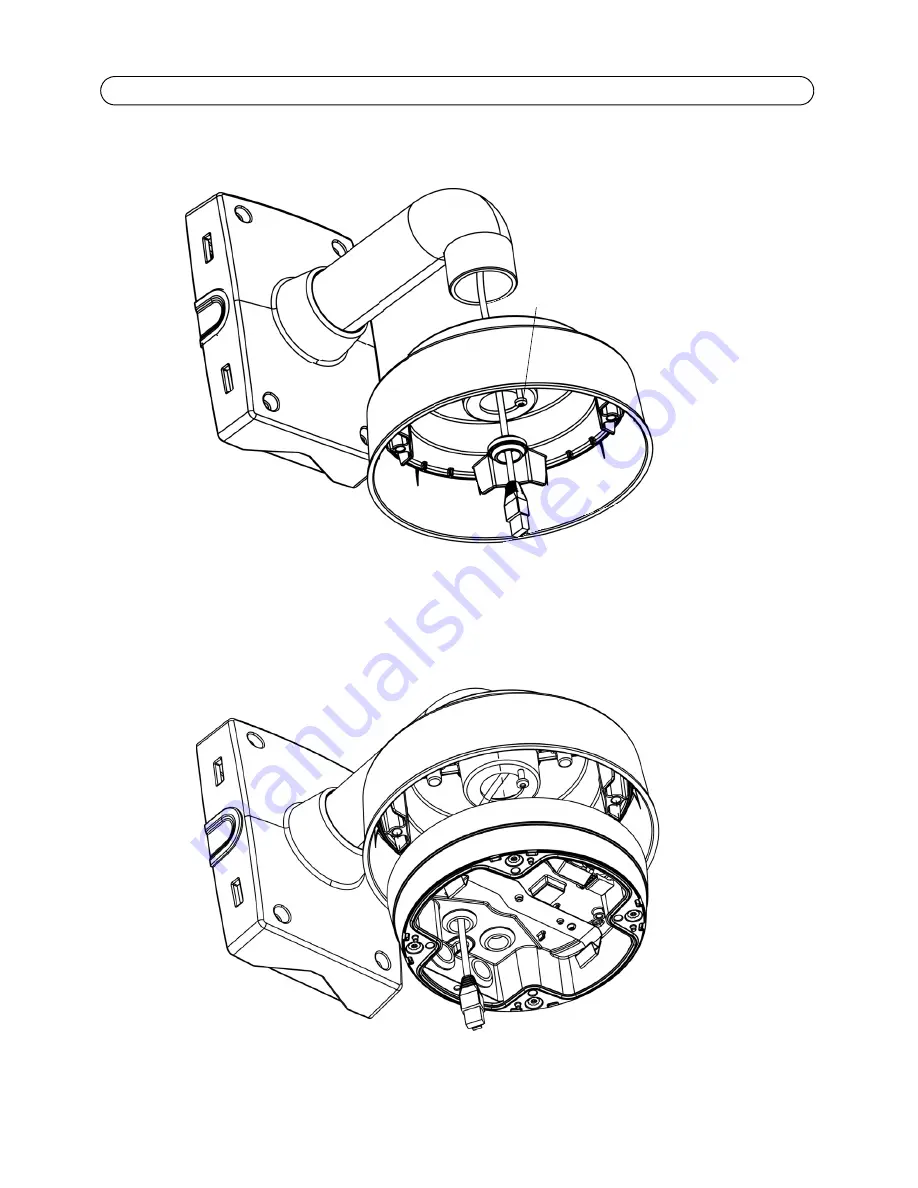
3. Attach the pendant adapter to the mount and secure it using the stop screw.

4. Remove the camera unit from the unit casing by pushing the springs aside. Pull the network 

cable through the gasket hole of the unit casing.

stop screw

Summary of Contents for P33-VE series

Page 1: ...INSTALLATION GUIDE ENGLISH DEUTSCH ITALIANO ESPAÑOL FRANÇAIS Pendant Kit for AXIS P33 VE Network Camera Series ...

Page 2: ...rial contained within this document including but not limited to the implied warranties of merchantability and fitness for a particular purpose Axis Communications AB shall not be liable nor responsible for incidental or consequential damages in connection with the furnishing performance or use of this material This product is only to be used for its intended purpose Support Should you require any...

Page 3: ...ils about the types of mounting go to Accessories at www axis com Please read through the entire guide before proceeding with the installation For all other aspects of using the Axis network camera please see the Installation Guide and User s Manual available from www axis com techsup Installation steps Check the package contents against the list on page 4 Installation instructions See page 5 Impo...

Page 4: ...Page 4 Pendant Kit Installation Guide Package contents 1 Weather shield 1 Pendant adapter 4 M4x8 screws Weather shield Pendant adapter M4x8 screws Bottom view Pendant adapter Side view ...

Page 5: ...the mounting kit Use the network cable included with the network camera or follow the instructions for prepar ing a network cable in the camera s installation guide 2 Attach the weather shield optional to the pendant adapter with the 4 M4x8 screws included with this kit The weather shield is optional and protects against direct sunlight and rain ...

Page 6: ...Guide 3 Attach the pendant adapter to the mount and secure it using the stop screw 4 Remove the camera unit from the unit casing by pushing the springs aside Pull the network cable through the gasket hole of the unit casing stop screw ...

Page 7: ...s to the camera unit Pull aside the springs in the unit casing and click the camera unit in place 6 Insert the unit casing camera into the pendant adapter and attach by tightening the captive screws Follow the instructions in the camera s Installation Guide for adjusting the lens ...

Page 8: ...Page 8 Pendant Kit Installation Guide 7 Place the dome cover and attach by tightening the captive screws ...

Page 9: ......

Page 10: ...Installation Guide Ver 3 0 Pendant Kit for AXIS P33 VE Series Printed February 2014 Axis Communications AB 2009 2014 Part No 55484 ...

Reviews: