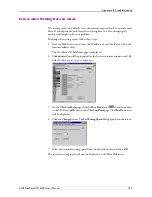
Appendix B: Troubleshooting
AXIS StorPoint CD E100 User’s Manual
131
Problems Connecting to the StorPoint CD in a PureIP Environment
SLP Parameters
In the PureIP environment, make sure your StorPoint CD is properly
configured for SLP. SLP (Service Location Protocol) is a protocol for locating
resources in IP networks.
You can specify a SLP scope list and directory agents for the StorPoint CD.
From the StorPoint CD Web interface, you find the SLP settings on the
Network Settings | Detailed View | TCP/IP
page.
Note:
If you are using DHCP on your network, the SLP parameters can also be
included in the DHCP scope. However, we recommend that you specify the
SLP settings in the StorPoint CD parameter list instead.
Time Synchronization
Make sure you have specified the time synchronization source properly. Note
that in the PureIP environment, you
cannot
use SAP for automatic time
synchronization. You can specify the name or IP address of the time server. You
find the time source setting on the
Network Settings | Detailed View |
NetWare
page.
Insufficient Access Rights in NetWare NDS
When you install the first StorPoint CD in the NDS tree, the StorPoint CD will
extend the NDS Schema with a new attribute. This is needed in order to store
the NDS access rights in the NDS tree. To carry out the schema extension, you
must use user account with Supervisor rights to [Root] object of the NDS tree.
If you do not have Supervisor rights or if schema extensions are not allowed in
your NDS tree, you can instead store the NDS access rights in a file on a Novell
file server.
Follow these steps:
1. Create a directory on the Novell server where you want to store the access
rights.
2. Make sure that your NDS tree is synchronized.
3. Install the StorPoint CD as described in “
Installation as an NDS Server
” on
page 52. Make sure you set the NDS Rights Storage parameter to File and
specify the name of the file where you want to store the access rights on the
Novell file server.
4. Logout and login again in order to obtain all the necessary rights on the
StorPoint CD server object.
5. Start NWAdmin. The server object just created will appear in the context
where you installed the StorPoint CD.
6. Add the StorPoint CD server object as a trustee with Read, Write, Create,
Erase, Modify and File Scan rights to the directory where you want to store
the access rights.
The StorPoint CD will create the file once you start adding trustees.

