background image


StorPoint NAS


100 User’s Manual


1


StorPoint NAS 100

Network Hard Disk Server

User’s Manual

Summary of Contents for StorPoint NAS 100

Page 1: ...StorPoint NAS 100 User s Manual 1 StorPoint NAS 100 Network Hard Disk Server User s Manual ...

Page 2: ...ssion according to limit B of EN55022 1994 and the requirements for immunity according to EN50082 1 1992 residential commercial and light industry Compliance is not valid for unshielded network cables Liability Every care has been taken in the preperation of this manual if you detect any inaccuraries or omissions please inform us at an address which can be found in the last appendix of the manual ...

Page 3: ...k server which includes thin embedded server software capable of simultaneous multiprotocol communication scalable RISC hardware and a built in Web server which allows easy access and management via any standard Web browser The ThinServer technology makes it possible to connect any electronic device to the network thus providing Access to everything Today Axis Communications is offering the ThinSe...

Page 4: ...l as PSTN and GSM phone lines Network Scan Servers enable easy distribution of paper based information across workgroups and the enterprise By sending the scanned documents to your destination via the Internet intranet you will reduce your faxing mailing costs as well as save time thus improving your organization efficiency Support Services Should you require any technical assistance please contac...

Page 5: ... Microsoft IBM Networks SMB 27 Network Settings 28 Access Control 30 Section 4 NetWare NCP 35 Network Settings 36 Access Control 43 Section 5 UNIX NFS 47 Network Settings 48 Access Control 49 Section 6 FTP 51 Network Settings 52 Section 7 Web Browser HTTP 54 Network Settings 55 Access Control 57 Section 8 RAID 1 Mirroring 59 Enabling RAID 1 New Installation 59 Adding Disks for RAID 1 60 Removing a...

Page 6: ...0 ErrorswhenAccessingtheStorPointNASoranInsertedAttachedHardDisk 91 Difficulties Locating the StorPoint NAS in NetWare 92 Insufficient Access Rights in NetWare NDS 93 Problems Locating the Domain Controller in Windows SMB 94 Appendix C Upgrading the StorPoint NAS 95 Obtaining New Software 96 Upgrading the Firmware 97 Extending the RAM Memory 101 Appendix D Tower and Drive Installation 104 Hardware...

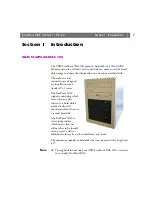
Page 7: ...designed for installation into a standard 51 4 tower The StorPoint NAS supports mirroring which means that any data written to a hard disk is automatically and simultaneously written to a second hard disk The StorPoint NAS is server independent which means that no software has to be loaded on any server and no additional software has to be installed on any client The maximum number of hard disks t...

Page 8: ... independent approach makes the installation quick and convenient In most environments the physical connection to the network is the only installation required prior to starting work with the StorPoint NAS No software needs to be installed on clients or file servers Your computer will see the StorPoint NAS as another network file server and you access it using the standard commands used in your ne...

Page 9: ...by setting up native access control in all network environments Maintenance New software can easily be downloaded to the StorPoint NAS s Flash memory over the network using FTP or drag and drop in the Windows Explorer All updates are free of charge Network Management The StorPoint NAS supports the Simple Network Management Protocol SNMP Year 2000 The StorPoint NAS is year 2000 compliant Mirroring ...

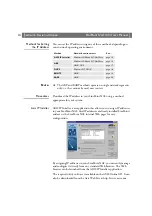
Page 10: ... x users are required to navigate to the CD root directory and click on the setup31 exe file from within the Windows File Manager Startup Procedures for Macintosh UNIX and OS 2 Navigate to the CD root directory and click on the start pdf file from within your preferred file manager application Note If the Adobe Acrobat Reader 3 0 is not installed on to your system locate and run the appropriate in...

Page 11: ...e relevant sections of the manual depending on your network environment Section 3 Microsoft IBM Networks SMB Section 4 NetWare NCP Section 5 UNIX NFS Section 7 Web Browser HTTP Note Typically your StorPoint NAS will already be installed in an enclosure when delivered However if required Refer to Installing the StorPoint NAS in a Tower on page 107 on how to install the StorPoint NAS in a 51 4 tower...

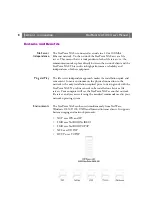
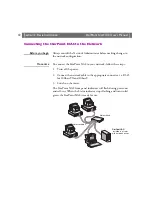
Page 12: ...orPoint NAS to your network follow these steps 1 Turn off the power 2 Connect the network cable to the appropriate connector i e RJ 45 for 100baseTX and 10baseT 3 Switch on the tower The StorPoint NAS front panel indicators will flash during power on and self test When the Status indicator stops flashing and turns solid green the StorPoint NAS is ready for use Network hub Network cables StorPoint ...

Page 13: ...tly to the description of the NetWare NDS installation Installation as an NDS Server on page 36 Before you begin Make sure the StorPoint NAS is powered up and attached to the network IP Address Unless you are using DHCP you must acquire an unused IP address from the Network Administrator System Privileges You will require root privileges on your UNIX system and administrator privileges on the Wind...

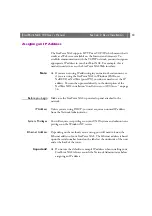
Page 14: ...dresses to your StorPoint NAS find IP addresses of already installed StorPoints and access the StorPoint NAS internal Web pages for easy configuration By assigning IP addresses to your StorPoint NAS you can easily manage and configure it directly from any standard Web browser The Web browser can be launched from the AXIS IP Installer application The required utility software is available on the AX...

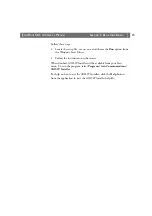
Page 15: ...n from the Windows Start Menu 2 Follow the instructions on the screen When finished AXIS IP Installer will be available from your Start menu To run the program select Programs Axis Communications AXIS IP Installer For help on how to use the AXIS IP Installer click the Help button from the application to start the AXIS IP Installer help file ...

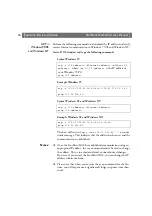
Page 16: ...ished Notes Once the StorPoint NAS has established communication using an appropriate IP address the arp command cannot be used to change the address This is to avoid accidental or unauthorized changes However if you restart the StorPoint NAS you can change the IP address within one hour Please note that when you execute the ping command for the first time you will experience a significantly longe...

Page 17: ...unication is established Notes Once the StorPoint NAS has established communication using an appropriate IP address the arp command cannot be used to change the address This is to avoid accidental or unauthorized changes However if you restart the StorPoint NAS you can change the IP address within one hour Please note that when you execute the ping command for the first time you may experience a s...

Page 18: ...ypically include the following parameters Range of IP addresses Subnet mask Default router IP address Lease duration Mail server IP address DNS server IP address WINS server IP address es Domain name NTP server IP address 2 Activate the scope DHCP is enabled by default The IP address and all the other settings will be downloaded automatically Note To fully benefit from DHCP it is recommended that ...

Page 19: ...our particular system 3 Start the BOOTP daemon if not already running typically by the command bootpd a 4 Restart the StorPoint NAS to download the IP address default router address and subnet mask host name ht hardware type vm vendor magic ha hardware address ip IP address sm subnet mask gw gateway field ht ether for Ethernet vm rfc1048 ha The Ethernet or node address i e the StorPoint NAS serial...

Page 20: ...mple 2 If you are using host names you can map a unique host name to the acquired IP address Refer to your system manuals or to the Network Administrator for instructions on how to perform the name mapping on your particular system 3 If it is not already running start the RARP daemon This is typically done using the command rarpd a 4 Restart the StorPoint NAS to download the IP address Ethernet ad...

Page 21: ...NAS text files Accessing the StorPoint NAS Web Pages The StorPoint NAS Web interface is divided into two parts The File View page for browsing and accessing files and folders on the networked hard disks This page is available to all users The Administration pages for specifying configuration parameters and access rights These pages are intended for the Administrator only You access the StorPoint N...

Page 22: ...torPoint NAS Home Page is displayed From this page users can display and access the discs inserted in the connected drives according to the access permissions set up by the Administrator 3 ClickadmintoaccesstheAdministrationpages Youwillbeprompted to supply the Server password the first time during a session Any user id can be used The default password is pass http IP address ...

Page 23: ...g icon Server Hard disk Main Menu From the main menu you can access the Administration pages This StorPoint System settings RAID options and information about the connected drives File Properties Managing Windows shares and access rights for hard disks folders and files Network Settings Specifying settings for the network protocols used Event Log Viewing the event log that contains occurrences in ...

Page 24: ...important that you set the Server password The Server password is used in basically all protocols i e HTTP NetWare NCP Windows SMB and SNMP For example a user will be prompted for the Server password when trying to access the Administration Web pages for the first time during a session To set the Server password follow these steps 1 On the This StorPoint page click Settings to open the Server Sett...

Page 25: ...ely supported by Windows NT servers You will need third party software To set the time manually choose Manually and specify the date in yy mm dd format and time in hh mm ss format using the 24 hour clock 5 Click Save 6 Click Close TCP IP The installation wizard is a convenient way to specify the Internet related settings for your StorPoint NAS 1 Click Network Settings 2 Click Wizard The Network Se...

Page 26: ...n 2 Basic Installation StorPoint NAS 100 User s Manual 26 7 Click OK Notes Context sensitive online help is available for all parameters The parameter list is described in detail in Appendix A Parameter List ...

Page 27: ... Message Blocks is a protocol that make use of NetBIOS NetBIOS can be transported over several different network protocols The StorPoint NAS supports the following transport methods SMB over NetBIOS NetBEUI SMB over NetBIOS TCP IP NBT Both protocols are enabled by default However you can disable the protocols by setting the appropriate configuration parameters If you are using the StorPoint NAS in...

Page 28: ... descriptive name for your server For example HD Server Access Control Access control is used for restricting access to the shared resources In the Windows SMB environment you can select whether you want to use user level or share level access control User level Access Control User level access control enables you to define a list of users and groups with specific access rights to each shared reso...

Page 29: ...MB environment 1 Start your Web browser and enter the name or IP address of the StorPoint NAS in the location address field 2 Click admin You will be prompted for the Server password By default this is set to pass To change the Server password see Server Password on page 24 3 Click Network Settings 4 Click Wizard The Network Settings Wizard dialog appears 5 Choose Windows SMB Click Start to procee...

Page 30: ...ify the security mode setting follow these steps 1 Start your Web browser and enter the name or IP address of the StorPoint NAS in the location address field 2 Click admin You will be prompted for the Server password By default this is set to pass To change the Server password see Server Password on page 25 3 Click Network Settings 4 Click Detailed View The Protocols dialog box appears 5 Select th...

Page 31: ...ly If you want to change a share i e remove it or change the name follow this procedure 1 Start your Web browser and enter the name or IP address of the StorPoint NAS in the location address field 2 Click admin You will be prompted for the Server password By default this is set to pass 3 Click File Properties 4 Locate the resource you want to share or protect in the file tree and click Properties ...

Page 32: ...ions button 4 Set or change permissions for groups and users Access rights work as in any other Windows NT 4 Server For more help on how to define access rights in a Windows NT environment see the Windows NT online help Notes The built in help in Windows NT 4 is a good place to start learning more about Windows NT security See access permissions files directories The access rights are additive whi...

Page 33: ... on page 24 3 Click File Properties 4 Locate the resource you want to protect in the file tree and click Properties The File Properties dialog box appears 5 Open the Windows Security page 6 Add permissions for the users and groups you want to grant access Notes All users must belong to the same domain All groups must be global not local Files and subfolders created within this folder will automati...

Page 34: ... of the StorPoint NAS in the location address field 2 Click admin You will be prompted for the Server password By default this is set to pass To change the Server password see Server Password on page 24 3 Click File Properties 4 Locate the resource you want to share or protect in the file tree and click Properties The Properties dialog box appears 5 Open the Windows Sharing page 6 Select the Share...

Page 35: ...ttings for running the StorPoint NAS in the Novell NetWare environment and how to set up access restrictions If you intend to use StorPoint NAS in a multiprotocol environment proceed to the other relevant sections in this manual namely Section 3 Microsoft IBM Networks SMB Section 5 UNIX NFS Section 6 FTP Section 7 Web Browser HTTP ...

Page 36: ...rPoint NAS must first be installed in the NDS tree The most convenient way to do this is using the installation wizard available from the StorPoint NAS Web interface see Wizard on page 37 However if you do not have TCP IP you must use a text editor and edit the configuration file manually Refer to Text Editor on page 38 Requirements When installing the first StorPoint NAS into the NDS tree it is r...

Page 37: ...cient Synchronizing the NDS Tree Before installing the StorPoint NAS in the NDS tree you need to verify that the NDS tree is synchronized To do that load DSREPAIR on the server in the NDS tree and select Unattended full repair If the NDS tree is not synchronized do not continue the installation until you have solved the problem Wizard The installation wizard is a convenient way to install your Sto...

Page 38: ...ist Text Editor If you do not have TCP IP on your network follow these steps to install the StorPoint NAS as an NDS server 1 Verify that the NDS tree is synchronized 2 Use a standard text editor such as Notepad to edit the configuration parameters From Windows Explorer or File Manager locate the StorPointNASconfigurationfile config iniwhichislocatedinthe System ServerProperties folder 3 Enter the ...

Page 39: ... this to install when you are ready to install the StorPoint NAS Forced will overwrite the existing server object without warning NDSRightsStorage NDS Set to NDS to store the access rights in the NDS tree Set to File to store the access rights in a file on the Novell server This is necessary if you do not allow schema extensions in your NDS tree or if you do not have Supervisor access rights NDSRi...

Page 40: ...S mode 5 Check the logfile txt file to verify that the StorPoint NAS was successfully installed See Installation Errors in NetWare NDS on page 41 6 After the installation you must logout and then login again to have all the necessary rights on the StorPoint NAS server object and the associated volume Using the NWAdmin you will find a new server object and corresponding volume object in the context...

Page 41: ...nName parameters Deleting the Server Object If using the partition manager within NWAdmin to delete the server object from your NDS tree you must turn off the StorPoint NAS and keep it turned off for 5 minutes before deleting the object If you do not turn off the server before attempting to delete the server object your client workstation will hang and you will have to reboot your PC However when ...

Page 42: ... specified in the NDSServerContext parameter was not found Verify the spelling Installation failed Insufficient rights to create server object The specified user in the NDSAdminName parameter does not have sufficient rights to create the server object in the specified context Installation failed NDS Server object already exists You have tried to install the server on top of an existing server obje...

Page 43: ...low users to log on in NDS mode only Note If NDS mode is not functioning you can always access the StorPoint NAS in bindery mode by logging in as Supervisor This is true even if you have disabled bindery mode Default Access Rights The default access rights protect all the system files which means that only users with Supervisor privileges on the StorPoint NAS have access to those files However all...

Page 44: ...assignments to the resource This makes it available only to the users in the trustee list Note The NetWare NDS access rights for the StorPoint NAS can be set using Security Equivalence Group Container Organization role and User Objects as with any other NDS file server There is no difference between how you use NWAdmin to set these access rights for a StorPoint NAS and how you would set the access...

Page 45: ...inistrator overhead as there is no need for maintaining a separate user database for the StorPoint NAS If the user is defined in the file server that the StorPoint NAS uses for authentication the user will automatically have access to the StorPoint NAS Authentication to a NetWare 3 x Server For access to a StorPoint NAS connected to a NetWare 3 x server authentication is done against the user list...

Page 46: ... To restrict access to a particular hard disk follow these steps 1 Login as Supervisor on the StorPoint NAS In order for Filer to access the StorPoint NAS the client must have an active connection 2 Login as Supervisor on your NetWare Bindery file server and start Filer 3 Change the current directory to AXIS nnnnnn _NW SYS 4 On the resource you want to protect set an inherited rights filter and fi...

Page 47: ... to set up access restrictions Notes Make sure you have set the Internet address as described in Assigning an IP Address on page 13 The NFS protocol is disabled by default If you are using the StorPoint NAS in a multiprotocol environment proceed to the other relevant sections of the manual namely Section 3 Microsoft IBM Networks SMB Section 4 NetWare NCP Section 6 FTP Section 7 Web Browser HTTP ...

Page 48: ...By default these are set to root and pass To change the Server password see Server Password on page 24 3 Click Network Settings 4 Click Detailed View The Protocols dialog box appears 5 Select the UNIX NFS tab and specify the settings 6 Click OK Important File locking does not apply to NFS clients For example when NFS is enabled a user can open edit and save a file regardless if the file is in use ...

Page 49: ...urce you want to protect in the file tree and click Properties 3 Select the UNIX Security tab 4 Choose whether you want to add a host name or an IP address 5 Click Add to add the new entry to the NFS export list 6 Click OK Notes When specifying a host name you can use these wildcards You can specify a IP address subnet mask pair in order to export the resource to a IP subnetwork 7 Click Add to add...

Page 50: ...Section 5 UNIX NFS StorPoint NAS 100 User s Manual 50 8 Click OK Note Per file access control is configured by using native utilities such as chown chgrp and chmod on the mounted exports ...

Page 51: ...ransfer Protocol FTP to put and get files with the StorPoint NAS If you intend to use StorPoint NAS in a multiprotocol environment proceed to the other relevant sections in this manual namely Section 3 Microsoft IBM Networks SMB Section 4 NetWare NCP Section 5 UNIX NFS Section 7 Web Browser HTTP ...

Page 52: ...rictions will apply After the user has logged in two folders are available Volumes and System except when the user logs in as an FTP user in which case only the Volumes folder will be accessible Each hard disk is found under the Volumes folder The following FTP commands are supported get put dir ls mkdir rd delete pwd Optional settings for FTP are FTP Time Out which specifies the time in seconds o...

Page 53: ... the required changes If the FTP User Name and FTP User Password fields are left empty you have to use the Server user name and password to log in to the FTP server 7 Click OK Notes Context sensitive online help is available for all parameters The parameter list is described in detail in Appendix A Parameter List ...

Page 54: ...its Web interface The StorPoint NAS supports HTTP over TCP IP which means that it works as a Web server available on the Internet and intranets If you are using the StorPoint NAS in a multiprotocol environment proceed to the other relevant sections of the manual namely Section 3 Microsoft IBM Networks SMB Section 4 NetWare NCP Section 5 UNIX NFS Section 6 FTP ...

Page 55: ...ick Network Settings 2 Click Wizard The Wizard Network Settings dialog appears 3 Choose Web HTTP Click Start to proceed with the installation 4 Follow the instructions on the screen When finished click Close 5 Click Detailed View The Protocols dialog box appears 6 Select the Web HTTP tab and verify the settings 7 Click OK Notes Context sensitive online help is available for all parameters The para...

Page 56: ...se steps 1 Click Network Settings 2 Click Detailed View 3 Select the Web HTTP tab In the URL to Page field specify the full path to the page e g http www company com In the URL to Image field optionally specify a link to an image to be used as a button for the customized link Specify the full path e g http www company com images image gif or the path relative to the URL of the page e g images imag...

Page 57: ...cessing the StorPoint NAS Web Pages on page 21 Note The Server password implies full access to the StorPoint NAS regardless any additional password set for any hard disk or folder File Properties To restrict user access to a particular resource 1 Click File Properties 2 Locate the resource you want to protect in the file tree 3 Click Properties 4 Open the Web Security page 5 Specify how to protect...

Page 58: ...e User Access To disable user access from the Web browser and thus limit access to the Administration pages only 1 Click Network Settings 2 Click Detailed View 3 Select the Web HTTP tab 4 Uncheck the Enable access to volumes via Web browser HTTP check button 5 Click OK ...

Page 59: ...ected to the StorPoint NAS whereof one must be newly formatted and of the same size or larger than the other disk Before starting a new installation it is recommended to Quick Format all hard disks prior to enabling RAID 1 To enable RAID 1 follow these steps 1 Start the Web browser 2 Enter the name or IP address of the StorPoint NAS in the location address field 3 Click admin You will be prompted ...

Page 60: ...ssword By default this is set to root and pass respectively 4 Click the Settings button and select the RAID tab 5 Uncheck two or more disks that have not been used for RAID before 6 Click Match Disks The StorPoint NAS will now add the unchecked disks for RAID 1 Note Existing RAID 1 pairs are not effected when new disks are added Removing a RAID 1 Volume To break up a pair of mirrored disks follow ...

Page 61: ...er shutdown 4 Turn off the StorPoint NAS tower 5 Replace the failed hard disk with another of the same or larger size and with the same SCSI ID 6 Turn on the StorPoint NAS tower 7 Quick Format the new hard disk see Format Hard Disk on page 62 8 On the This StorPoint page click the Settings button and select the RAID tab 9 Uncheck the new hard disk and click the Match Devices button See Adding Disk...

Page 62: ...e It may take several hours depending on the hard disk size To format a hard disk follow these steps 1 Start the Web browser 2 Enter the name or IP address of the StorPoint NAS in the location address field 3 Click admin You will be prompted for User Name and Password By default this is set to root and pass respectively 4 Click the icon that corresponds to the hard disk you want to format 5 Click ...

Page 63: ...e RAID controller set up has to be performed through the panel display if available of the RAID controller or through another interface for example a terminal set up To install a SCSI to SCSI RAID controller with the StorPoint NAS follow these steps 1 Physically connect the StorPoint NAS RAID controller and hard disks as described in the RAID controller documentation In that description the StorPo...

Page 64: ...et for example after power off on of the main power supply of the enclosure the StorPoint NAS has to be restarted after the RAID controller has booted up and is ready for use See step 3 above The above information is based on testing performed with the Infortrend IFT 3102U2G IFT 9178B4A and Chaparral K5412 RAID controller respectively ...

Page 65: ...NAS 65 Section 11 Monitoring the StorPoint NAS This section describes the following monitoring tools Tools See Event log page 66 Statistics page 67 E mail page 68 SNMP page 69 AXIS ThinWizard a tool for locating and managing all the AXIS servers on your network page 71 ...

Page 66: ...rPoint NAS Web interface follow these steps 1 Start your Web browser and enter the name or IP address of the StorPoint NAS in the location address field 2 Click admin You will be prompted for the Server password By default this is set to pass 3 Click Event Log All events are viewed in the same order as they entered the log Notes If a synchronization source has been found or time and date have been...

Page 67: ... prompted for the Server password By default this is set to pass To change the Server password see Server Password on page 24 3 Click Statistics The StorPoint NAS presents statistics such as Server up time Cache hit ratio in the RAM cache List of users who are currently connected to the StorPoint NAS in each particular network environment Available space on the attached hard disk s List of hard di...

Page 68: ...Server password By default this is set to pass To change the Server password see Server Password on page 24 3 Click Network Settings within the Administration Web pages 4 Click Detailed View The Protocols dialog box appears 5 Select the E mail SMTP tab Specify the settings for the mail server 6 Enter the Administrators e mail address 7 Select the required log events from the Mail Log Events drop d...

Page 69: ...work devices by the means of messages which are references to one or more objects A message can be a question or an instruction to a device or an alarm triggered by a specific event in a device Objects are contained in data bases called MIBs Management Information Base where MIB II is a standard database The StorPoint NAS supports all relevant parts of MIB II SNMP Settings To configure your StorPo...

Page 70: ...Section 11 Monitoring the StorPoint NAS StorPoint NAS 100 User s Manual 70 6 Specify the settings and click OK ...

Page 71: ...AXIS Online CD The required software can also be downloaded from the Axis Web Site free of charge An installation wizard will guide you through the installation procedures Accessing AXIS ThinWizard Follow these steps to access the AXIS ThinWizard 1 Make sure an AXIS ThinWizard server is running on your network 2 Start the Web browser and enter the name or IP address of the AXIS ThinWizard server i...

Page 72: ... types i e storage servers print servers etc that are included Follow these steps to create a network group 1 Click Network Groups in the AXIS ThinWizard main menu 2 Click Create 3 The Create Network Group page opens Type a name for the new network group 4 Specify the IP subnets and AXIS server types to be included in the network group If you are only interested in storage servers deselect all opt...

Page 73: ...the AXIS ThinWizard main menu 2 Select the network group that includes your StorPoint NAS from the pull down list 3 All the detected AXIS serversincluded in the network group arelisted 4 ClicktheIP AddresslinkofyourStorPoint NAS TheStorPointNAS Home Page the File View page appears Note The AXIS ThinWizard can also be used for upgrading the StorPoint NAS software Refer to Upgrading the Firmware on ...

Page 74: ...ts no Set to configuration volumeProperties or all Restart no Set to yes to restart the StorPoint NAS TimeZone UTC Must be set to the time zone that the StorPoint NAS is operating in Refer to Time Zone Parameter Values on page 78 TimeSyncSource None Specifies the time source for the StorPoint NAS Set to NDS for the NetWare network Set to NTP for UNIX and SMB over TCP IP Set to SMB for NT ServerPas...

Page 75: ...es Enables HTTP Set to no to restrict users from accessing the StorPoint NAS from a Web browser EnableMediaAccess yes Enables access to the attached resources When set to no only administration is available from HTTP ExternalLink Specifies the URL to a customized link e g to your company s Web site The link will be available from the StorPoint NAS Web interface ExternalImage Specifies the URL to t...

Page 76: ...t is 0 0 0 0 i e all SNMP traps are disabled TrapCommunityName public Specifies the community for all generated SNMP traps It corresponds to the trapCommunity SNMP object SystemContact Optional entry which should be in plain text and may be used to show the name of the system contact person SystemName Optional entry which should be in plain text and may be used to show the name of the location of ...

Page 77: ...tall the StorPoint NAS in NDS or forced to overwrite the NDS server object NDSRightsStorage NDS Set to NDS to store the access rights in the NDS tree Set to File to store the access rights in a file on the Novell server This is necessary if you do not allow schema extensions in your NDS tree or if you do not have Supervisor access rights NDSRightsFile If you have set NDSRightsStorage to File speci...

Page 78: ...a 9 UTC 3_ No_DST 3 US_Aleutian 10 UTC 4_ No_DST 4 Cuba 5 UTC 5_ No_DST 5 Egypt 2 UTC 6_ No_DST 6 Libya 1 UTC 7_ No_DST 7 Sudan 2 UTC 8_ No_DST 8 Tunisia 1 UTC 9_ No_DST 9 Brazil_Noronha 2 UTC 10_ No_DST 10 Brazil_Sao_Paulo 3 UTC 11_ No_DST 11 Brazil_Manaus 4 UTC 12_ No_DST 12 Brazil_Rio_Branco 5 Chile 4 UTC Universal Time Coordinated which used to be known as Greenwich Mean Time GMT i e the local...

Page 79: ...purpose of each folder is explained on the following pages The System Folder The System folder includes configuration information about the StorPoint NAS e g configuration settings connected drives inserted discs access rights etc It contains these subfolders DeviceProperties Includes one text file for each connected hard disk ServerProperties Includes the configuration parameter list event log an...

Page 80: ...at hard disk are accessed through this folder By default the Volumes folder is available to all users However the Administrator can set a password to protect it The names of the subfolders found under the Volumes folder will comply with the following rules If the Administrator has set a volume name this name will be used If no volume name has been set the volume label of the hard disk will be used...

Page 81: ... the URL of the StorPoint NAS i e the name or IP address in the location address field Example FTP You can retrieve the configuration parameters of your StorPoint NAS using the File Transfer Protocol FTP FTP is supported by most operating environments Follow these instructions 1 Log in to the StorPoint NAS with the command where IP address is the name or IP address of your StorPoint NAS 2 You will...

Page 82: ... uppercase CONFIG is omitted the file will only be stored temporarily until the next time the product is powered off 7 To exit FTP type the command quit bye or exit Caution Windows 95 has a directory called config that contains important system files It is therefore important to change to another directory using the cd command before modifying your StorPoint NAS configuration file from within the ...

Page 83: ...ration Settings The StorPoint NAS configuration settings are stored in the config ini file located in the System ServerProperties folder Example Access Control Parameters The StorPoint NAS access control parameters are stored in separate text files for each shared resource These text files are located in the System VolumeProperties folder AXIS StorPoint NAS Parameter List V1 00 Server HardwareAddr...

Page 84: ...When editing the file be sure that the equal sign and the parameter values are separated by a space Do not remove the END marker from the file Explanations W Writable R Read only Identification R Volume name Root R Volume label Root R Volume serialnumber 00000001 W Volume description Access rights Windows Sharing File Share name Root Comment AccessRight Full Server Password Read Only Password Full...

Page 85: ...stalling your StorPoint NAS in NetWare From this web page you can also produce a Server Report which includes technical Server Report available when contacting your vendor for technical support To receive update information about Axis products services and software updates by e mail you can subscribe to the AxisNews mailing list at http www axis com services axisnews htm Problem See The front pane...

Page 86: ...e StorPoint NAS unit Normal Conditions The Power LED is controlled by hardware and is always green when power is connected When the system starts running after startup the Status LED turns solid green The SCSI and Network LEDs are turned off This table shows the other front panel indicators under normal conditions Flashing short interval Flashing long interval Event Status LED SCSI LED Network LED...

Page 87: ... dealer and return the unit for replacement Event Action Status LED SCSI LED Network LED New firmware required Flash loading via FTP possible AMBER Illegal serial number Return unit RED Error in Flash PROM Return unit RED Error in DRAM Return unit RED Error in DRAM expansion module Replace DIMM module RED AMBER Fatal SCSI error Return unit RED Drive disconnected or not working properly Check SCSI ...

Page 88: ...need to re assign the IP address in order to re establish the Web browser connection Web Browser To restore the defaults settings using a Web browser 1 Start the Web browser 2 Enter the name or IP address of your StorPoint NAS in the location address field 3 Click admin You will be prompted for the Server password By default this is set to pass To change the Server password see Server Password on ...

Page 89: ...ommand get defaults The unit will then automatically restart 4 Log out using any of the commands quit bye or exit depending on your FTP version Push Button To restore the default settings using the Push button To restore default settings using the Push button 1 Press and hold the Push button 2 Start the StorPoint NAS 3 Wait until the Status indicator flashes yellow one flash second 4 Let go of the...

Page 90: ...t are currently accessing the StorPoint NAS will be interrupted The diagnostic test is only available the first hour after startup If you want to repeat the test you must first restart the StorPoint NAS Procedure To perform the diagnostic test follow these steps 1 Start the Web browser and enter the URL of the Diagnostics page in the location address field Example 2 The Diagnostics page appears ht...

Page 91: ...he last unit is terminated Consult the drive documentation for settings IP Address If using TCP IP make sure that you have assigned a unique and valid IP address to the StorPoint NAS If you have changed the IP address try restarting the StorPoint NAS We also recommend that you try and ping your StorPoint NAS For more information on how to do this see Methods for Setting the IP Address on page 14 S...

Page 92: ...ame types If your network has multiple sections with different frame types on some of the sections then the StorPoint NAS might log on to the wrong network section and adapt to a frame type incompatible with the intended network section For this reason you have the option to disable those frame types by changing the parameter from auto to off Alternatively it is possible to use the eight digit net...

Page 93: ...irectory on the Novell server where you want to store the access rights 2 Make sure that your NDS tree is synchronized 3 Install the StorPoint NAS as described in Installation as an NDS Server on page 36 Make sure you set the NDS Rights Storage parameter to File and specify the name of the file where you want to store the access rights on the Novell file server 4 Logout and login again in order to...

Page 94: ... Account In Windows NT you can correct the problem by logging on to the StorPoint NAS as local administrator Note that the local administrator is not the same as an Administrator with an account on the domain In the Map Network Drive dialog specify the following Example The host name of the StorPoint NAS is hdserv Note In Windows 95 you cannot tell the SMB client to change domain and user when you...

Page 95: ...Appendix C Upgrading the StorPoint NAS 95 Appendix C Upgrading the StorPoint NAS This section includes the following information Task See Obtaining new software page 96 Upgrading the firmware page 97 Extending the RAM memory page 101 ...

Page 96: ...e Internet You may wish to check the Axis Web Site at http www axis com where you can download the latest versions of the software A link to the Axis Web Site is available from the StorPoint NAS Home Page Anonymous FTP You can also get files and information through anonymous ftp log in to ftp axis com and go to the pub axis directory Your Dealer Contact your dealer to check if there has been any n...

Page 97: ...se steps to upgrade the StorPoint NAS by using drag and drop 1 Start the Windows Explorer 2 Find the StorPoint NAS 3 Expand the Root and System folders 4 Copy the new firmware file to the Flash folder 5 Wait for the copy to complete Caution The StorPoint NAS will automatically restart when the upgrade is complete It is very important that you do NOT press the Power button during the upgrade Note I...

Page 98: ...field Note If the AXIS ThinWizard server is installed on a port other than 80 you must add port number to the URL Example 2 Log in to AXIS ThinWizard 3 Click Manage Network in the main menu 4 SelectthenetworkgroupthatincludesyourStorPointNAS Notethat you can only update servers that are included in the selected network group 5 Allthedetectedserversincluded inthenetworkgrouparelisted Click Firmware...

Page 99: ...these steps to upgrade the StorPoint NAS using FTP 1 Log in to the StorPoint NAS with the command where IP address is the name or IP address of your StorPoint NAS 2 You will be prompted for user id and password Use the ftp user name and password defined in the config ini file or on the FTP tab which is accessed from Network Settings in the web interface 3 To change to binary transfer mode issue th...

Page 100: ...ing the StorPoint NAS StorPoint NAS 100 User s Manual 100 Caution The StorPoint NAS will automatically restart when the upgrade is complete It is very important that you do NOT press the Power button during the upgrade ...

Page 101: ... the same disc Memory Modules You can add one module of either 32 64 or 128 Mbytes in size 32 Mbyte Module 144 pin 8 byte SO DIMM 4Mx16 EDO DRAM based 4 pcs 3 3V 50 ns 4k refresh cycles A0 A11 address inputs Use one of these modules or equivalent 64 Mbyte Module 144 pin 8 byte SO DIMM 4Mx16 EDO DRAM based 8 pcs 3 3V 50 ns 4k refresh cycles A0 A11 address inputs Manufacturer Type Centon P N CKE115T...

Page 102: ...8 byte SO DIMM 16Mx8 EDO DRAM based 8 pcs 3 3V 50 ns 4K refresh cycles A0 A11 address inputs Use one of this module or equivalent Manufacturer Type Centon P N CKF115TE4VD391G Samsung P N KMM466F804BS1 L5 Toshiba P N THL64V8015ATG 5 Golden RAM P N 76H0268 Southland Micro Systems P N SGE SD8X64E6V Manufacturer Type Centon P N CAX16MX64 5EVDG ...

Page 103: ...ntthememorymodulebyslidingitintotheX4socketatanangle of 45 degrees Once the module is fully inserted press it downwards towards the PCB until the socket locks the module into place Caution Always use an antistatic bracelet when handling the memory modules 4 Replace the server casing 5 Power up the StorPoint NAS The new memory module is automatically identified and the usage optimized by the StorPo...

Page 104: ... is missing All packaging materials are recyclable The standard delivery includes the following Hardware Description Part Number StorPoint NAS AXIS StorPoint NAS Ethernet 0099 002 01 4 Screws 2 Screws To attach the server unit 15163 11998 Product Label To be attached to the back of the tower 16277 NetworkConnection Board 16273 Shielded Cat 5 Cable To connect the server unit and the network connect...

Page 105: ...tor will automatically adjust to 10baseT or 100baseTX full or half duplex mode Use a Category 5 UTP cable for the 100baseTX operation Note When the StorPoint NAS has been installed in a tower the network connector is found on the network connection board that appears at the back of the tower Note that the network cable cannot be connected directly to the server unit Front panel indicators SCSI con...

Page 106: ...panel indicators show the status of the unit The indicators have the following functions Status Flashes during startup The light turns solid green when the StorPoint NAS is ready for use SCSI Flashes to indicate disc access Network Flashes to indicate the presence of network traffic Power Remains on to indicate that power is present in the unit Refer to The Front Panel Indicators on page 86 for a ...

Page 107: ...or attach the enclosed product label to the back of the tower The serial number is foundontheundersidelabelofthe StorPointNASand willbeneeded during the TCP IP configuration 3 Slide the StorPoint NAS into the tower 4 Fix the StorPoint NAS with the four screws supplied Use the upper or lower holes depending on type of tower and mounting Caution The length of the screws must not exceed 0 2 inch 5 mm...

Page 108: ...ing the shielded CAT 5 cable Important It is not possible to connect an RJ 45 cable directly between the back of the StorPoint NAS server unit and the hub 7 Mount the board on the back of the tower The mounting plate on the board fits into the standard Centronics cut out available on most towers 8 Attach the product label to the back of the tower ...

Page 109: ...ed The SCSI bus allows 15 hard disks to be connected to the StorPoint NAS Each unit on the SCSI bus must have a unique SCSI address To work properly the bus must be electrically terminated at both ends Caution Always make sure that power is not connected to the StorPoint NAS or any of the drives when making changes to the SCSI chain The SCSI bus may become damaged if you connect or disconnect any ...

Page 110: ...4 Connect an external preferably active SCSI terminator to the last drive in the SCSI chain If there is only one drive it is the last one in the chain and must be terminated The StorPoint NAS has built in SCSI termination which is always switched on Therefore the server must be physically located at one end of the chain Do not terminate the hard disks placed between the StorPoint NAS and the last ...

Page 111: ...X NFS over UDP IP TCP ARP RARP BOOTP DHCP SNMP FTP Web Browser HTTP over TCP IP Network Management SNMP MIB II Platform independent configuration and management via standard Web browser Security Novell NetWare Encrypted passwords Authorization via file server including NDS Windows and OS 2 User level or share level access control UNIX NFS version 2 PCNFSD authentication via file server Web Browser...

Page 112: ...ra fast SCSI 20 MBytes sec or ultra wide SCSI 40MBytes sec Power Supply Via 4 pin power connector 12V DC 0 5 A and 5V DC 2 A Dimensions Height 1 7 in 4 3 cm Width 5 9 in 14 9 cm Depth 8 8 in 22 4 cm Weight 1 5 lbs 0 7 kg Environmental Temperature 40 105 F 5 40 C Humidity 20 80 RHG non condensing Year 2000 The StorPoint NAS is year 2000 compliant Approvals EMC CE EN 55022 1994 EN50082 1 1992 FCC Su...

Page 113: ...matching entry is found the daemon then downloads the IP address to the device BSD Berkeley Software Distribution The University of California Berkeley additions to the UNIX operating system DHCP Dynamic Host Configuration Protocol A system based on network interface card addresses for allocating IP addresses and other configuration information for networked systems It provides automatic but tempo...

Page 114: ... IP session layer protocol that regulates packet forwarding by tracking Internet addresses routing outgoing messages and recognizing incoming messages LED Light Emitting Diode The LED indicators on the StorPoint CD front panel indicate the status of the unit MIB Management Information Base A database of network configuration information used by SNMP and CMIP to monitor or change network settings N...

Page 115: ... their existence to network clients SCSI Small Computer System Interface A high speed parallel interface used to connect a computer to peripheral devices using just one port SLP Service Location Protocol A protocol used for advertising and discovering network services e g printers and CD servers SMB Server Message Blocks A protocol that makes use of NetBIOS SNMP Simple Network Management Protocol ...

Page 116: ...name must be resolved to an IP address WINS is designed to eliminate the need for broadcasts in order to resolve computer names to IP addresses It provides a dynamic database that maintains computer name to IP address mappings Wizard A form of user assistance that automates a task through a dialog with the user in order to speed up operation These tasks are typically complex and require experience...

Page 117: ... 27 NetWare 35 UNIX 47 Web HTTP 54 configuration file 74 83 configuration tools 81 connecting the hard disks 109 connecting to the network 12 customized link 56 D data throughput 111 default settings 88 DHCP 18 diagnostic test 90 Diagnostics page 90 directory structure 79 distinguished name 41 domain controller in SMB 85 94 DOS access control 28 configuration 27 protocol settings 29 52 server name...

Page 118: ...P 17 BOOTP 19 DHCP 18 RARP 20 L LED indicators 86 106 local administrator in SMB 94 logfile txt 41 66 M managing security Microsoft IBM networks 34 NetWare 43 NetWare bindery 44 NetWare NDS 43 UNIX 49 Web HTTP 57 memory check 90 memory expansion 101 MIB 69 Microsoft IBM networks access control 34 configuration 27 monitoring 65 N NBT 27 NDS schema extension 36 93 NDS server 36 NetBEUI 27 NetBIOS 27...

Page 119: ...button 106 R RARP 20 restoring default settings 88 S schema extension 36 93 SCSI address 109 SCSI chain 110 SCSI terminator 110 security management Microsoft IBM networks 34 NetWare 43 NetWare bindery 44 NetWare NDS 43 UNIX 49 Web HTTP 57 serial number 13 106 server name Microsoft IBM networks 28 NetWare 36 SMB 28 Server password 24 setting the IP address 13 ARP 17 BOOTP 19 DHCP 18 RARP 20 share l...

Page 120: ...74 85 typeful name type 41 typeless name type 41 U UNIX access control 49 configuration 47 protocol settings 48 upgrading the firmware 97 user level mode 31 user level security in SMB 94 V volume name 80 Volumes folder 80 W Web HTTP access control 57 configuration 54 Windows access control 28 share level 29 user level 28 configuration 27 protocol settings 29 52 server name 28 WINS database 91 wiza...

Reviews: