7
Attaching/detaching the ASIP
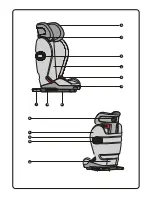
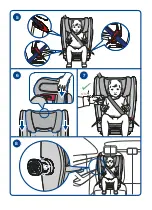
To adjust the height of the child car seat, squeeze the adjustment handle (I) on the back of the
headrest and move the headrest up or down to one of its positions until the correct height is
achieved. The correct height of the headrest is when there is a distance of 1 cm between the
shoulder and the lower edge of the headrest. Once the right fit is found, release the handle and
check the headrest to ensure it is locked into position.
IMPORTANT:
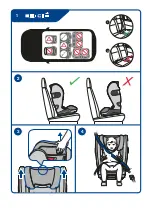
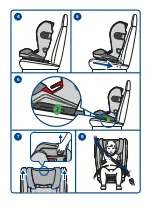
NEVER place your child in the child car seat whilst it is not fitted in a car. The child car
seat should never be used free-standing as it may tip backwards. Slot the vehicle seat belt’s shoulder
strap through the shoulder belt guide (B) and place the lap belt under the armrest (C). Lock the
vehicle seat belt into the buckle ensuring it “CLICKS” into place.
IMPORTANT:
Make sure the seat belt is not twisted and that the lap belt is worn low over the hips.
Check that the lap belt passes under the armrests and over the red lap belt guides (A) on both sides
of the seat. Check that the shoulder belt passes through the shoulder belt guide (B) then diagonally
across the child’s chest and over the top of the armrest nearest to the seat belt buckle. Finally, check
that all slack has been removed from the seat belt and that your child is now secure.
IMPORTANT:
The seat belt buckle should NOT foul, jam or wedge itself under the armrest as shown.
WARNING:
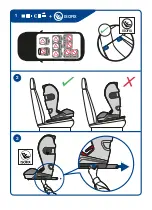
An unoccupied child car seat should be secured using a 3-point seat belt or the ISOFIX
connectors if available.
Adjusting the child car seat to fit your child
Although optional we STRONGLY advise using the side impact pad (ASIP) where possible to add
extra protection from side collisions.
Locate the side impact pad connector (ASIP) (L) on the child seat nearest to the side of the
vehicle (i.e. closest to the door).
Press the button on the ASIP and slide it into position
IMPORTANT:
Make sure that the ASIP locks into position
To remove: Push the button on the ASIP and remove
8
9
10
Summary of Contents for Bigkid
Page 2: ...A C L H G Q E K J P O I N D ...
Page 3: ...ISOFIX ...
Page 4: ...2 i ii 3 4 1 ...
Page 5: ...1cm 5 6 8 7 ...
Page 6: ...1 2 3 ISOFIX ISOFIX ...
Page 7: ...4 7 6 5 8 ...
Page 8: ...10 12 8 1cm 11 ...


