background image

Changing the 150mm Grinding Stone

11

11

12

10

8

7

9

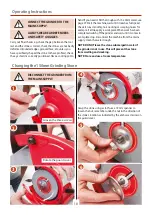
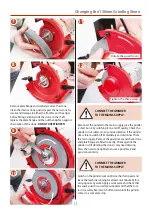
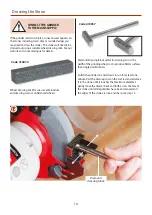
Remove plate flange and carefully remove the stone. 
Clean the interior stone guard, inspect the new stone for 
cracks and damage to either the front face or the edges 
before fitting. Carefully slide the stone on the shaft, 
replace the plate flange and the nut then tighten against 
the rotation of the stone.  DO NOT OVERTIGHTEN.

Tighten the three screws

Rotate the guard cover

CONNECT THE GRINDER 
TO THE MAINS SUPPLY.

CONNECT THE GRINDER 
TO THE MAINS SUPPLY.

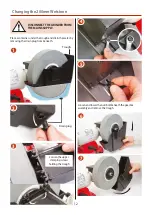
Reconnect the grinder to the mains supply, give the grinder 
a ‘short burst’, by switching it on and off quickly. Check the 
grinder is not subject to any undue vibration. If the grinder 
does vibrate, switch off immediately and disconnect from 
the main supply.  Remove the guard cover and check stone 
and plate flange are fitted correctly.  Check again, if the 
grinder is still vibrating the stone/s may need dressing. 
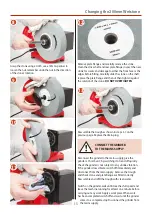
Dress the new stone lightly to ensure a ‘good face’ and 
good concentricity.

Switch on the grinder, wait until it reaches full speed and 
leave the machine running for at least one minute before 
carrying out any work. Apply a work piece and check that 
the spark guard is correctly positioned and that the tool 
rest is securely fixed. Switch off and wait until the grinder 
comes to a complete stop.

Summary of Contents for AC200WDG

Page 1: ...AC200WDG 150 200mmWet Dry Grinder Code 105246 Original Instructions AT M 09 04 2019 BOOK REF 105790 ...

Page 2: ... at No 15 Sichan Road Wendeng Shandong 264400 China and complies with the relevant essential health and safety requirements 2006 42 EC 2006 95 EC EN 61000 3 3 2008 EN 55014 2 1997 A1 A2 declares that the machinery described This machine complies with the following directives EU Declaration of Conformity EN 61000 3 2 2006 A1 A2 EN 55014 1 2006 A1 A2 Signed Andrew Parkhouse Operations Director Date ...

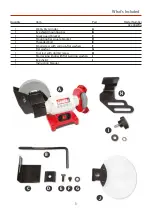
Page 3: ...ield mounting bar B 1 Spark guard bracket C 1 Mounting bar square bracket D 1 Threaded bolt E 1 Small screw with spring flat washers F 1 Flat washer G 1 Tool rest with drill bit recess H 1 Star locking knob with flat spring washers I 1 Eye sheild J 1 Instruction Manual A C D E F G J B H I ...

Page 4: ...e there may be volatile gases Check cutters are correct type and size are undamaged and are kept clean and sharp this will maintain their operating performance and lessen the loading on the machine OBSERVE make sure you know what is happening around you and USE YOUR COMMON SENSE WARNING KEEPTOOLS AND EQUIPMENT OUT OF REACH OF YOUNG CHILDREN KEEPWORK AREA AS UNCLUTTERED AS IS PRACTICAL UNDER NO CIR...

Page 5: ...s etc onto the shaft 15 Always stand to one side of the grinder when starting the machine 16 Avoid awkward hand positions where a sudden slip could cause the hands to come into contact with a grinding wheel wire brush etc 17 If the wheel requires dressing dress only the front of the wheel do not dress the sides 18 Do not use any attachments that causes the machine to vibrate If after changing grin...

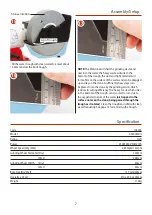
Page 6: ...ng bracket J over the mounting bar B and nip up the nut Adjust the spark guard bracket C until it s just clear of the stone Adjust the tool rest H the same as described above Lower the shield C H Make sure the draining plug is inserted into the base of the water trough Drain plug B J ...

Page 7: ...h reduces its cutting efficiency The heavy waste which sinks to the bottom of the trough can also start to rust due to the oxygenated nature of the water air trapped in the surface water on the stone being passed through the trough as it rotates Clean the trough and refill with clean water frequently See page 12 for removing the trough Specification Code 105246 Model AC200WDG Rating Craft Power 25...

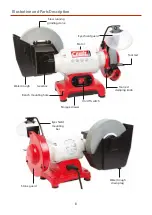
Page 8: ...scription 8 On Off switch Storage drawer Water trough drain plug Stone guard Tool rest clamping knob Tool rest Motor Eye shield guard Slow running grinding stone Water trough Gearbox Bench mounting hole Eye shield mounting bar ...

Page 9: ...tion and Parts Description 9 On Off Switch Trough draining plug Storage drawer Tool rest with drill bit angle recess Grinding stone eye shield guard Support notches to steady tools being offered up to the stone ...

Page 10: ...t the stone from swelling and cracking NOTE Store and use at room temperature Changing the 150mm Grinding Stone 6 5 4 3 2 1 Grasp the stone using a cloth use a 19mm spanner to loosen the nut remember undo the nut in the direction of the stone s rotation as indicated by the embossed arrow on the guard cover Loosen the three screws Rotate the guard cover Carry out final checks e g check the gap betw...

Page 11: ...the grinder a short burst by switching it on and off quickly Check the grinder is not subject to any undue vibration If the grinder does vibrate switch off immediately and disconnect from the main supply Remove the guard cover and check stone and plate flange are fitted correctly Check again if the grinder is still vibrating the stone s may need dressing Dress the new stone lightly to ensure a goo...

Page 12: ... SUPPLY 6 7 4 5 3 2 Loosen and lower the nut bolt beneath the gearbox assembly and remove the trough Place a container under the trough and drain the water by removing the drain plug from beneath Loosen the upper clamping screws holding the trough Drain plug 1 Trough ...

Page 13: ...3 7 on the previous page Replace the drain plug CONNECTTHE GRINDER TOTHE MAINS SUPPLY Reconnect the grinder to the mains supply give the grinder a short burst by switching it on and off quickly Check the grinder is not subject to any undue vibration If the grinder does vibrate switch off immediately and disconnect from the main supply Remove the trough and check stone and plate flange are fitted c...

Page 14: ...m and dressing worn or unbalanced wheels Code 410074 Switch the grinder on and allow it to run for at least one minute Rest the dressing tool on the tool rest and advance it to the stone until it touches the maximum diameter gently move the dresser back and forth across the face of the stone until all irregularities have been removed and the edges of the stone are nice and sharp see step 14 Diamon...

Page 15: ...Exploded Diagrams Lists 15 ...

Page 16: ... label 1 11 Tooth washer 4 1 12 Rubber foot 4 13 Switch HY12 1 14 Phillips screw M5 x 8 2 15 Switch plate Q235 1 16 Base HT150 1 17 Strain relief 1 18 Plug and cord 1 19 Bolt M6 x 18 1 20 Water block 1 21 Hex nut M5 3 22 Hex bolt M5 x 16 1 23 Wet wheel stone guard ABS 1 24 Worm shaft 1 25 Phillips screw M4 x 10 2 26 Turbine 1 27 Phillips screw M4 x 18 2 28 Phillips screw M4 x 8 4 29 Flat washer 4 ...

Page 17: ...51 Phillips screw spring washer flat washer assembly M5 x 18 3 52 Right wheel guard cover Q235 1 53 Wheel flange Q235 2 54 Wheel stone 150 x 20 x 12 7mm 1 55 Right wheel guard Q235 1 56 Spark deflector Q235 1 57 Lock washer M5 3 58 Right tool rest Q235 1 59 Flat washer 6 1 60 Lock handle M5 x 10 1 61 Hex bolt M6 x 14 1 62 Bracket Q235 1 63 Eyeshield mount rod Q235 1 64 Hex nut M4 2 65 Eyeshield 1 ...

Page 18: ...Wiring Diagram 18 ...

Page 19: ...Notes 19 ...

Page 20: ...together with household waste material By law they must be collected and recycled separately EU Countries Only The Axminster guarantee is available on Craft Trade Engineer AirTools CNCTechnology Series machines Buy with confidence from Axminster So sure are we of the quality we cover all parts and labour free of charge for three years For more information visit axminster co uk 3years ...

Reviews: