background image

Optional Accessories

14

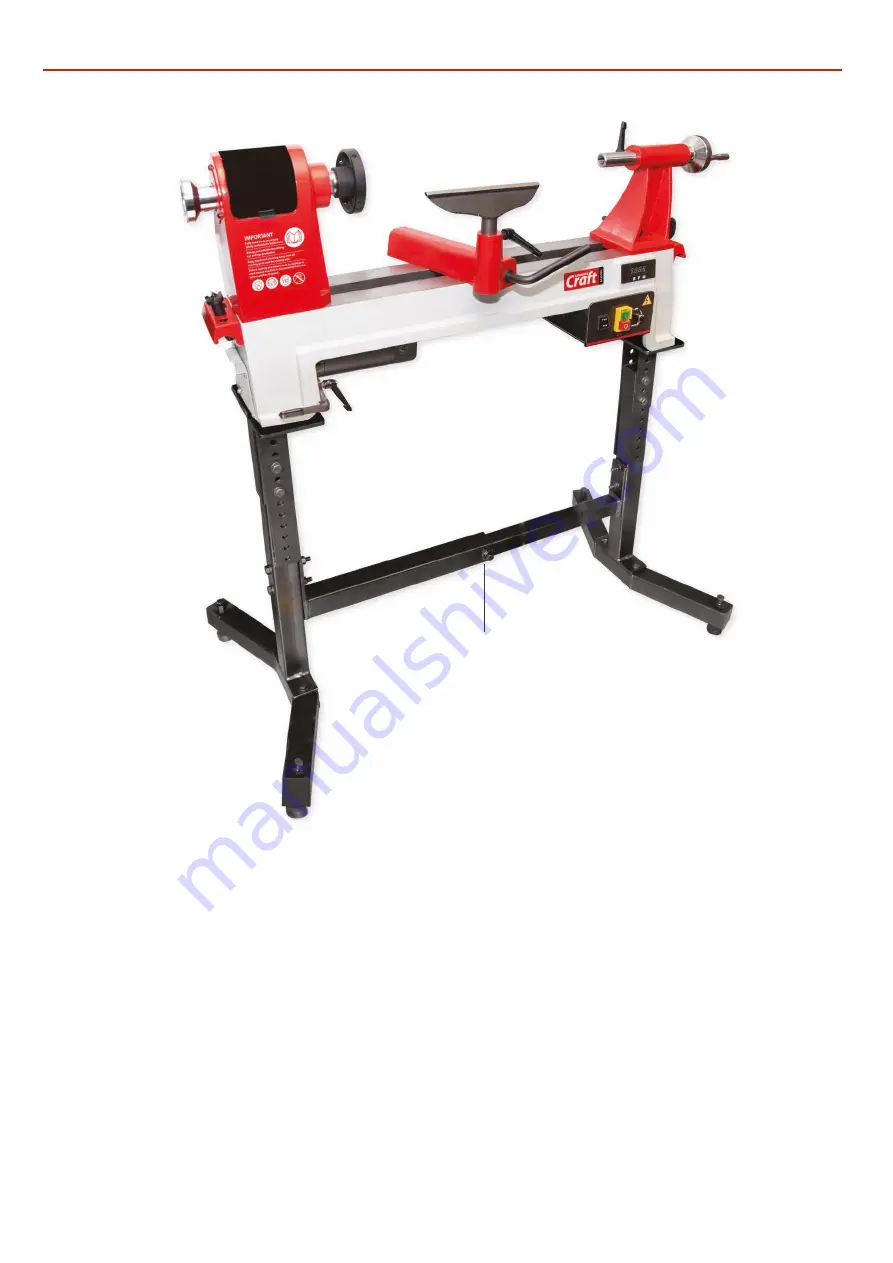
Code 104794 Floor stand assembly

The floor stand for the Axminster Craft AC355WL wood turning 
lathe is made from box section steel and simple to assemble 
and sturdy enough to hold the lathe securely. It is adjustable in 
height from 610mm-875mm to create a comfortable working 
height. The feet are splayed back to give plenty of foot space, 
and are also fitted with rubber feet which are adjustable to
accommodate an uneven workshop floor. Unscrew the lathe 
feet, line up the holes on top of the stand assembly and secure 
with bolts washer/nuts.

Summary of Contents for AC355WL

Page 1: ...AC355WL Woodturning Lathe Code 104792 Original Instructions AT M 02 07 2019 BOOK REF 007295 ...

Page 2: ...his machine complies with the following directives EU Declaration of Conformity Signed Andrew Parkhouse Operations Director Date 11 09 2017 The symbols below advise the correct safety procedures when using this machine Fully read manual and safety instructions before use Eye protection should be worn Ear protection should be worn HAZARD Dust mask should be worn EU Declaration of Conformity 02 What...

Page 3: ...umber AC355WL 1 Woodturning Lathe A 1 204mm Tool Rest B 1 100mm Faceplate C 1 Spanner D 1 Push Rod E 1 Axminster 4 Prong Drive Centre F Code 340106 1 Axminster Standard 60 Live Centre G Code 340203 1 Power Cable 1 Instruction Manual A E F G B C D ...

Page 4: ...d stores or in areas where there may be volatile gases Check cutters are correct type and size are undamaged and are kept clean and sharp this will maintain their operating performance and lessen the loading on the machine OBSERVE make sure you know what is happening around you and USE YOUR COMMON SENSE KEEPWORK AREA AS UNCLUTTERED AS IS PRACTICAL UNDER NO CIRCUMSTANCES SHOULD CHILDREN BE ALLOWED ...

Page 5: ...ries prior to it being set up Use proprietary de greaser Wear overalls coverall and eye protection before cleaning 95 of the machine comes fully assembled all that remains is to fit the four prong drive centre F and the 60 live centre G and tool rest B 1 Locate the four prong drive centre F and live centre G Remove the faceplate C by loosening the two grub screws and using the spanner D unscrew th...

Page 6: ... 07 08 Fig 07 08 B Tool holder carrying handle 5 Locate the power cable and insert the connector into the three pinned socket to the side of the control box see fig 09 Fig 09 6 Place the lathe on a work bench and adjust the four feet until level Optional Accessories see page 14 Please contact our Customer Service Department for further details or visit our website at axminster co uk Floor stand as...

Page 7: ...ndle speed digital indicator Lift shift handle 4 Prong drive centre Headstock access panel Headstock wheel Banjo arm lock 60 Live centre Tailstock barrel Tailstock operating handle Motor handle lock Motor operating handle Control box Tool holder carrying handle 24 Indexing stops Drive belt ...

Page 8: ...ch while lathe is in motion ON OFF NVR switch B Variable speed control knob 250 3 550rpm Handle A to raise lower the motor for drive belt position Motor lock B Tool holder carrying handle on either end of lathe bed Tailstock operating handle A Tailstock barrel lock B Tailstock handle lock C 100mm Faceplate A B A B A B C ...

Page 9: ...r pulley access plate Control box with heat sink Tailstock lock handle Tool rest Banjo arm DC brush motor Motor brush access port Lathe bed Lathe foot Headstock Indexing pin Tailstock A B Tailstock barrel scale DO NOT USE THE INDEX PIN TO LOCK THE SPINDLE WHEN REMOVING OR MOUNTING THE FACEPLATE ...

Page 10: ...el handle 24 indexing positions Fig 12 2 Rotate the spindle by turning the headstock operating wheel lower the indexing pin knob until the pin engages into one of 24 indexing slots see fig 13 14 Replace the access panel DISCONNECT THE LATHE FROM THE MAINS BEFORE CONTINUING Fig 13 14 Indexing slot Removing the Drive Live Centres Adjusting theTailstock Locate the push rod E insert it through the cen...

Page 11: ...he spanner D to hold the spindle tighten the grab screws to secure the faceplate see fig 19 3 Note The faceplate will be tight after use To remove follow steps 1 2 insert the push stick rod E into one of the machined holes in the faceplate Hold the spanner D in place and pull the push stick E towards you see fig 20 Fig 19 D C Hex key DO NOT USE THE INDEX PIN TO LOCK THE SPINDLE WHEN REMOVING OR MO...

Page 12: ...oosen the four screws holding the motor pulley access plate A and remove see fig 21 22 Fig 21 22 2 Release the motor locking handle B and lift up the motor retighten the locking handle see fig 23 24 Fig 23 24 B 3 Reposition the drive belt to one of the three positions see fig 25 26 27 Note The speed chart shows approximate speeds Fig 25 26 27 A ...

Page 13: ...able speed control dial Before switching on make sure the indexing pin is disengaged and the speed control dial is turned down to low see fig 28 29 Fig 28 29 2 Select Forward or Reverse on the selector switch DO NOT change direction while in operation see fig 30 3 Make sure the work piece is secure and all tools are clear of the work area Switch on the mains supply and press the NVR GREEN button t...

Page 14: ...d sturdy enough to hold the lathe securely It is adjustable in height from 610mm 875mm to create a comfortable working height The feet are splayed back to give plenty of foot space and are also fitted with rubber feet which are adjustable to accommodate an uneven workshop floor Unscrew the lathe feet line up the holes on top of the stand assembly and secure with bolts washer nuts ...

Page 15: ...OM THE MAINS SUPPLY Fig 33 Fig 34 Fig 35 Remover the access port with a flat headed screwdriver Replace the motor brush if worn down to the Line Remove the motor brush and check its condition Line Daily After Use Monthly Clean wood shavings away from the lathe bed and tool rest Smear a light coat of wax Axminster Machine Wax code 101582 see fig 36 over the lathe bed to allow the banjo and tailstoc...

Page 16: ...Exploded Diagrams Lists 16 ...

Page 17: ... 1 42 LEADSCREW 1 43 TAILSTOCK WHEEL 1 44 HANDWHEEL AXLE 1 45 C RING 8 1 46 HANDWHEEL HANDLE 1 47 SET SCREW M8X10 1 48 TAILSTOCK LOCK LEVER 1 50 TAILSTOCK CLAMP BOLT 1 51 TAILSTOCK CLAMP 2 52 NUT M12 2 53 C RING 1 57 C RING 2 59 ADJUSTING HANDLE 1 60 TOOL REST CLAMP BOLT 1 71 PHLP HD SCREW M4X8 2 75 DIGITAL READOUT 1 77 WRENCH 1 78 HEX WRENCH 03 1 79 HEX WRENCH 04 1 80 HEX WRENCH 05 1 81 HEX WRENC...

Page 18: ...Wiring Diagram 18 ...

Page 19: ...Notes 19 ...

Page 20: ...together with household waste material By law they must be collected and recycled separately EU Countries Only The Axminster guarantee is available on Craft Trade Engineer AirTools CNCTechnology Series machines Buy with confidence from Axminster So sure are we of the quality we cover all parts and labour free of charge for three years For more information visit axminster co uk 3years ...

Reviews: